How T-AI Land works
T-AI Land simplifies the process of preparing and submitting real estate applications by guiding you step by step and automatically checking your documents.
The platform uses AI-powered verification to make the process faster, more accurate, and more secure. This helps reduce errors and ensures your application is properly prepared before your office visit.
Application flow
- Create an account.
- Upload documents.
- Pass verification.
- Fix any issues if needed.
- Book an appointment.
This helps you move from registration to your office visit in a clear order, so you always know what comes next.
AI-driven multi-step verification
All documents go through several levels of verification:
- Individual document checks (format, completeness, validity).
- Cross-checks between documents (consistency of names, details, and parties).
- Additional analysis to identify inconsistencies and potential risks.
These verification steps are supported by AI technologies, ensuring faster, more accurate, and more reliable results. This helps you avoid last-minute surprises and reduce the risk of delays at the office.
Transparent and guided process
You can track your application at every stage:
- Upload documents.
- Review validation results.
- Fix any issues if needed.
- Proceed to booking an appointment.
The system clearly shows what is missing or needs correction, so you always know what to do next.
Enhanced security with AI
In addition to standard validation, the platform applies AI-based checks to assess document integrity and identify potential risks.
This adds an extra layer of protection and helps ensure a more secure and reliable transaction for all parties.
Prepared before your visit
All key checks are completed before your appointment.
This helps you avoid delays, reduce rework, and ensures a faster and more efficient experience at the Trustee office.
Data security
All data is stored and processed within the UAE and follows local data protection regulations (PDPL).
Before you start, follow the steps below to create your account and submit your application.
This section is intended for end-users (clients) of the T-AI Land platform.
Account creation
For registration, a user needs only a name and email address. At the current stage, registration is available through the form on the website.
Navigate to the T-AI Land welcome page. You will see the platform overview with key features and two options: Create an account and Login.
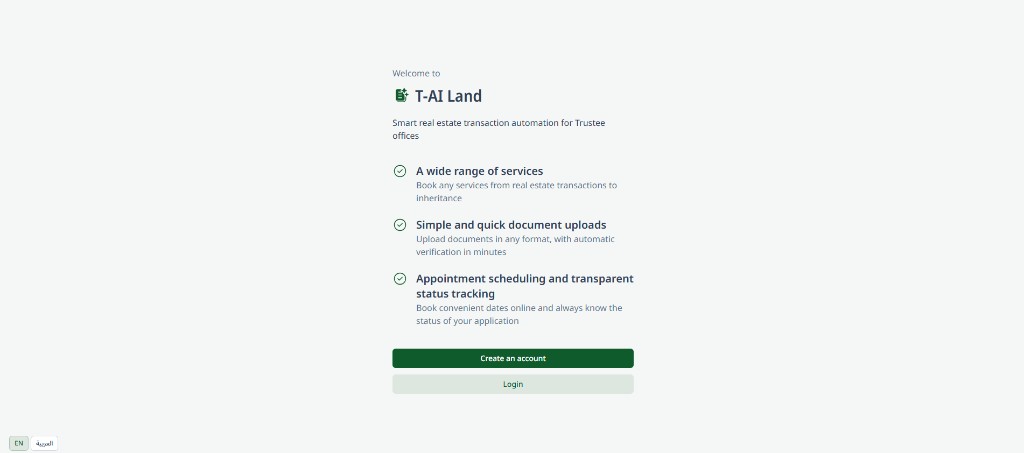
Click the green "Create an account" button to start the registration process.
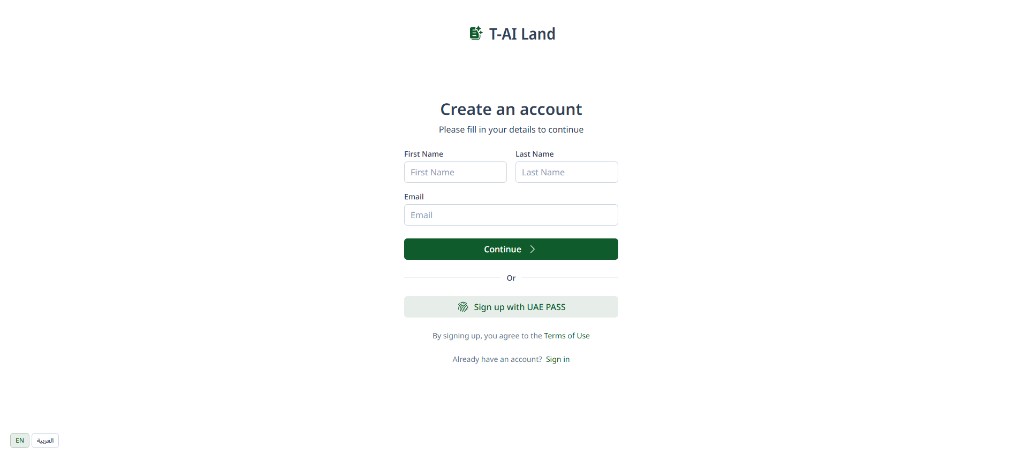
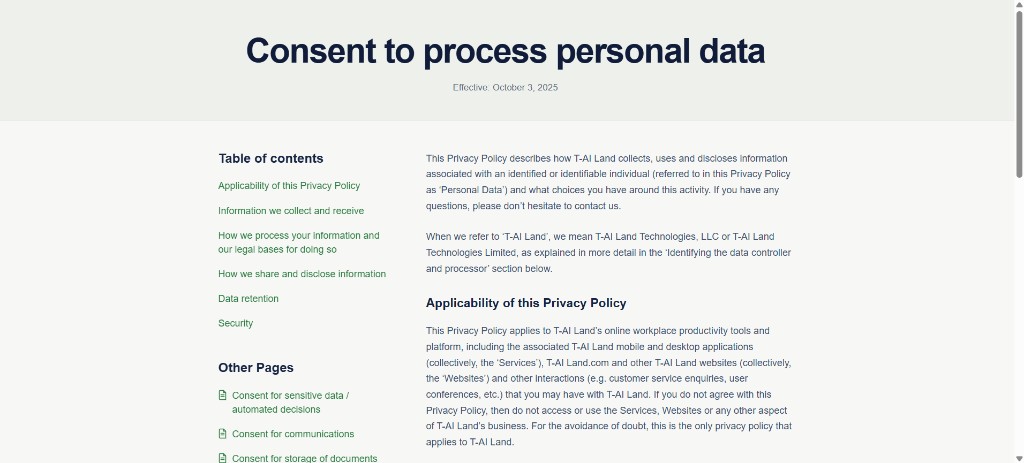
Review the policy and consent pages before continuing.
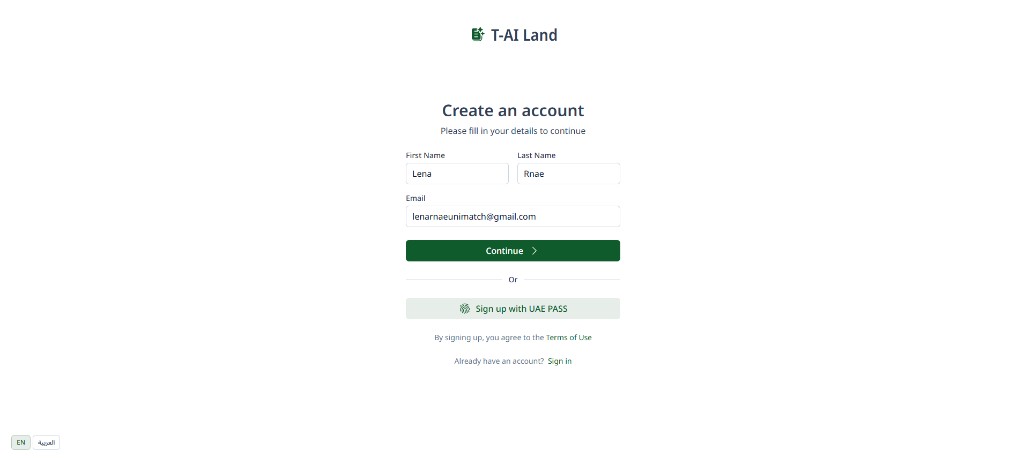
Enter your First Name, Last Name, and Email address. Click "Continue" to submit details and proceed to email verification.
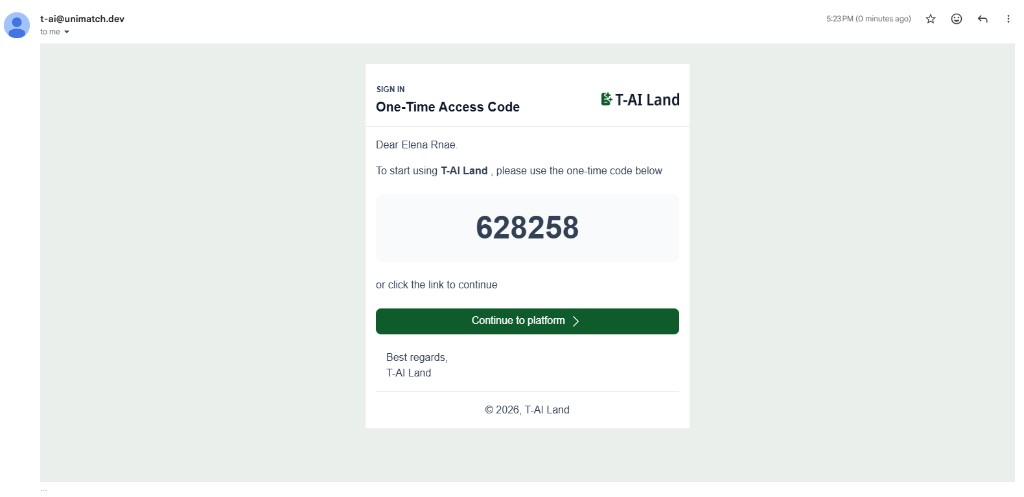
A one-time access code (OTP) will be sent to your email address.
This email gives you two options to continue:
- If the email is opened on the same device where you started the registration, click Continue to platform.
- If you want to continue on another device, enter the one-time code on the device where you want to continue.
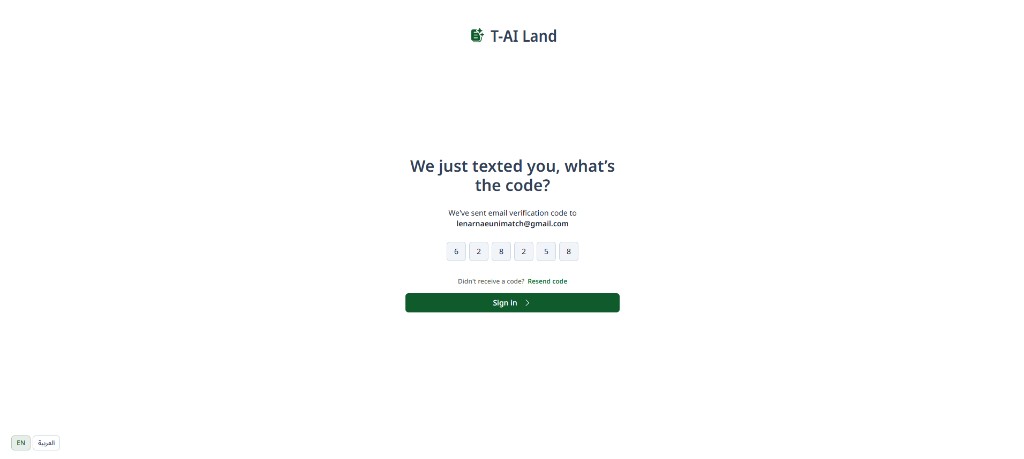
Enter the 6-digit code sent to your email and click "Sign in".
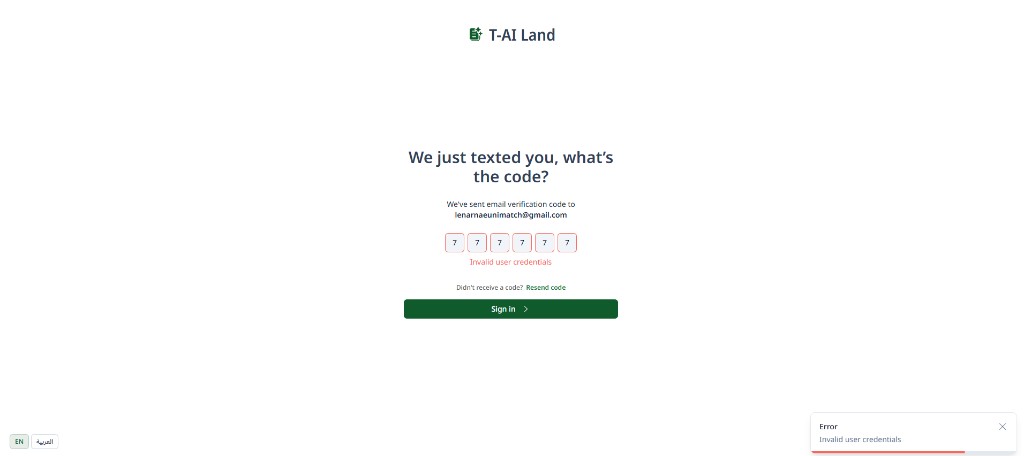
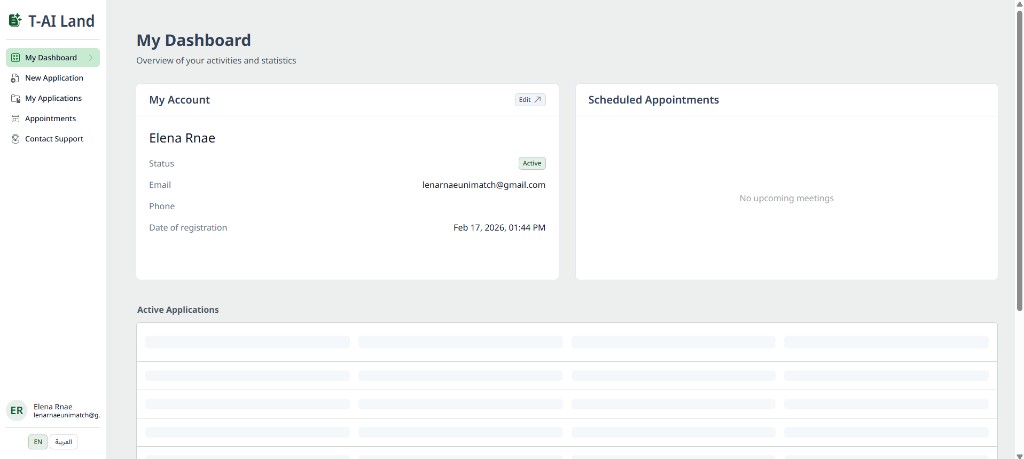
After successful verification, you will be redirected to your My Dashboard page as an authorized user.
Authorization
Authorization is available only for users with an existing registered account. Fast authorization flow with email only.
Navigate to the welcome page and click "Login". Enter your registered email address and click "Continue". You can also log in using UAE PASS.
On the Welcome back page, enter the email address you used during registration and click "Continue". At this step, only your email is required.
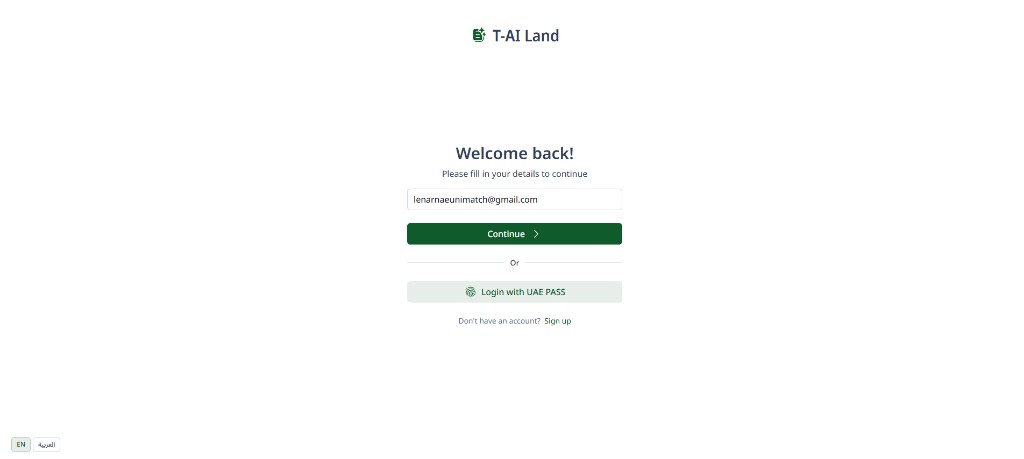
After you click "Continue", a confirmation email is sent to your registered address. The email includes a One-Time Access Code and a Continue to platform link.
Check your email for a confirmation message, then enter the 6-digit code sent to your email and click "Sign in". You can also click Continue to platform directly in the email.
After successful authorization, you will see your My Dashboard page with your account information, active applications, and scheduled appointments.
Profile Management
To open the account management section, click your name in the left menu and select Account. You will be redirected to the profile information card with your account details (name, email, and phone, if provided).
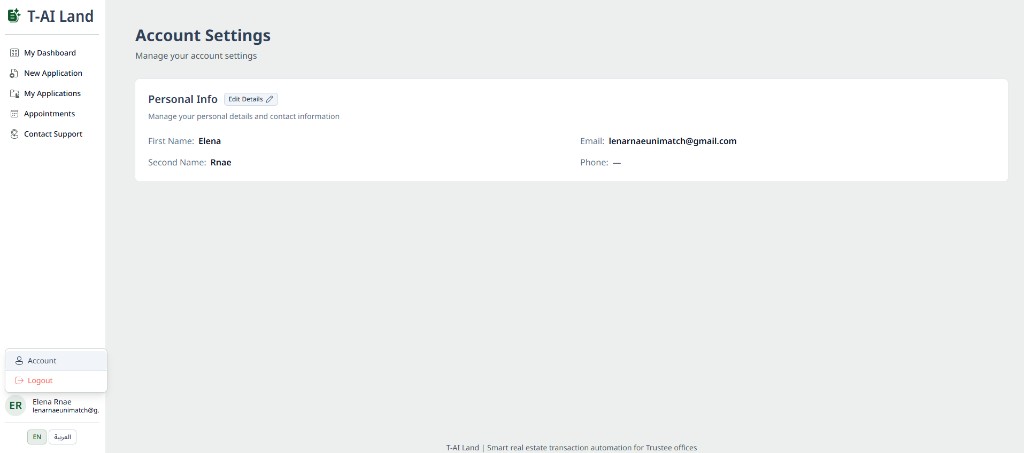
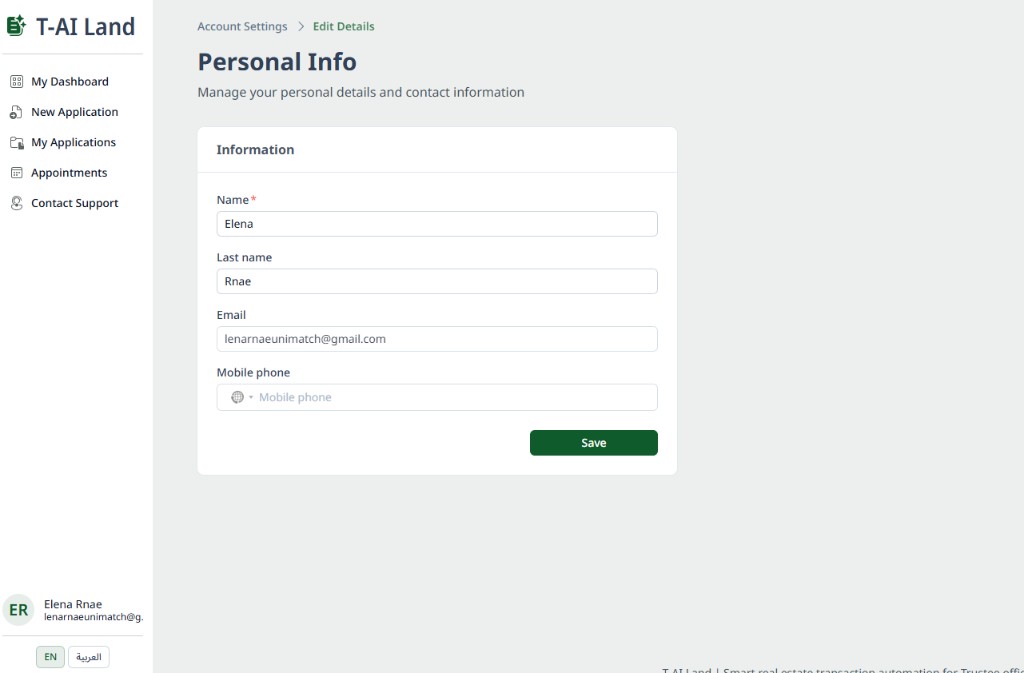
To edit your personal information, click Edit Details, update the fields, and click Save.
Sign out
Use one of the methods below to safely sign out of your account.
Click your profile block in the left menu and select Logout.
You can also sign out by opening a direct logout URL in your browser: append the logout path your environment defines (for example, /logout) to your deployment’s base URL — the same root address you use to open the application — then open the full address (for example, https://your-domain.example/logout).
Selecting an application
Choose a transaction type from the catalogue, review service information and fees, then open a new application. This helps you start the right workflow for your transaction before you add contacts and files. Next, Application review stages explains what happens after you submit. Then Filling in application data covers contacts, documents, and uploads on the application page.
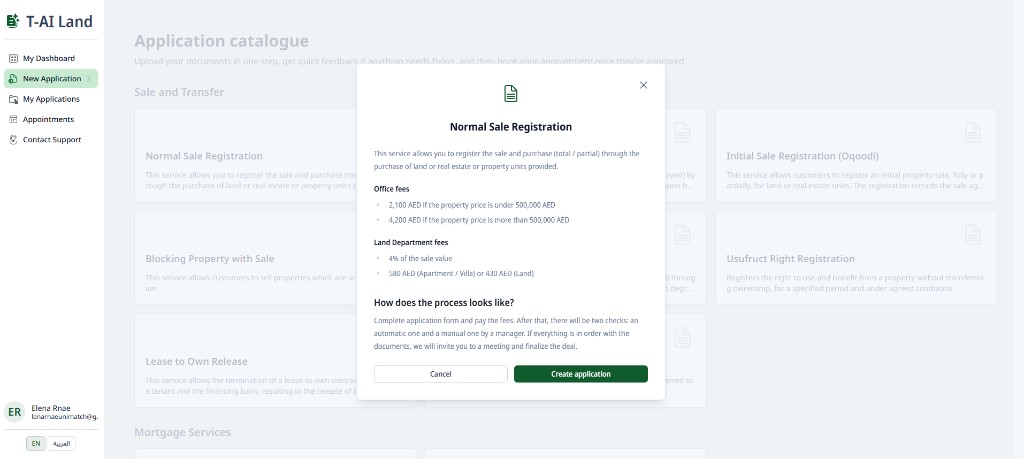
In the left menu, open New Application. You will see the Application catalogue — transaction types grouped by category (for example, Sale and Transfer, Mortgage Services, Company Services). Choose the application type that matches your needs.
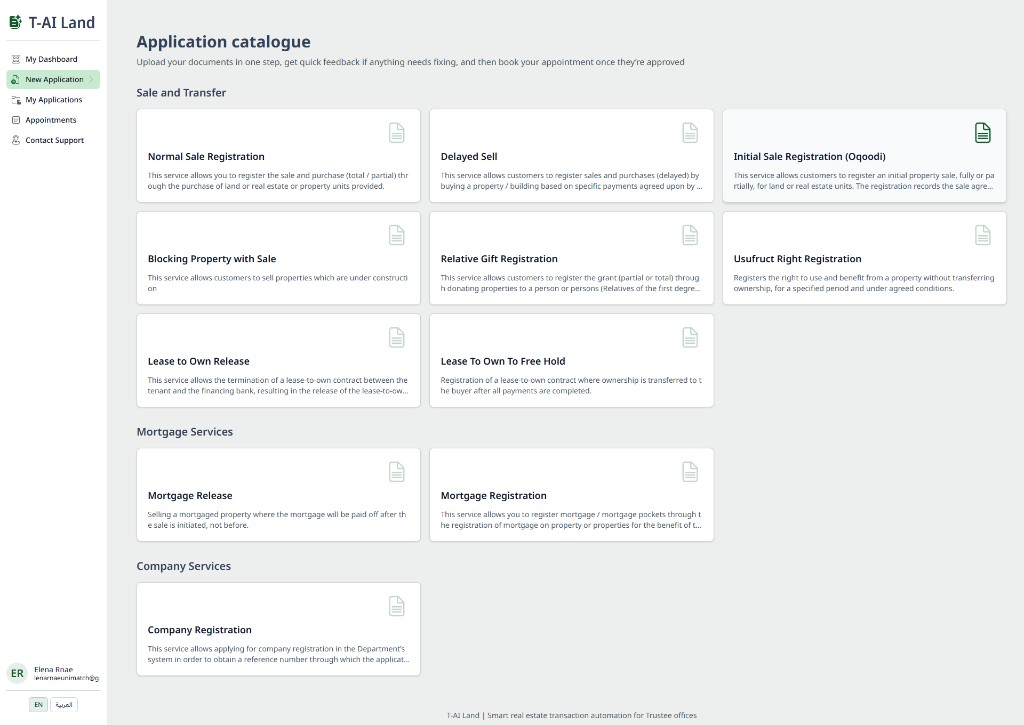
Click a service card to open detailed information: description, office fees, Land Department fees (where applicable), and how the process works. When you are ready, click Create application to continue.
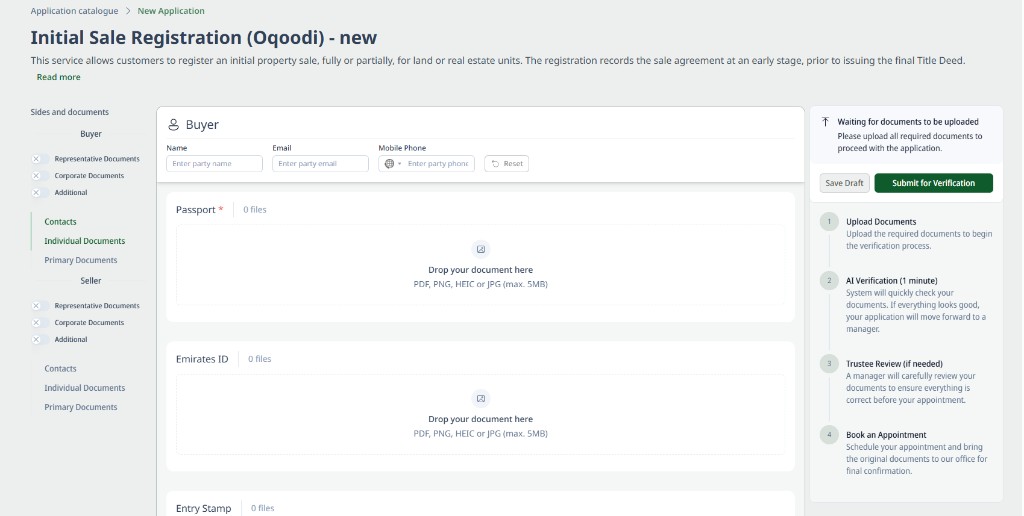
After you create the application, you land on the Application page. It has three main areas — centre (forms and uploads), right (status and stepper), left (document package). You will configure groups, contacts, and files in Filling in application data.
Application review stages
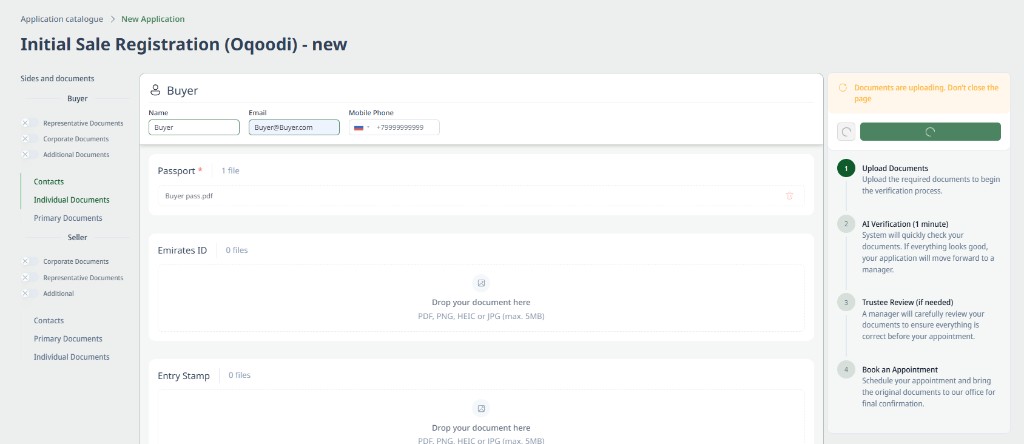
These stages are transparent so you always know what is happening with your application. This section describes each stage from the moment you submit files until you can book an office visit. After you click Submit for Verification, the application status is shown on its card in your dashboard. Your documents are uploaded from your device to the server, and review begins.
At this stage, documents are transferred from your computer to the server and the verification process starts. You can follow progress on your application page.
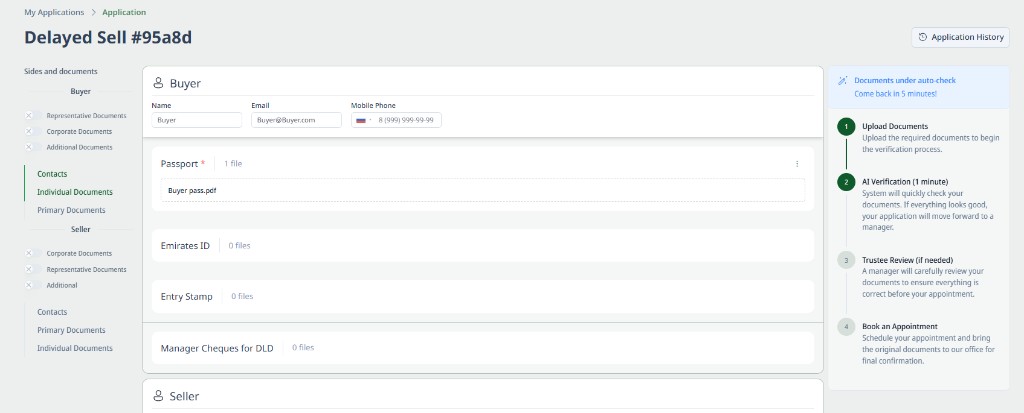
This stage usually takes only a few minutes. If the system detects potential issues in your documents, or documents do not match each other, your application is not blocked permanently — it is returned for rework with clear guidance on what to check or update. You are notified by email. Finding issues at this stage is normal and can be fixed: you can update only the affected documents and submit again.
Automated checks help spot issues early; a human manager always makes the final decision after this stage, not the algorithm alone.
If no issues are found, the application moves to the final stage of manual validation by a manager.
A manager validates the automated check and either confirms the outcome or returns the application for further rework with clear guidance on what to change, so you can correct it and continue.
AI helps prepare the case for review; the final decision is always made by a qualified specialist. You can clarify details with a person if needed.
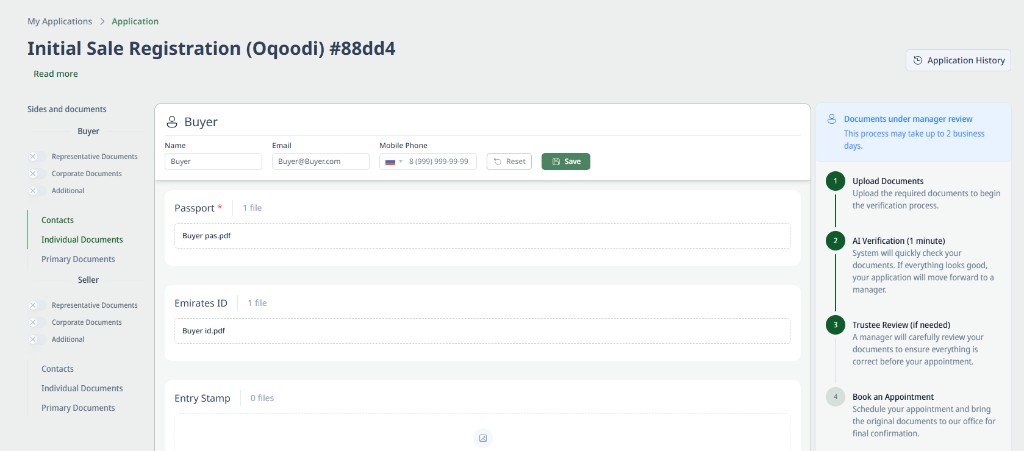
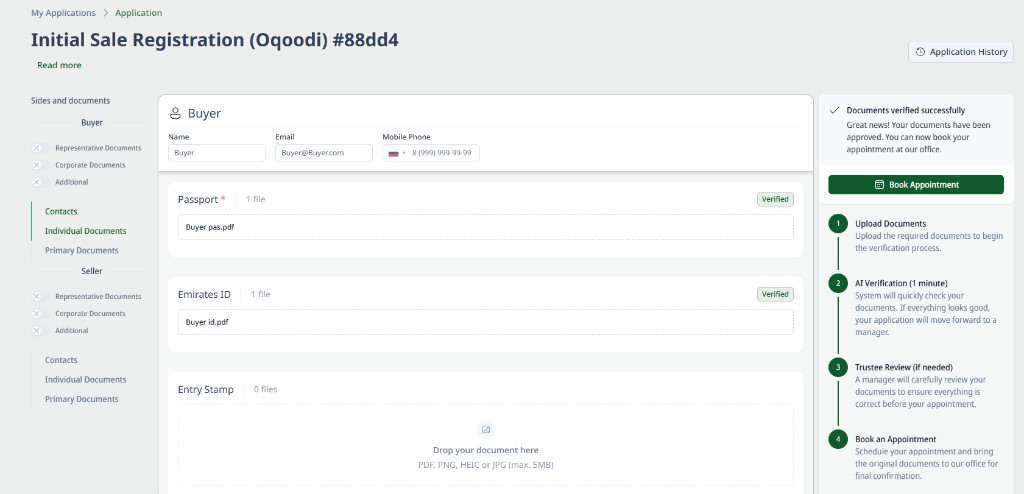
When all documents have passed verification, your application is ready for the next step: you can book an appointment and visit the office. This makes it easier to arrive with confidence that your package is in good shape. Details are in If Your Application Is Approved and Appointment Booking below.
Filling in application data
Configure document groups for each side, enter contacts, upload files, and submit when ready. Use Save Draft if you need to pause. This makes it easier to prepare your package at your own pace before you submit.
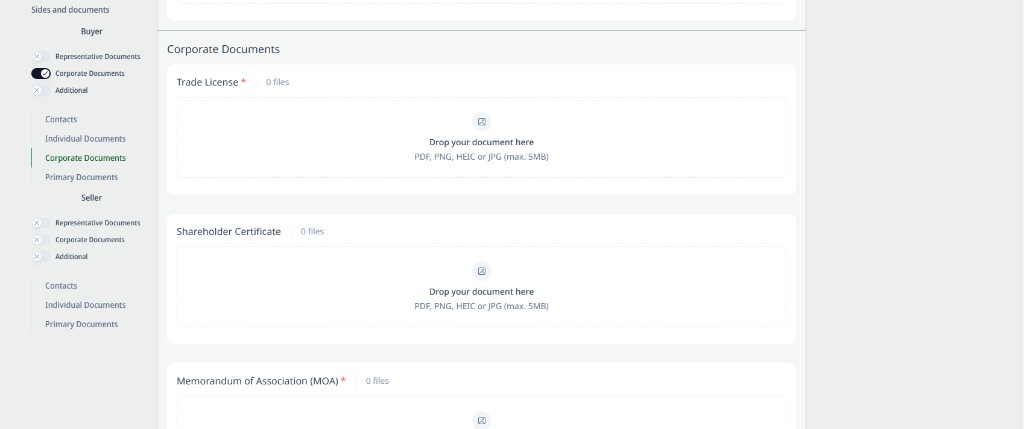
In Sides and documents, use the toggles to add document groups only when they apply. When a toggle is on, the matching sections appear in the list and the corresponding fields and upload zones appear in the centre.
- Individual documents and Primary documents are included by default for the relevant side — you do not need to turn them on.
- Representative documents — enable only if a representative (attorney) acts for that side.
- Corporate documents — enable only if that party in the application is a company.
- Additional — optional uploads for any extra supporting documents.
Select a subsection in the left list (for example, Contacts, Individual Documents) to show the matching content in the centre.
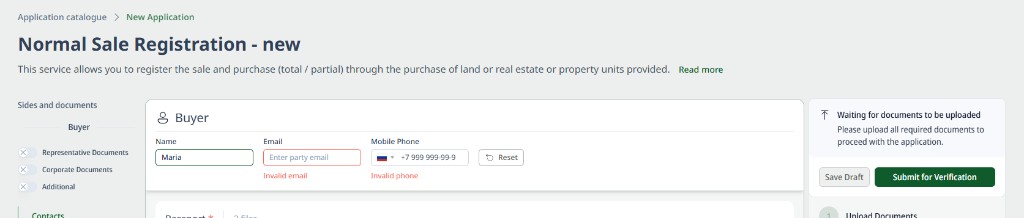
Open the Contacts section for each side (Buyer, Seller, etc.) and enter Name, Email, and Mobile phone as required.
Upload files in the formats shown on each card (typically PDF, PNG, HEIC, or JPG, up to about 5 MB per file). Upload all documents marked as required (often with an asterisk *). Wait until each upload finishes before you continue.
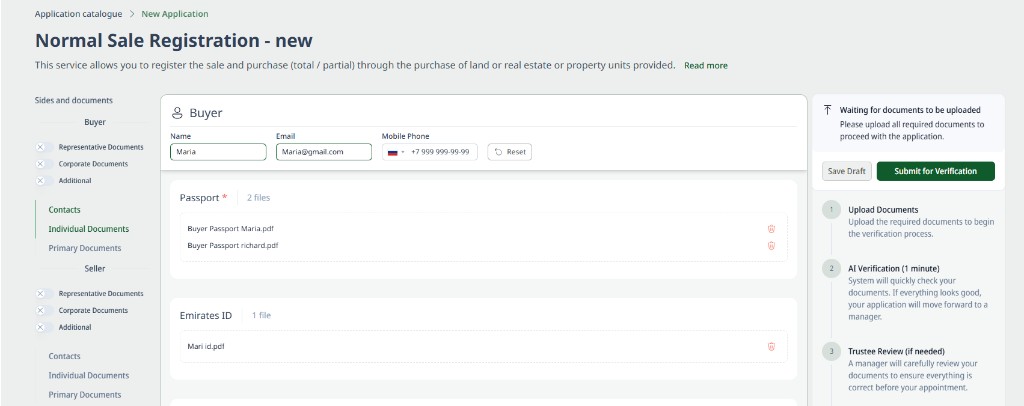
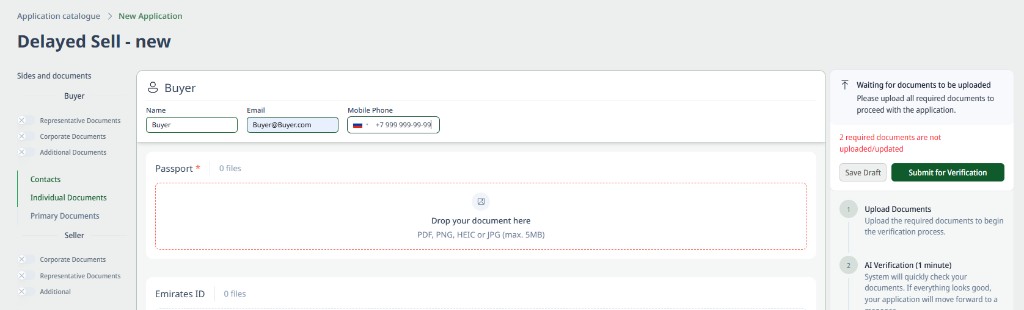
If you try to send the application while required files are still missing or uploads have not finished, the system will:
- Show how many required documents are still not uploaded or not updated (for example, in the right-hand status area).
- Highlight mandatory upload blocks (for example, with a red outline) so you can see what still needs a file.
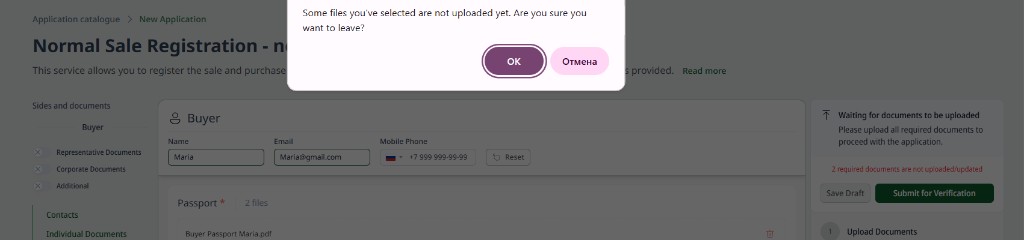
If you try to leave the page while some selected files are not fully uploaded yet, the system may warn you that data could be lost. Read the message and choose whether to stay and finish uploads or confirm leaving.
To keep progress when you do not yet have every document, click Save Draft. You can return later from My Applications and continue.
When all required documents are uploaded and contacts are complete, click Submit for Verification. The application moves into application review (automated check first, then manual review if needed).
Common document feedback
This is a reference for typical reasons a document or application may be returned for rework, and how messages can appear in the product. It is not a checklist you must complete in order. Most issues are normal and fixable — the system highlights them so you do not have to guess. When you need to fix issues and send the application back for review, follow the steps in Resolving rework below.
Wrong document type
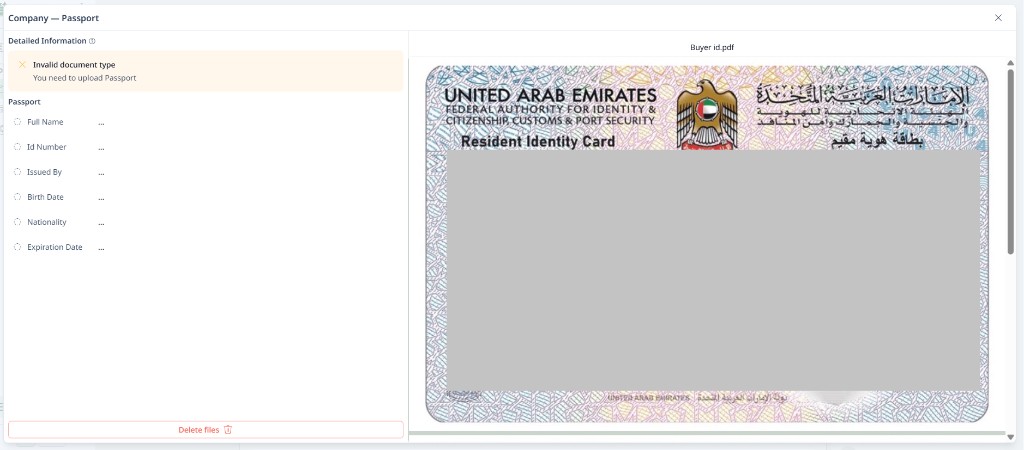
The file you uploaded is not the type of document requested for that slot (for example, a wrong document category or format where a specific document was required). In the example below, an ID card (Emirates ID) was uploaded in the Passport field. The system highlights issues like this so you do not have to search for them manually.
Document list: On the application page, the affected slot shows a status such as Need updates and a short notice (for example, Invalid document type) with actions to open details or remove the file. If a document needs changes, you will see this clearly before you replace anything.
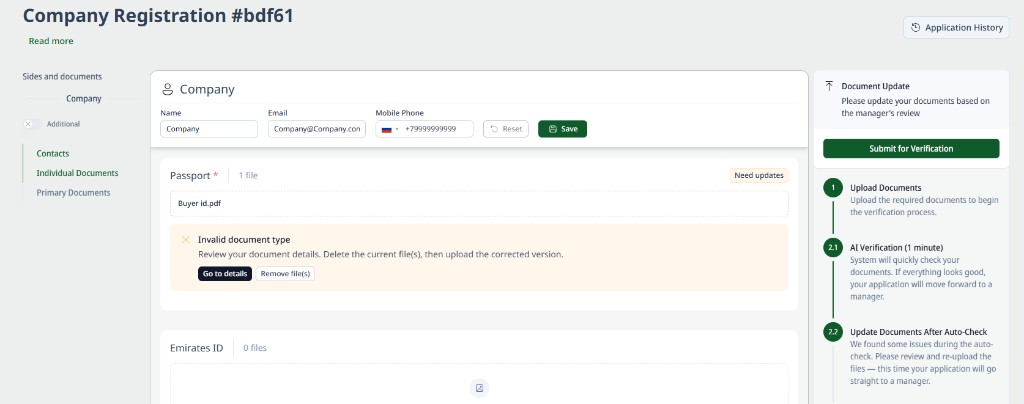
Details: The detailed view shows the expected document type, the validation message, and a preview of what was uploaded so you can delete the file and upload the correct document type.
Missing, extra, or cropped pages
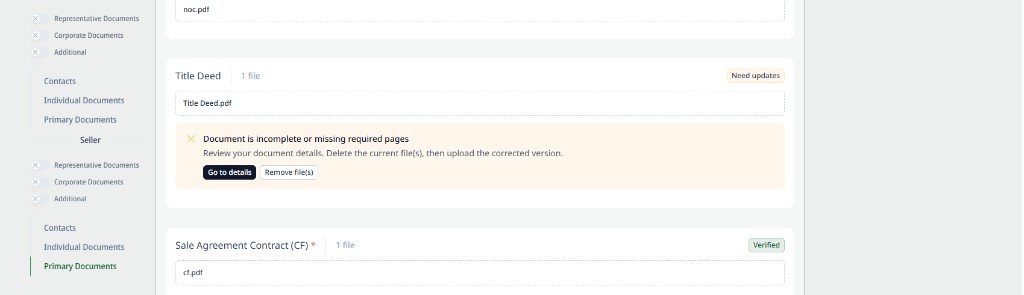
The system checks document completeness carefully. Upload every page that belongs to the document, in the right order, and avoid cutting off edges so that all required information stays visible.
The upload may be returned for rework if pages are missing, extra pages are included, or scans are cropped so that required information is not visible — this is normal and can be fixed with a new upload. In the document list, affected files are marked with an error such as Document is incomplete or missing required pages (and often a Need updates status on the card).
Data issues in a document
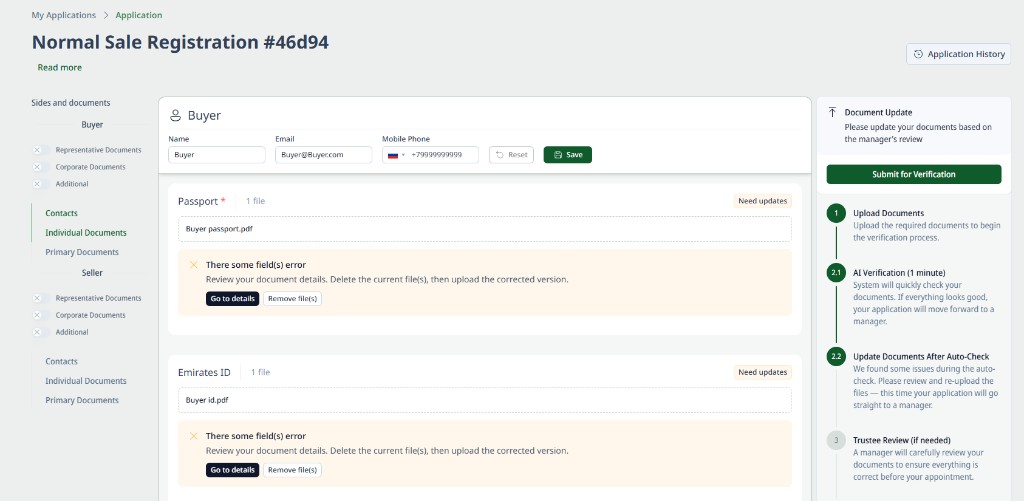
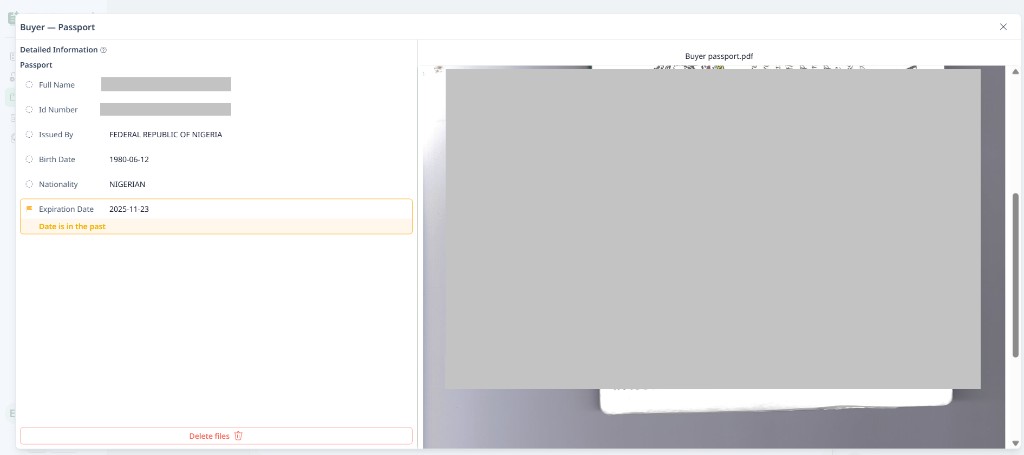
Examples include expired documents, or missing stamps or signatures where they are required. The system may also flag extracted field values that fail validation (for example, a date that is no longer valid). These issues are common and fixable once you see where they are pointed out.
Document list: On the application page, the affected document shows a status such as Need updates and a summary message (for example, that some fields have errors). Use Go to details to open the full check.
Details: In the detailed view, each field with a problem is highlighted, with a short explanation next to it (for example, why a date or value is not accepted). Delete the file if needed and upload a corrected document.
Mismatch between documents
The system checks that data is consistent across documents. For example, if the buyer’s name on a passport does not match the name on a contract, the system will flag it.
Document list: A summary banner may appear (for example, Data mismatch found) with the number of issues. Affected document cards can show Need updates and messages such as field errors. Use Go to details to open the full comparison.
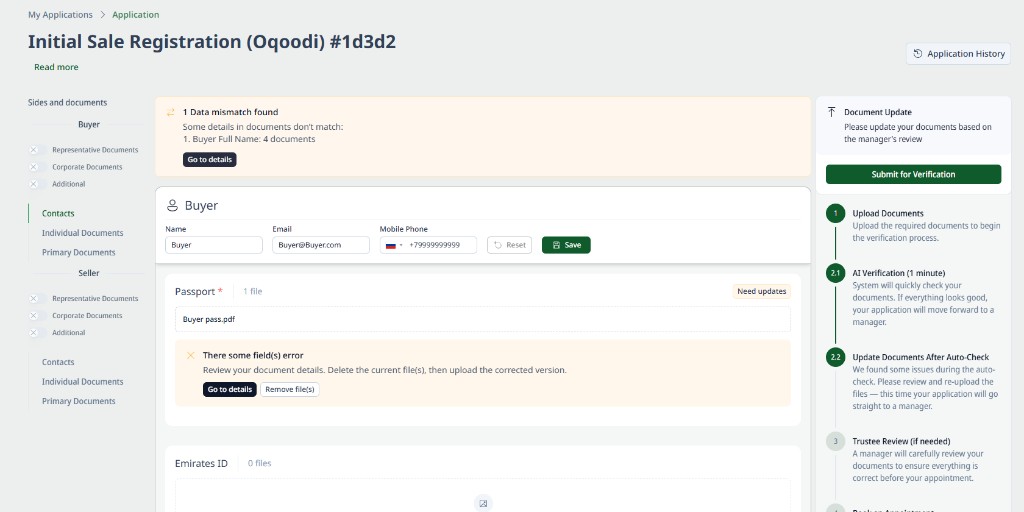
All mismatches: The detailed screen lists each conflicting field and the documents involved, with the values that do not align. This gives you a single place to see every inconsistency before you change any files.
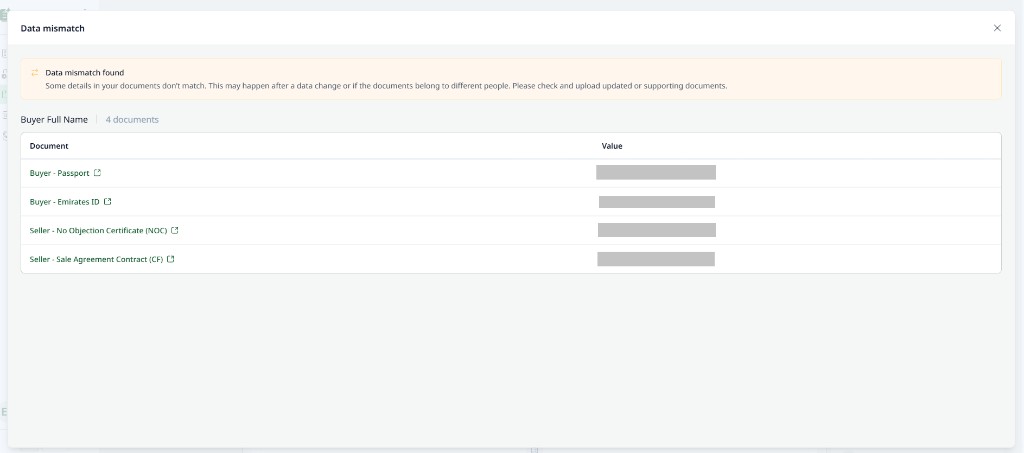
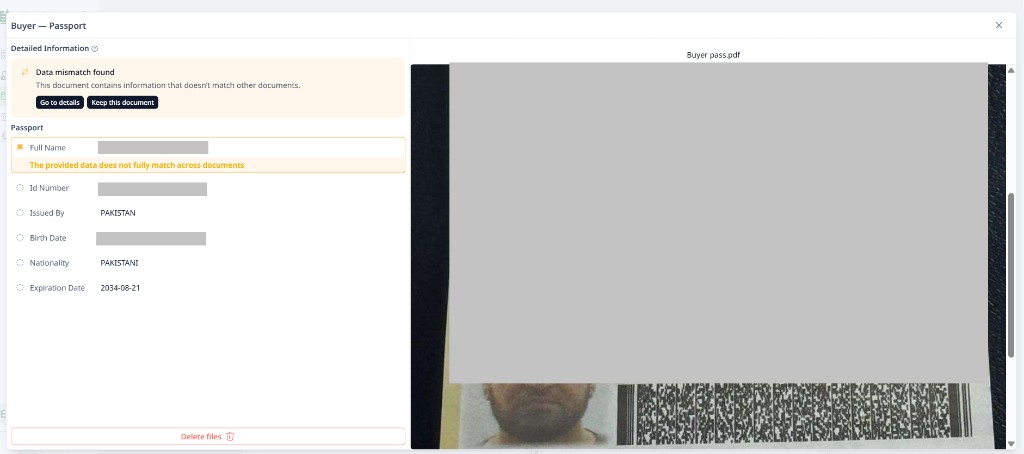
Single document view: In the detailed view for one file, fields that conflict with other documents are highlighted, with a short explanation. If a document does not need to be re-uploaded, you can keep it by clicking Keep this document in the information block; replace or re-upload only the files that actually need to change.
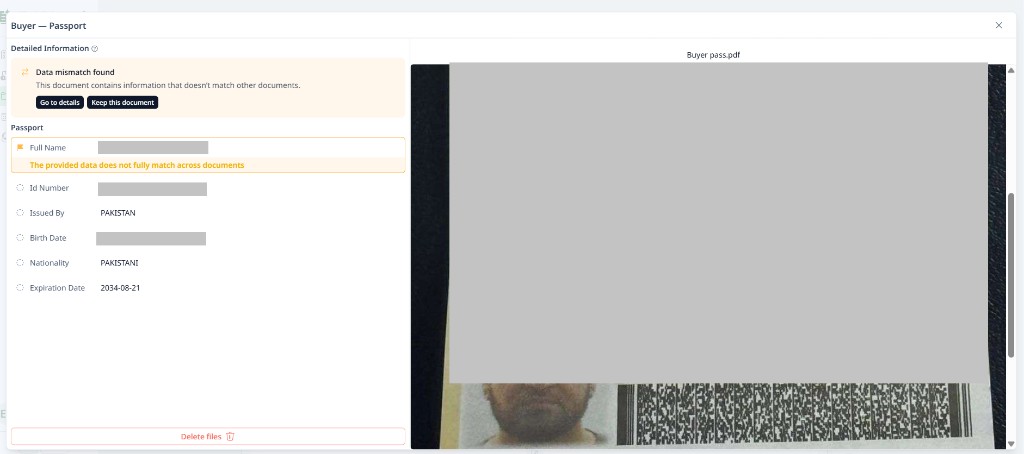
Additional document requested by a manager
A manager may ask you to upload an extra document into the application. You will receive a notification about the required update. The requested item is highlighted with an informational block in the interface.
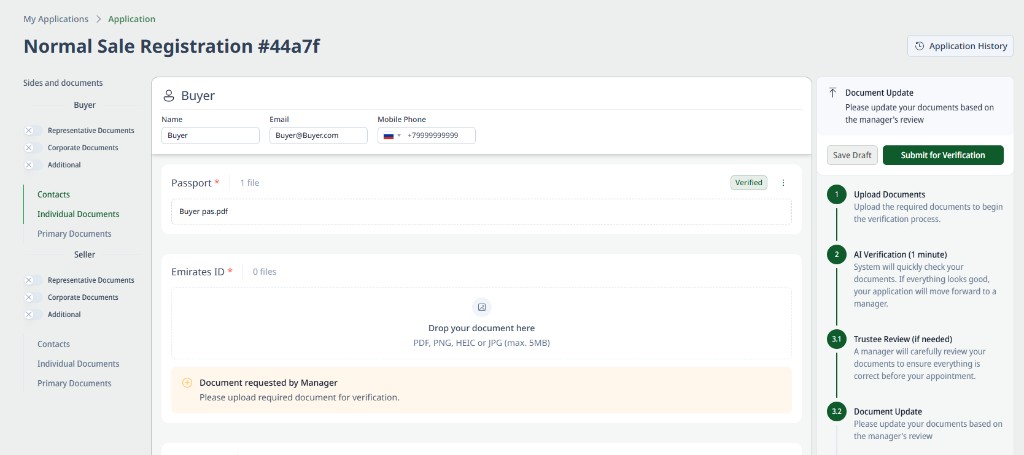
Manager comment with additional details
A manager may describe an issue in plain text and send you a comment. Read it carefully and replace or update the document to meet the requirements.
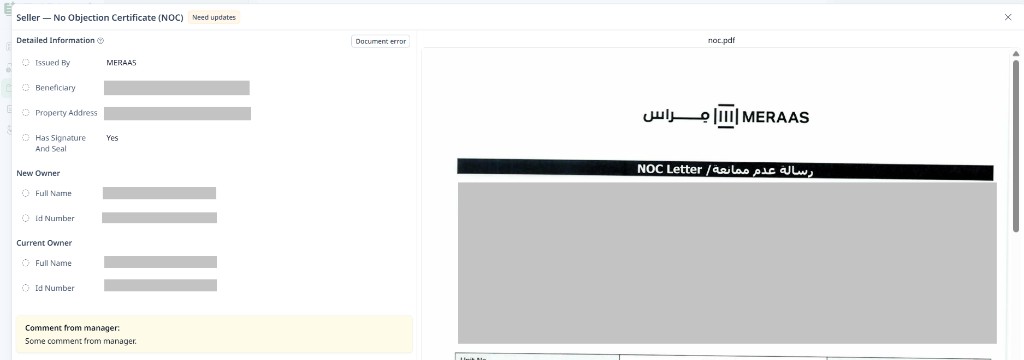
Resolving rework
When your application is returned for corrections, use these steps in order: from the email notification through reviewing issues, updating files, and sending the application for another review. This helps you fix only what needs to change and move forward without starting over.
If your application requires rework at any stage, you will receive an email notification. Use the link in the email to open the application, or go to My Applications in your dashboard.
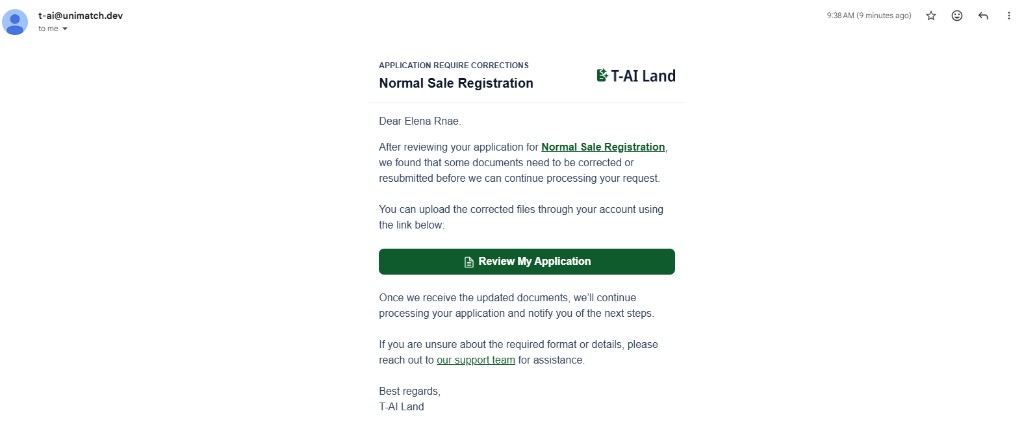
Open the application and read the feedback for each document. You may see statuses such as Need updates next to items that need your attention — this means you can update only those items. Use Go to details where available to see exactly what to fix before you change anything.
For each issue, either replace the document with a corrected file or keep it as-is when the file does not need to be re-uploaded (for example, using Keep this document in the details panel). The system highlights issues so you do not have to search for them manually.
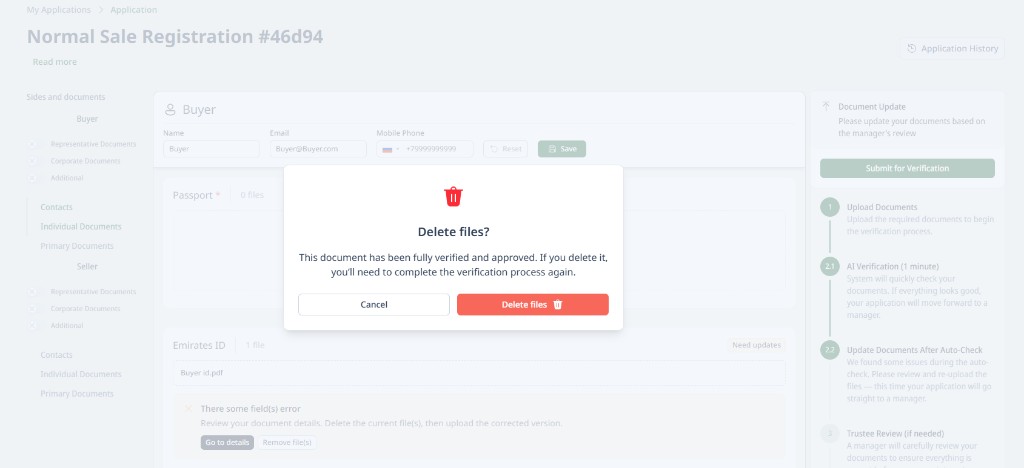
For each document that must be corrected, use Remove file(s) or the delete action on the card. If a file was already verified, you may see a confirmation such as Delete files? explaining that you will need to complete verification again after replacing it — read it and confirm or cancel. Then upload the new file and confirm the upload (for example, with Upload on the card).
When your updates are complete, click Submit for Verification to send the application for another review.
If Your Application Is Approved
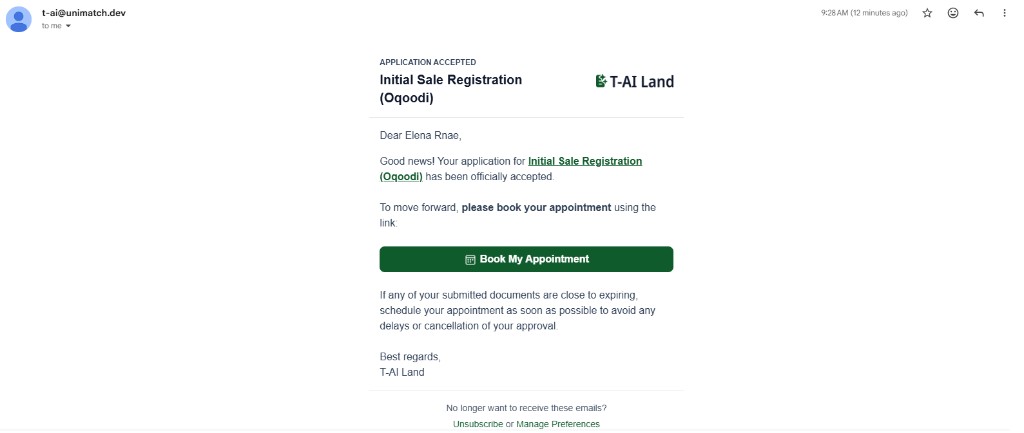
When the review is successful, you are notified by email. The next step is to book an office visit — see Appointment Booking below.
You will receive an email when your application has been accepted. Use the button or link in the email (for example, Book My Appointment) to continue, then follow Appointment Booking for choosing an office, time, and confirming your visit.
Appointment Booking
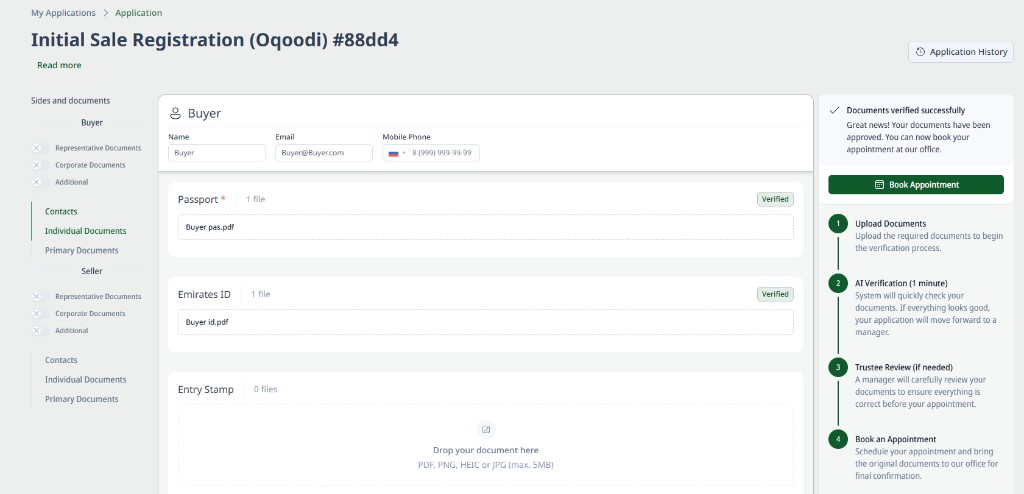
When your application has passed verification, booking an office visit becomes available. Open the approved application from My Applications or follow the link from your acceptance email. On the application page, use the Book Appointment button when it appears in the status area (for example, after the “Documents verified successfully” message).
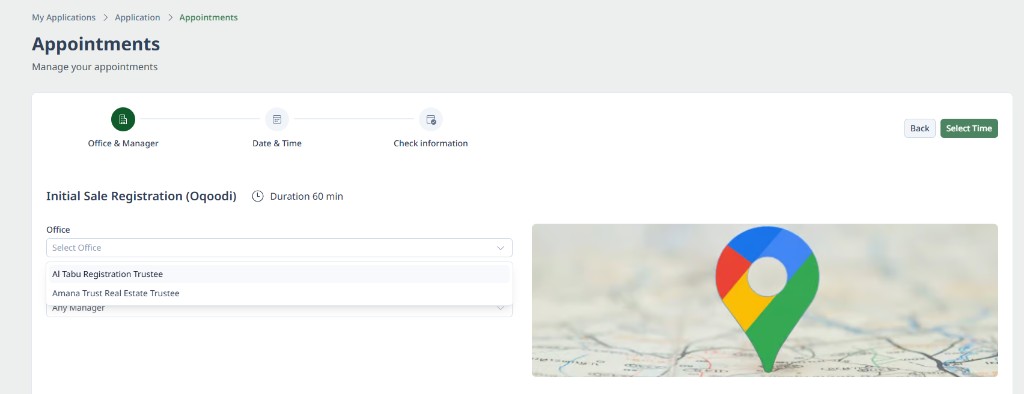
Select an office that is convenient for you.
If you know which manager you would like to see, choose them in the manager field. If you are not sure, leave Any Manager — the system will assign a manager automatically based on the date and time you select in the next step.
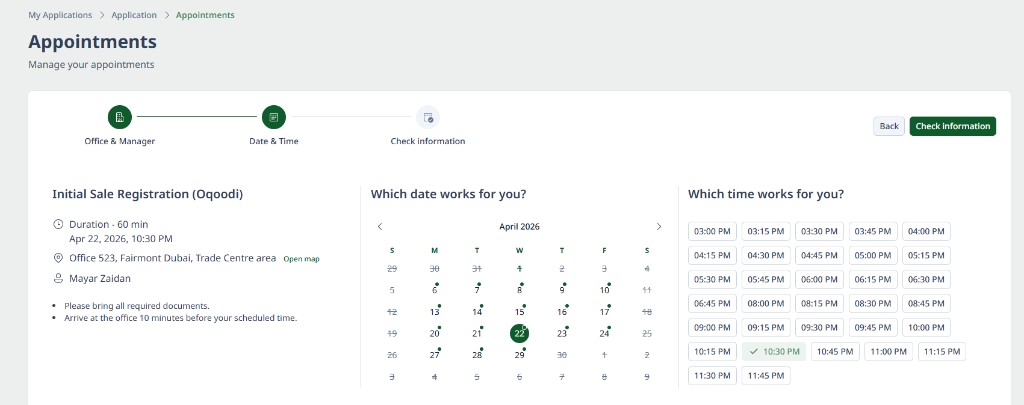
On the Date & Time step, select a date in the calendar — available days are usually marked (for example, with a dot). Then pick a time slot from the grid. Your choices appear in the summary on the left. Use Back if you need to change the office or manager; when you are ready, continue to Check information.
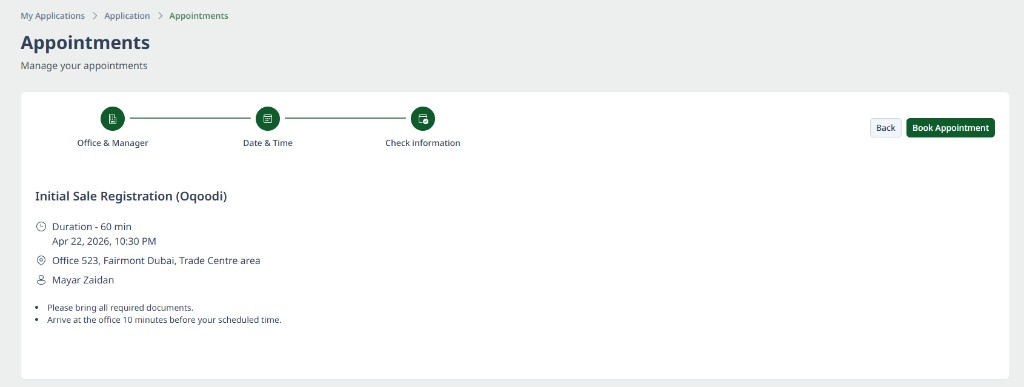
On the Check information step, double-check every detail — service, date and time, office location, and manager. It is important that this matches what you intend before you confirm. If something is wrong, use Back to return to an earlier step. When everything is correct, click Book Appointment.
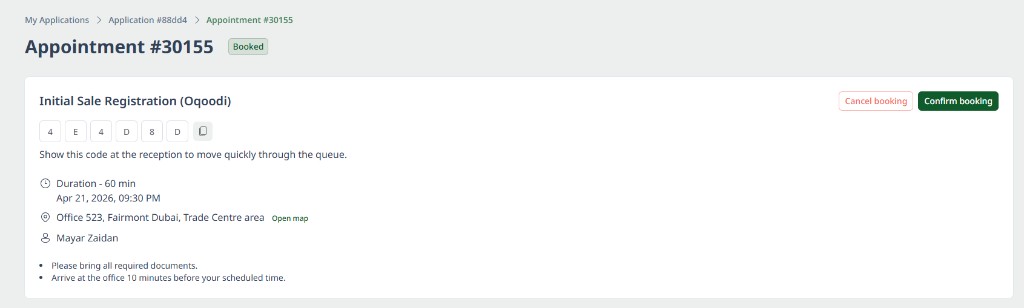
After you confirm, your booking is created. The appointment page shows your details and a unique appointment code. You will also receive an email with the same information and reminders.
Important: Save your appointment code (copy it or keep the email handy). You will need to show it at reception when you check in.
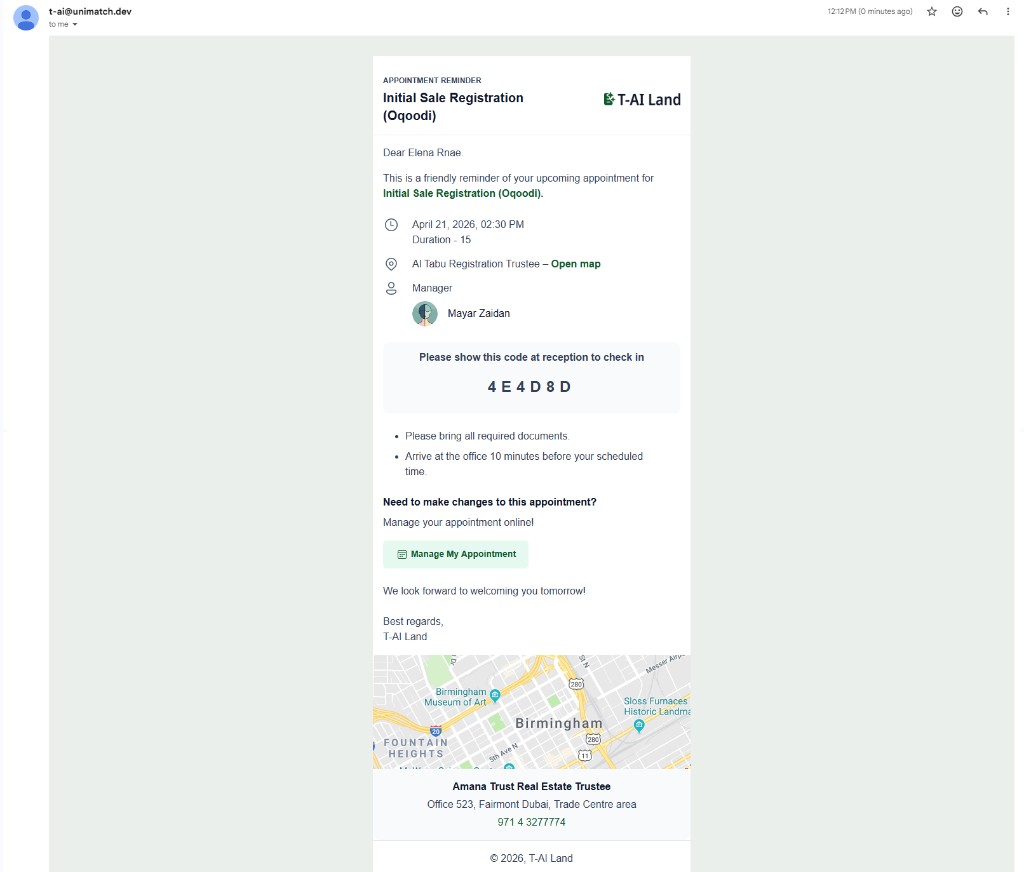
Email: The message repeats the date, office, manager, and code so you can use it on the day of your visit.
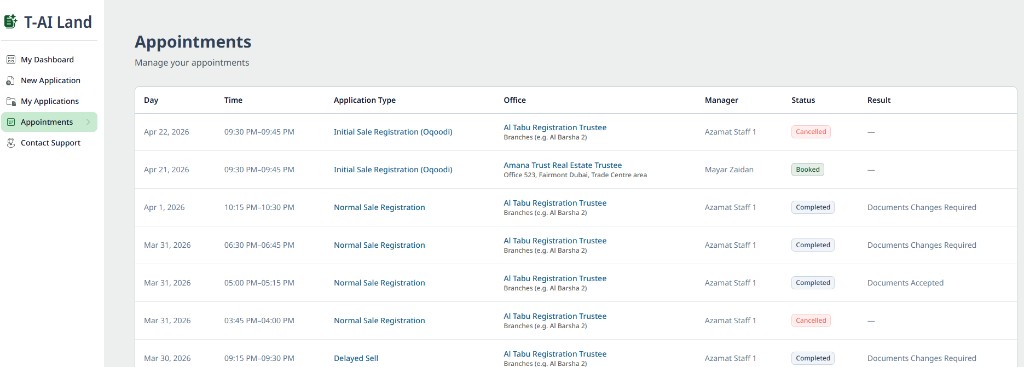
You can see all your bookings under Appointments in the left menu. The list includes upcoming and past visits, with status, results where applicable (for example, after your visit), and the main details — date, time, application type, office, and manager.
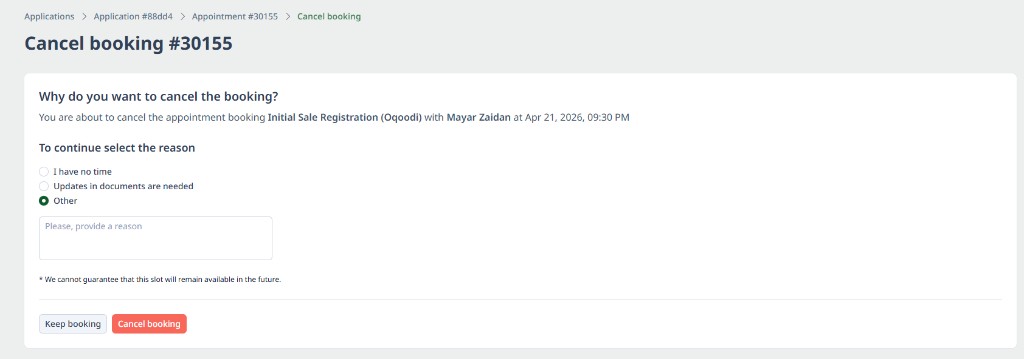
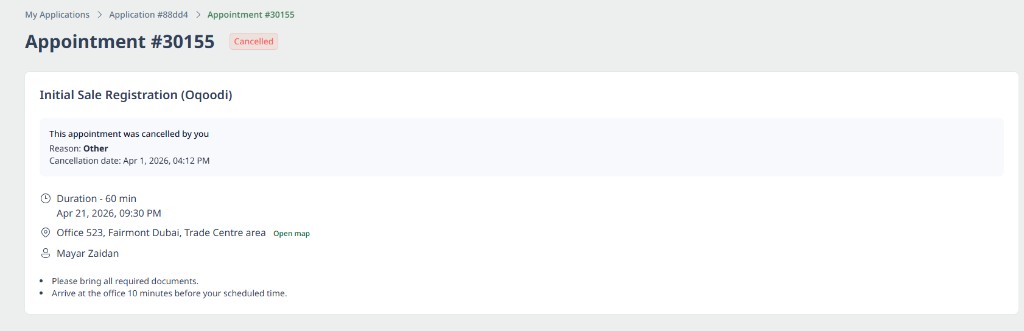
If you need to cancel a created booking, open the appointment card and choose Cancel booking. To continue, select the cancellation reason and confirm your decision.
After cancellation, you can create a new appointment for the same transaction at a time that is convenient for you.
Contact Support
If you have issues with registration, authorization, application submission, or appointment booking, contact support from your account.
Open Contact Support from the left menu. On the form, select the application that needs clarification, add a subject, and write your message. The page explains that the reply will be sent to your registered email.
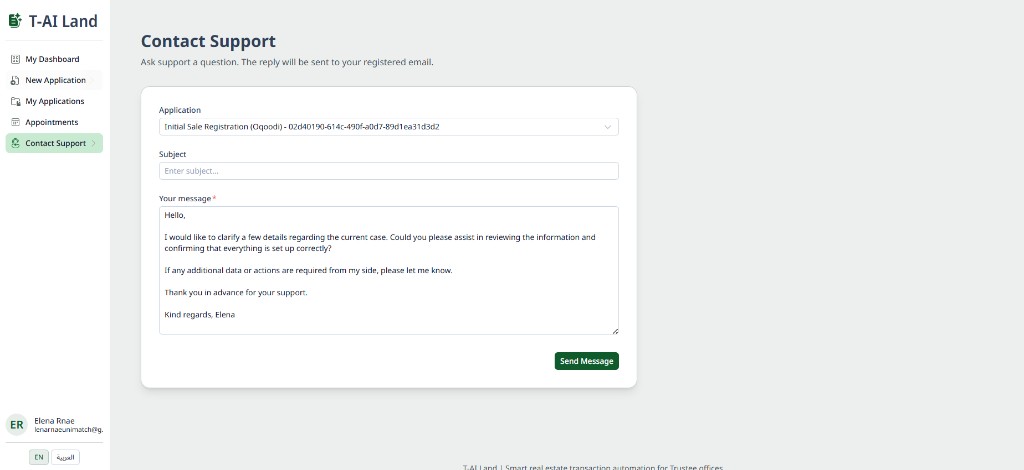
After you send your message, a manager will reach out using your registered account email, clarify details, and help resolve your question.
Short answers to the most common questions about creating an account and signing in with an email code.
Account FAQ
Do I need a password to log in?
No. You can sign in using your email and a one-time access code (OTP).
I didn’t receive the login code. What should I do?
- Check your Spam or Junk folder.
- Make sure the email address is correct.
- Wait a few minutes and try again.
- Click Resend code.
Can I use the same account on multiple devices?
Yes. You can log in from any device using your email and OTP.
Can I edit my personal information?
Yes. Go to your profile settings, update the information, and click Save.
Application FAQ
This helps you understand how submission, verification, and rework work before you visit the office.
What happens after I submit my documents?
After submission, your application goes through several stages: upload confirmation, automated checks, and review by a manager if needed. You can track the progress in your dashboard, so you always know what to do next.
What should I do if my application is returned for rework?
Open your application, review the highlighted issues, update only the required documents, and submit again. You will have clear guidance on what to change — you can try again as many times as needed to address the feedback.
Can I fill in the application partially?
Yes. You can save your application as a draft and continue later.
Can I upload photos of documents instead of scans?
Yes. Photos are accepted if they are clear, in good quality, and show the full document.
Can I upload one document in multiple files?
Yes. You can upload a document as several images or files, as long as all parts are clearly visible.
Why do I see errors in my documents?
The system checks documents automatically and may highlight missing, inconsistent, or unclear information. That is normal — please review the feedback and update only what is needed.
Can I continue if there are errors in my documents?
You may be asked to fix certain issues before proceeding. This is designed to help you succeed at the office, not to block you without a path forward.
Can I update documents after submission?
Yes. If your application is returned for revision, you can update and re-upload documents.
What happens if I don’t complete my application?
Your application will remain in draft or pending status. If there is no activity for a long time, you may receive a notification before it is automatically cancelled.
Will my documents be reviewed by a human?
Yes. While the system uses AI to perform automated checks, all applications are ultimately reviewed by a human manager. AI helps identify potential issues, but the final decision is always made by a qualified specialist — AI is an assistant, not the final authority. This means you can always clarify and resolve questions with a person if needed.
What happens if the system decides there is something wrong with my documents?
If the system detects potential issues, it does not block your application permanently. You will see a clear message explaining what needs to be checked or updated, and you can calmly correct only the affected documents and submit your application again. A human manager always makes the final decision, not the algorithm, so you have the opportunity to clarify details and bring your application to approval.
Can my application be completely rejected because of a mistake in my documents?
In most cases, if an issue is found, your application is not immediately rejected but returned to you for rework with specific guidance. This gives you a chance to make corrections and resubmit the documents. The goal of the system is not to “fail” your application, but to help you prepare a package that can successfully pass the manager’s review as soon as possible.
What if I do not understand what is wrong with my documents at all?
If the comments from the system or the manager are unclear, you can always go back to your application, open the detailed view for each document, and see exactly where the issues were found. If needed, you can ask for clarification at the office or from your representative. The system does not expect you to be a legal expert: it highlights where inconsistencies appear so that you can resolve them in the way that is most convenient for you.
Appointments FAQ
This helps you plan your visit, keep your booking code handy, and see past and upcoming appointments in one place.
Where can I see my appointments?
Go to the Appointments section to view all upcoming and past visits.
Can I book an appointment only after completing the application?
Yes. You can book an appointment after your documents are reviewed and ready.
Can I cancel an appointment?
Yes. Go to the Appointments section and click Cancel appointment. You will receive a confirmation after cancellation.
Can I reschedule my appointment?
Yes. You can cancel your current booking and choose a new available time.
What should I bring to the appointment?
Please bring original documents and any required supporting papers related to your application.
What happens if an issue is found during the appointment?
If a critical issue is identified and cannot be resolved on the spot, it will be recorded. You will be able to update your documents and return later to complete the process.
What happens if I don’t attend the appointment?
Your appointment may be cancelled. You can book a new one when ready.
T-AI Land — Trust-Office Staff Guide
This guide covers the two main roles: Office Manager and Officer / Staff.
URL: admin.t-ai.ae.
Roles
| Role (in system) | Who it is | What they do |
|---|---|---|
| Staff | Officer / processor | runs applications: client → application → documents → check → appointment |
| Office Manager | Trust-office manager | + employees, office, slot assignment, control of all office applications |
Detailed below: Officer (Role 1) and Manager (Role 2).
Sign in (for everyone)
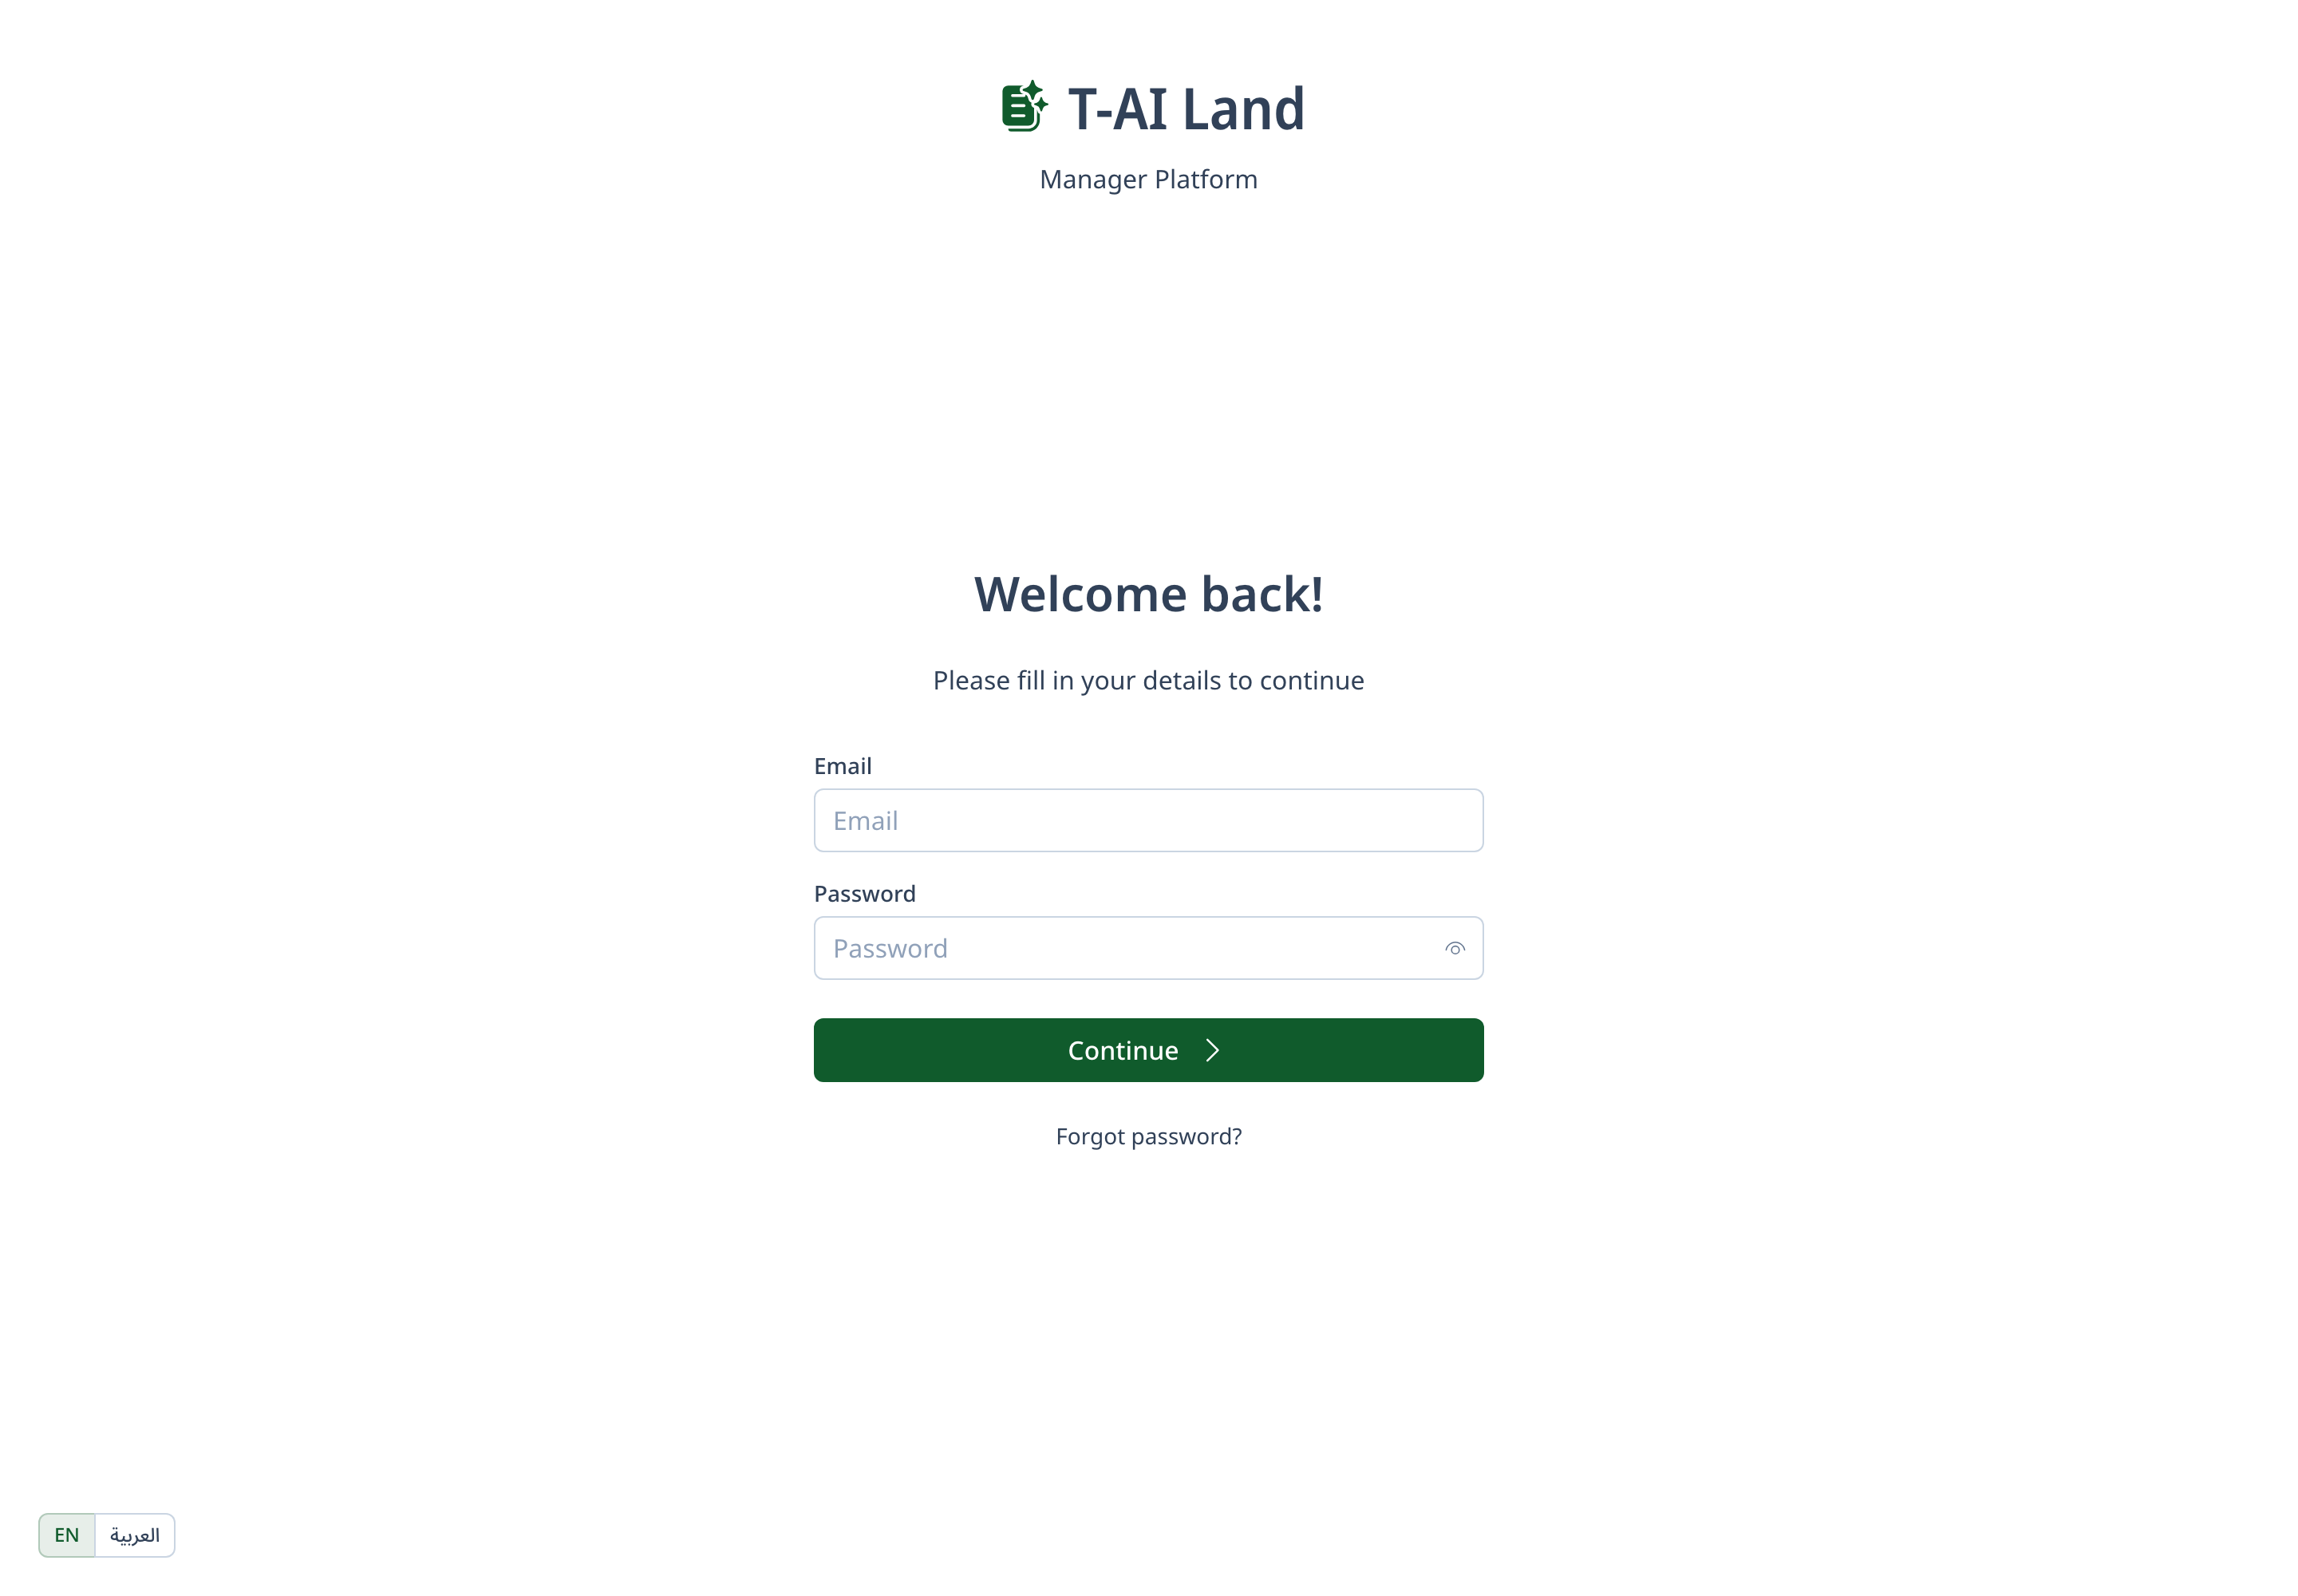
- Open admin.t-ai.ae → enter Email and Password → Continue.
- Interface language — EN / العربية (bottom-left).
Role 1 — Officer (processor): handling a deal
Officer menu: Home · Applications · Appointments · Clients (no Employees/Offices).
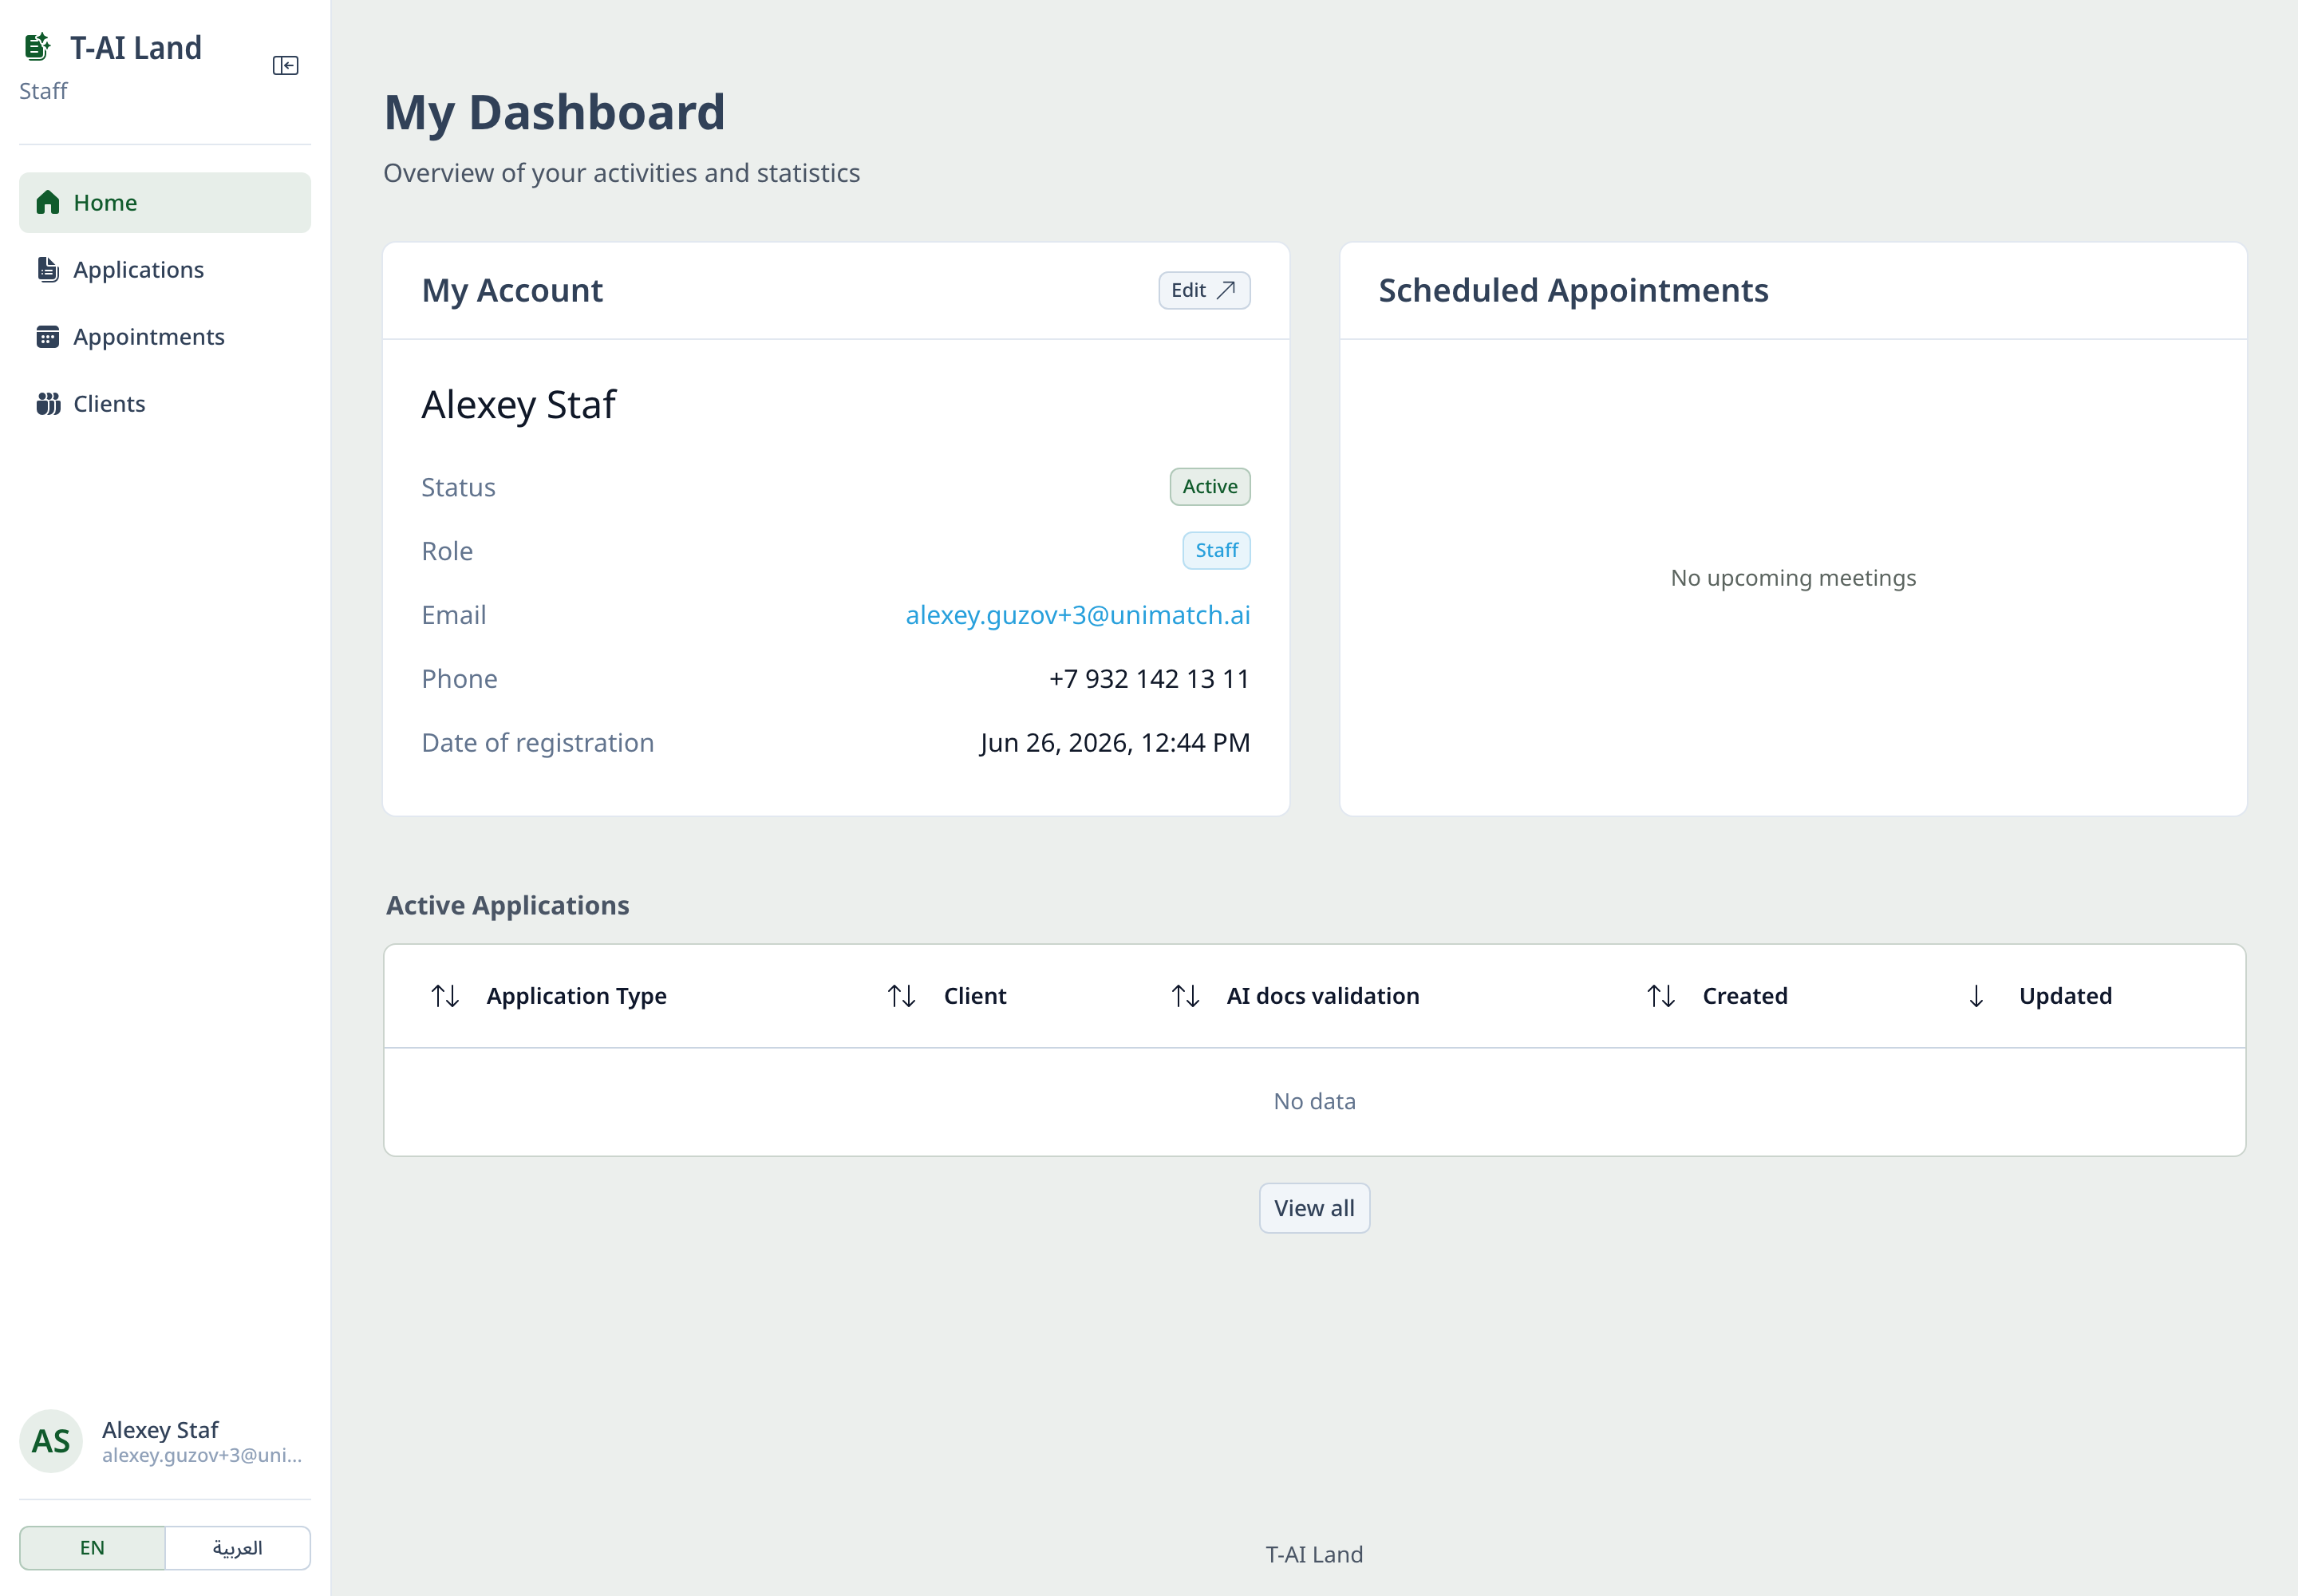
💡 Two sources of applications. An application can be created by the officer (Steps 1–2) or by the client themselves in their portal. In both cases it appears in the shared Applications list and is handled the same way: check the documents and approve them (Steps 3–4), after which the client gets free slots to book (slots are assigned in advance by the manager — see Role 2, Step 3). Client-created applications show up in the Applications list — pick them up there.
Step 1. Create a client
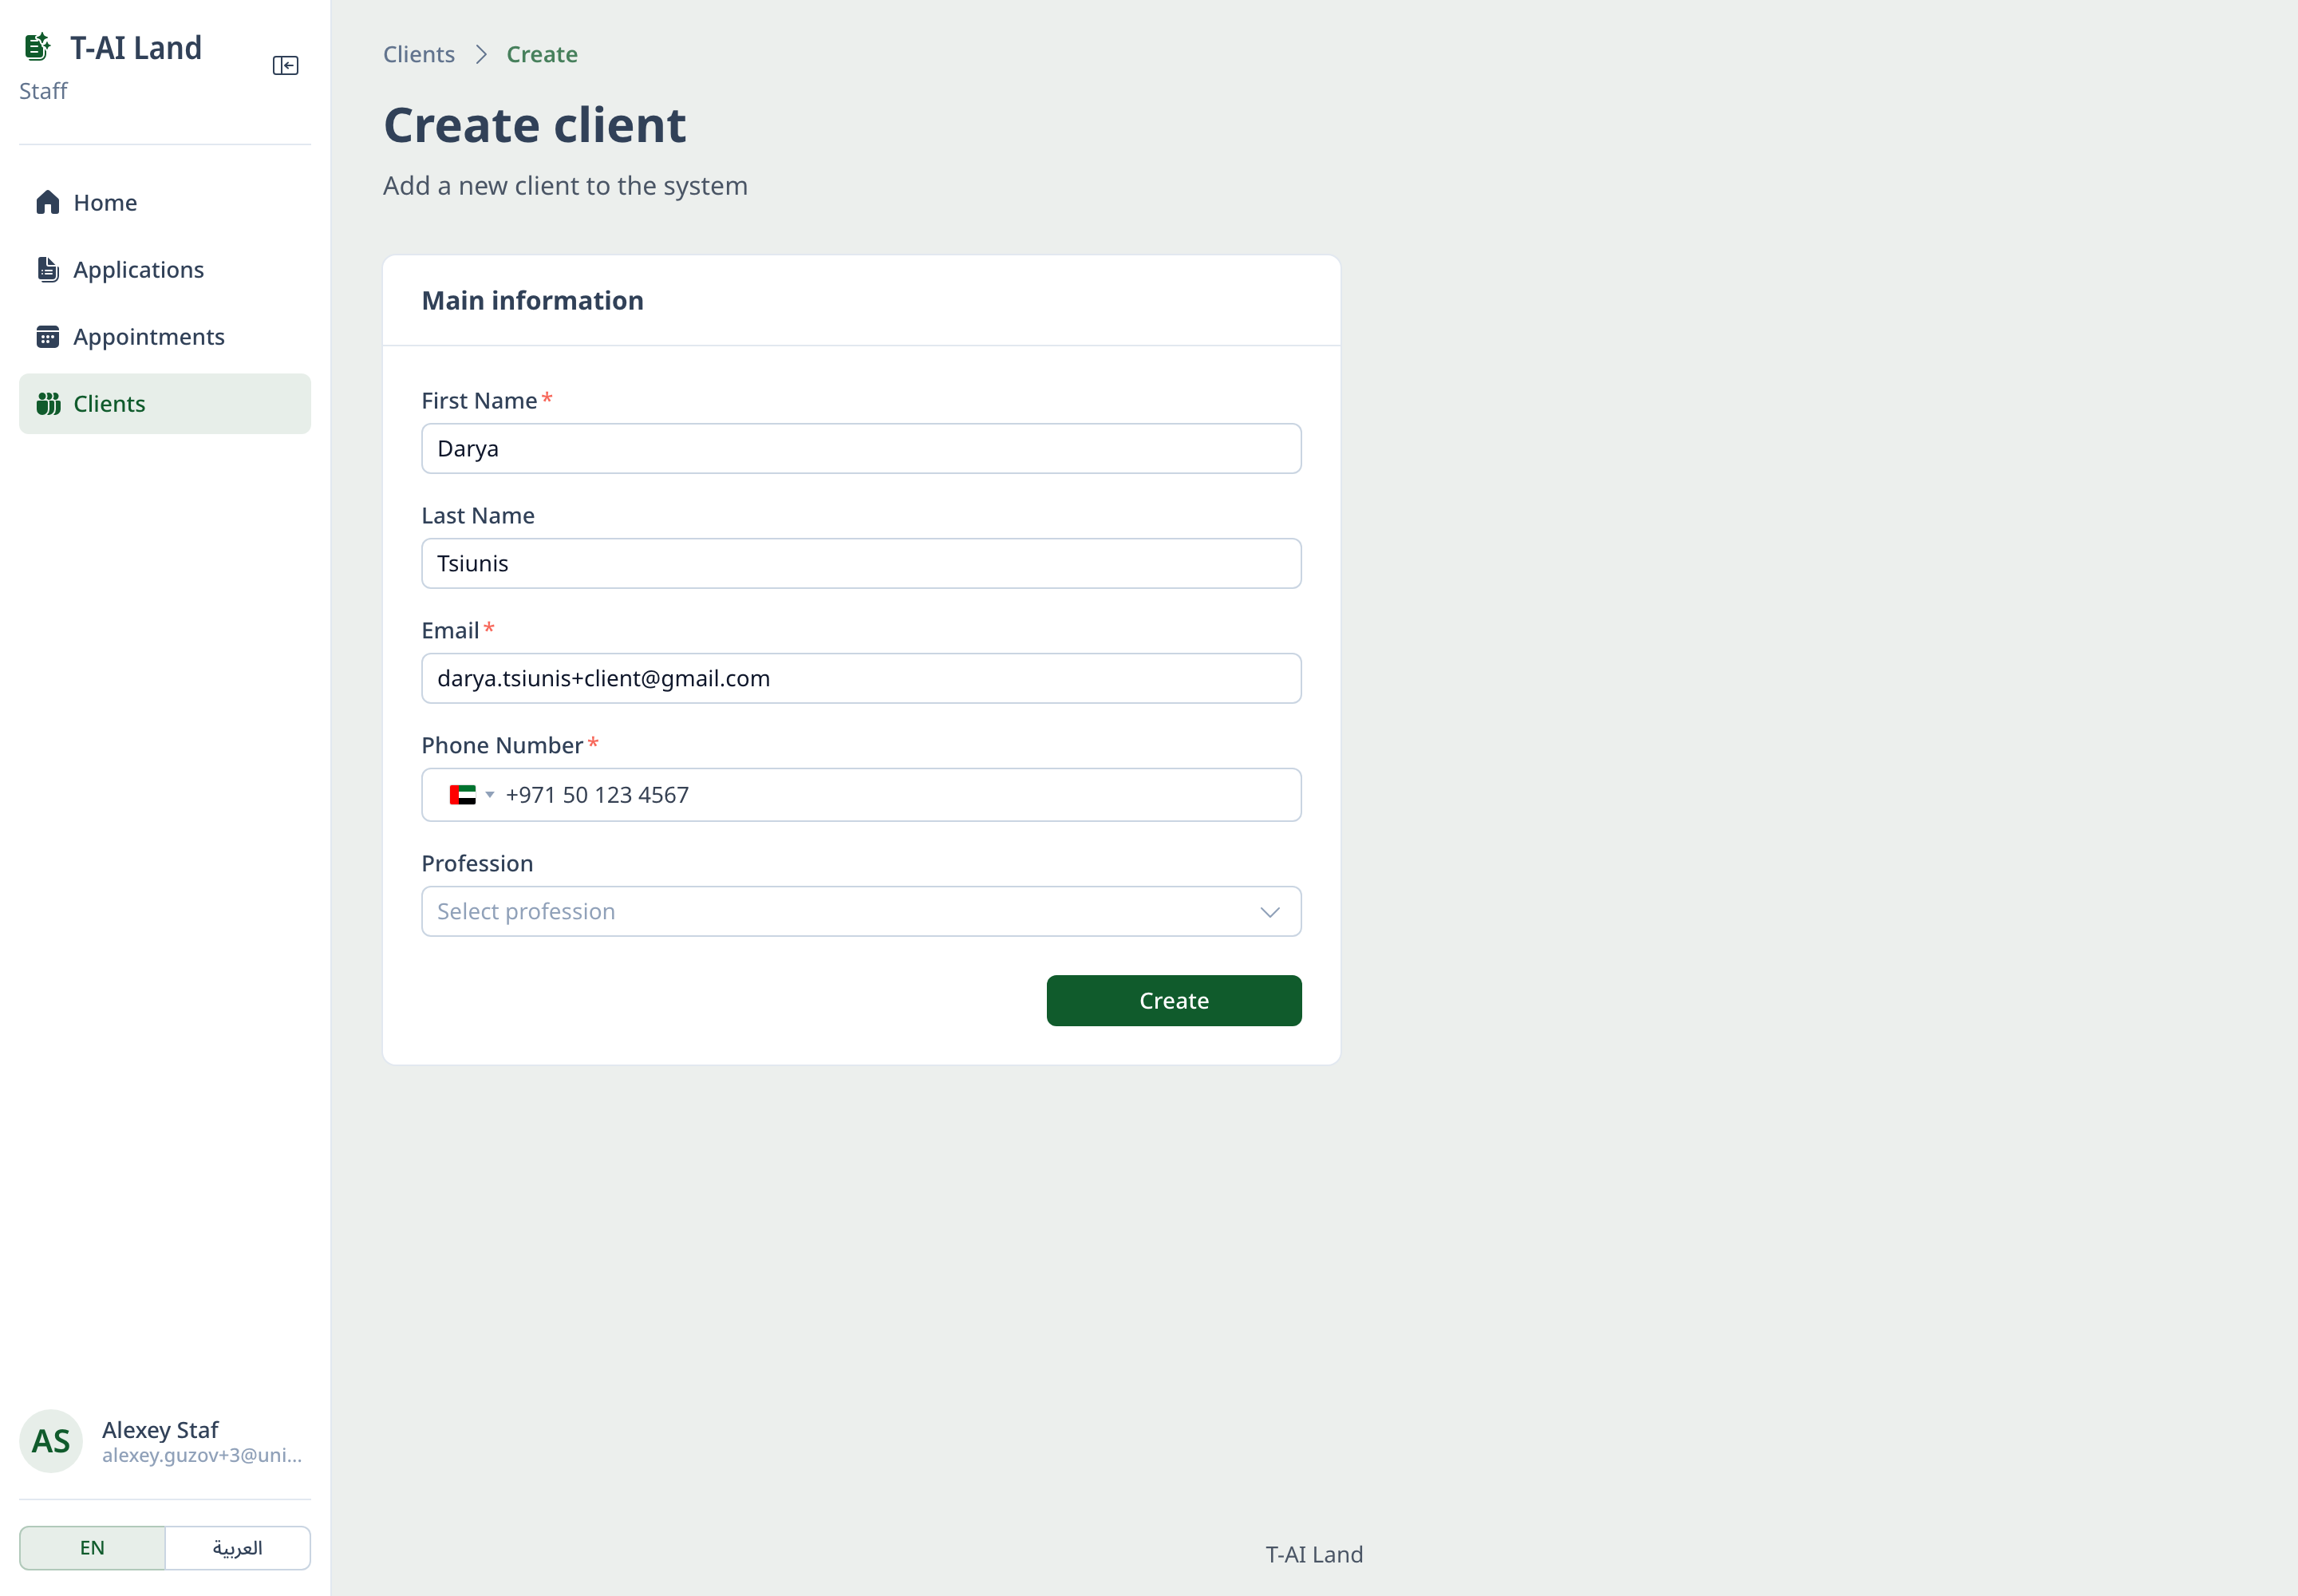
- In the Clients menu → Create client button.
- Fill in First Name, Last Name, Email, Phone Number (must include the country code, e.g. +971…; without it the form won't save), and optionally Profession → Create.
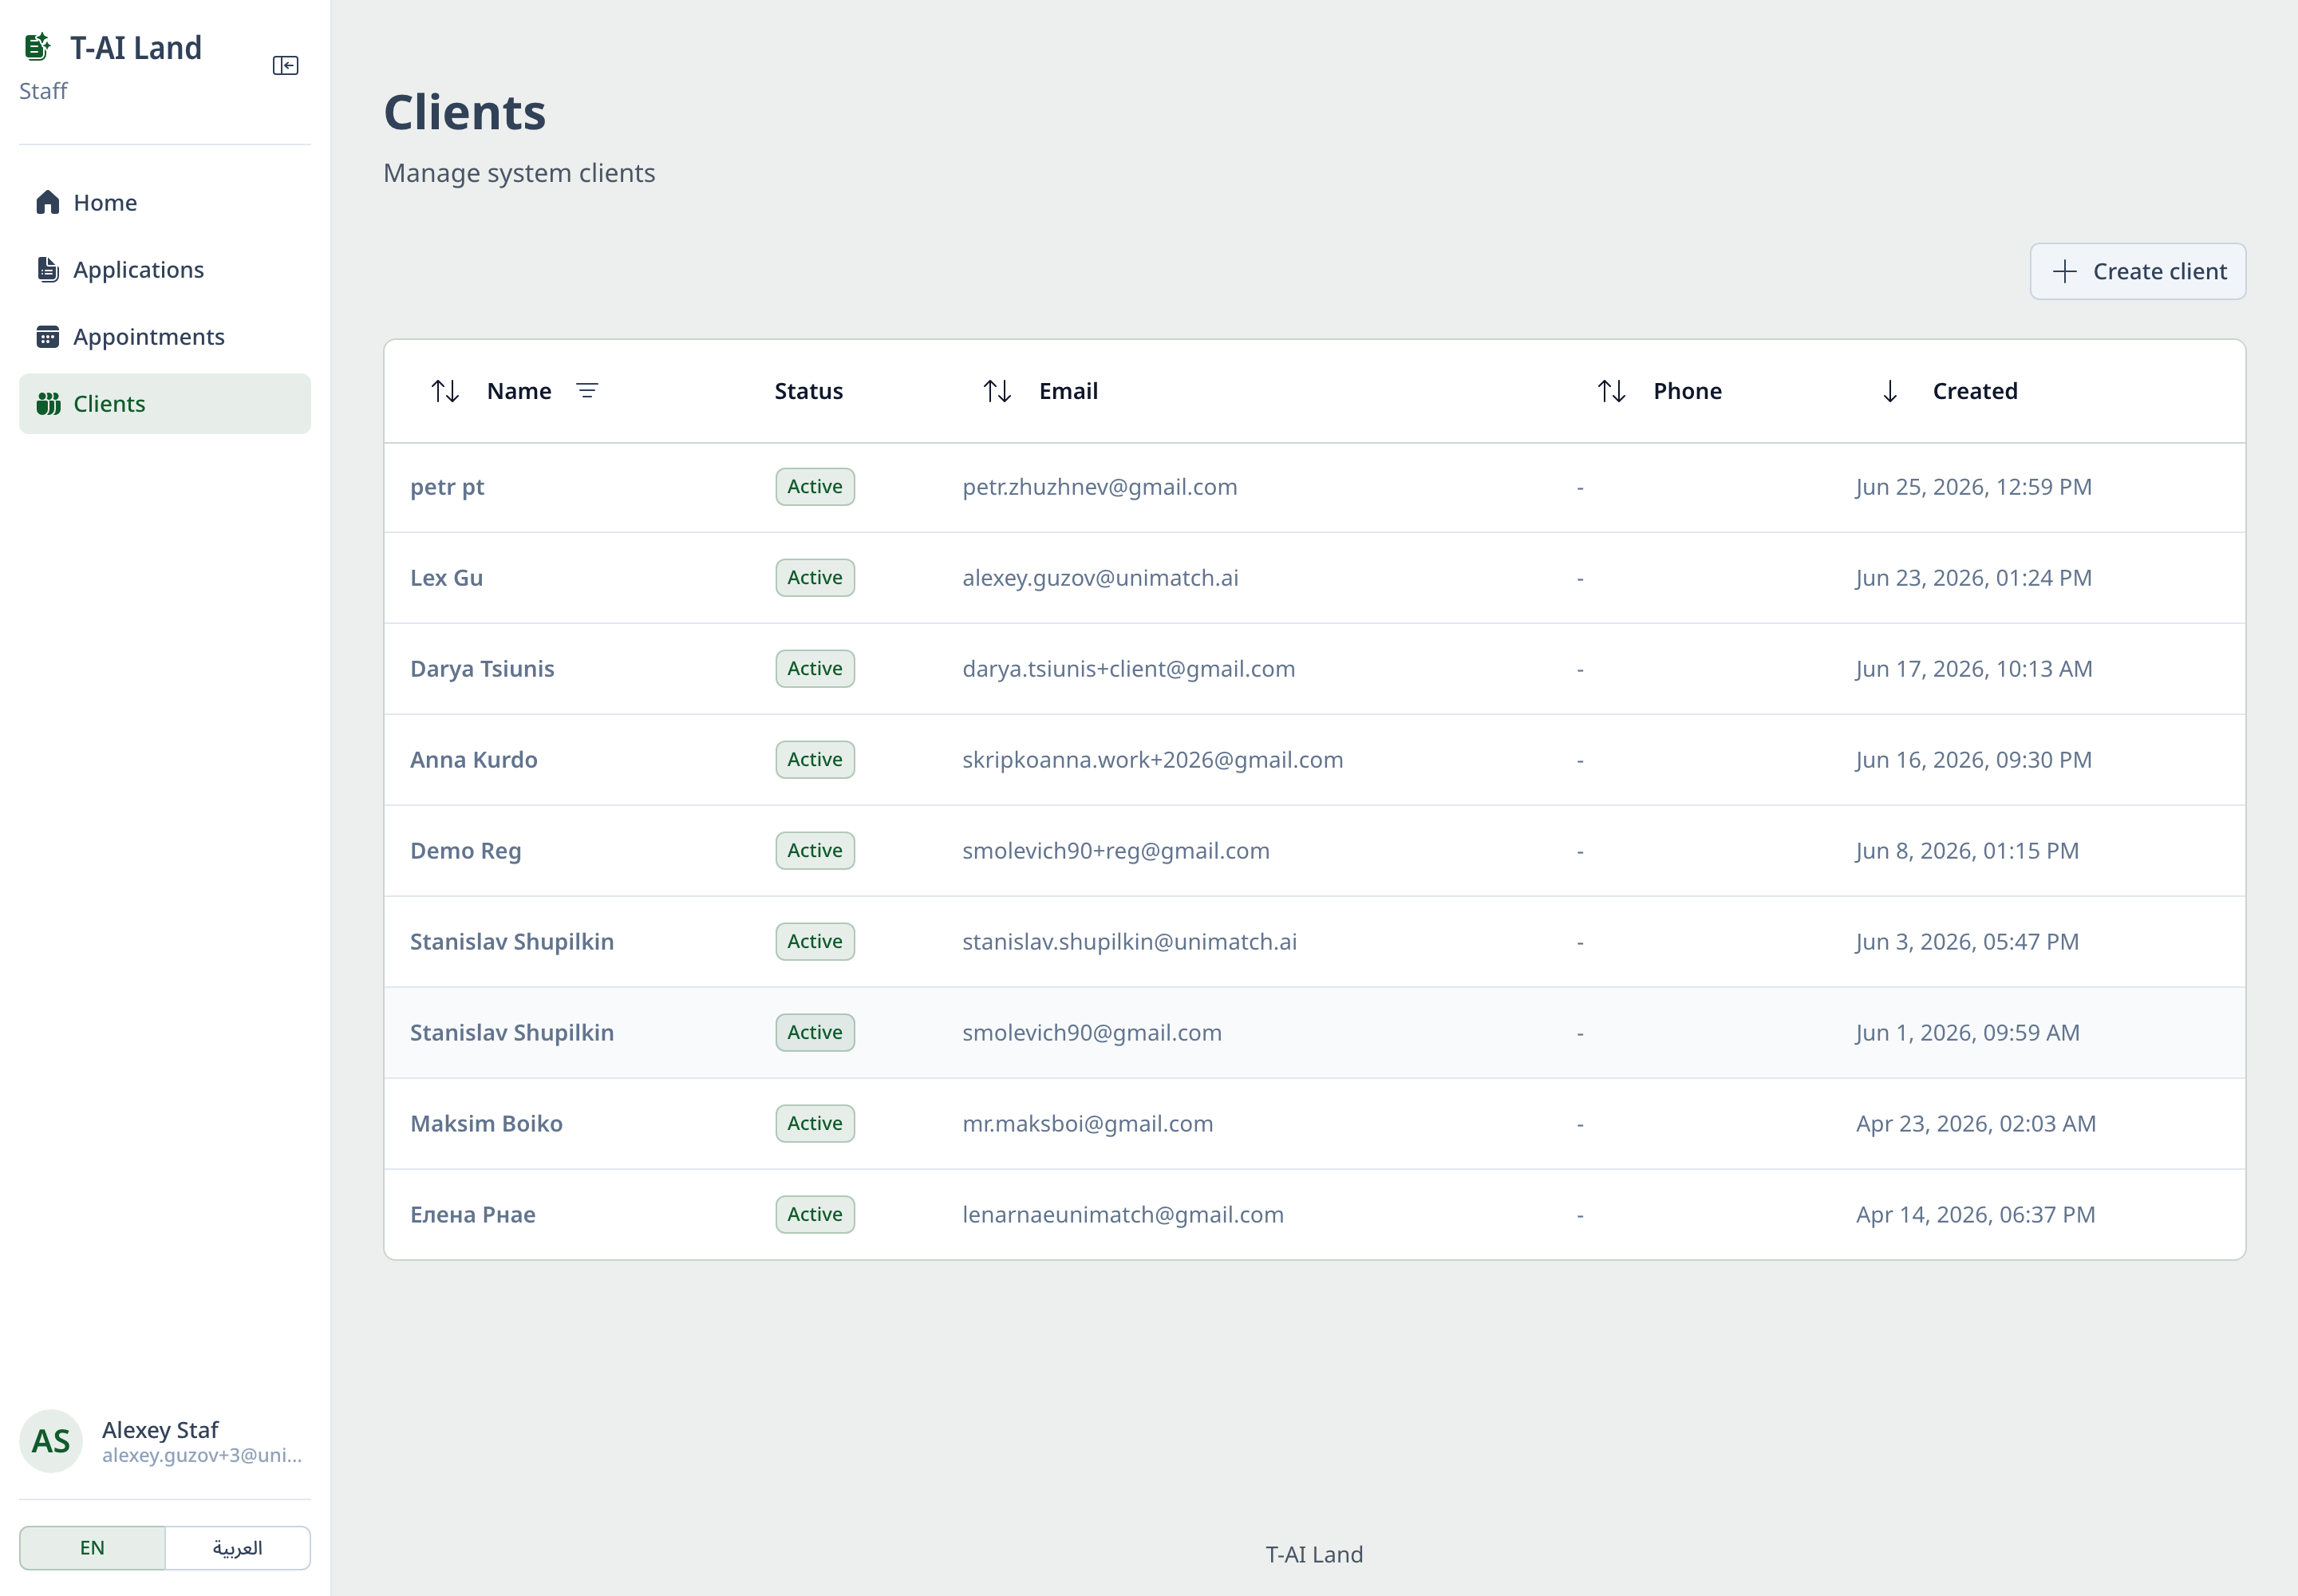
- The new client appears in the Clients list.
💡 Alternative — client self-registration. Instead of creating the client and their applications manually, the trust-office manager can send the client a registration link. The client follows the link, registers themselves and uploads documents into the relevant deal for validation. In this flow the officer doesn't create the client and application manually (Steps 1–3) — only checks and approves the uploaded documents (Steps 4–5).
🔗 Client registration link (copy and send): https://t-ai.ae/register
Step 2. Create an application for a specific client
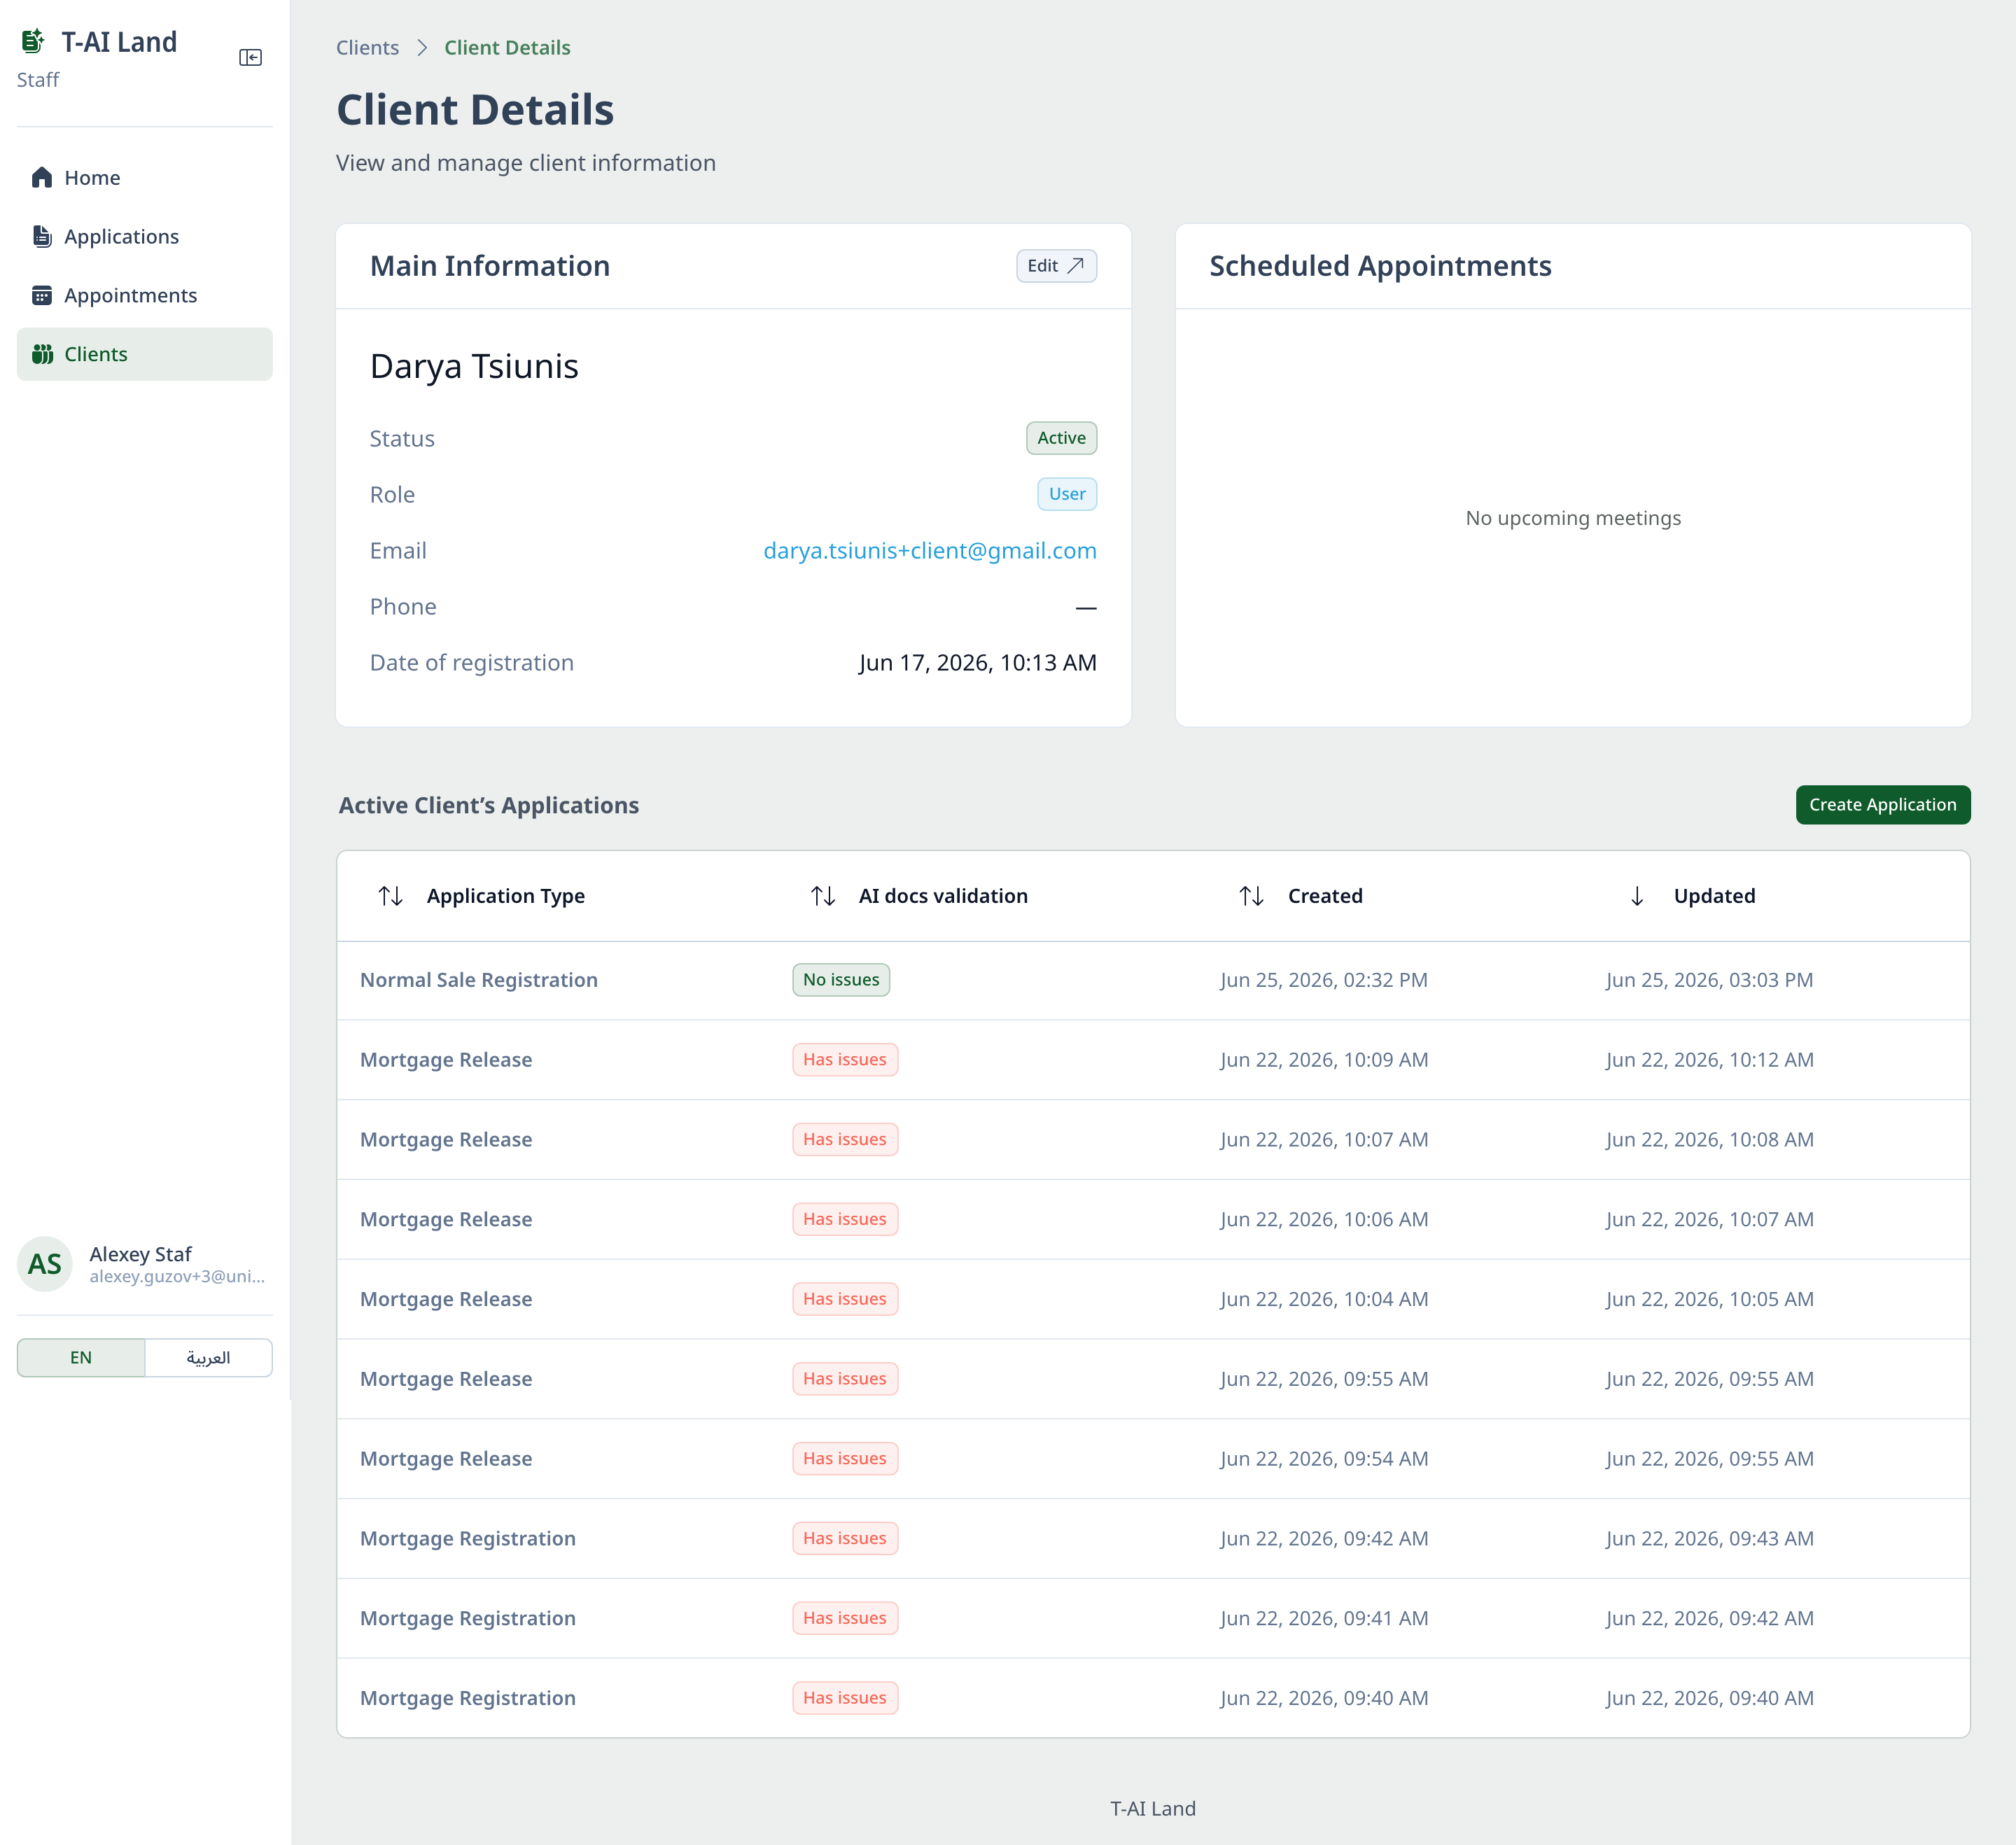
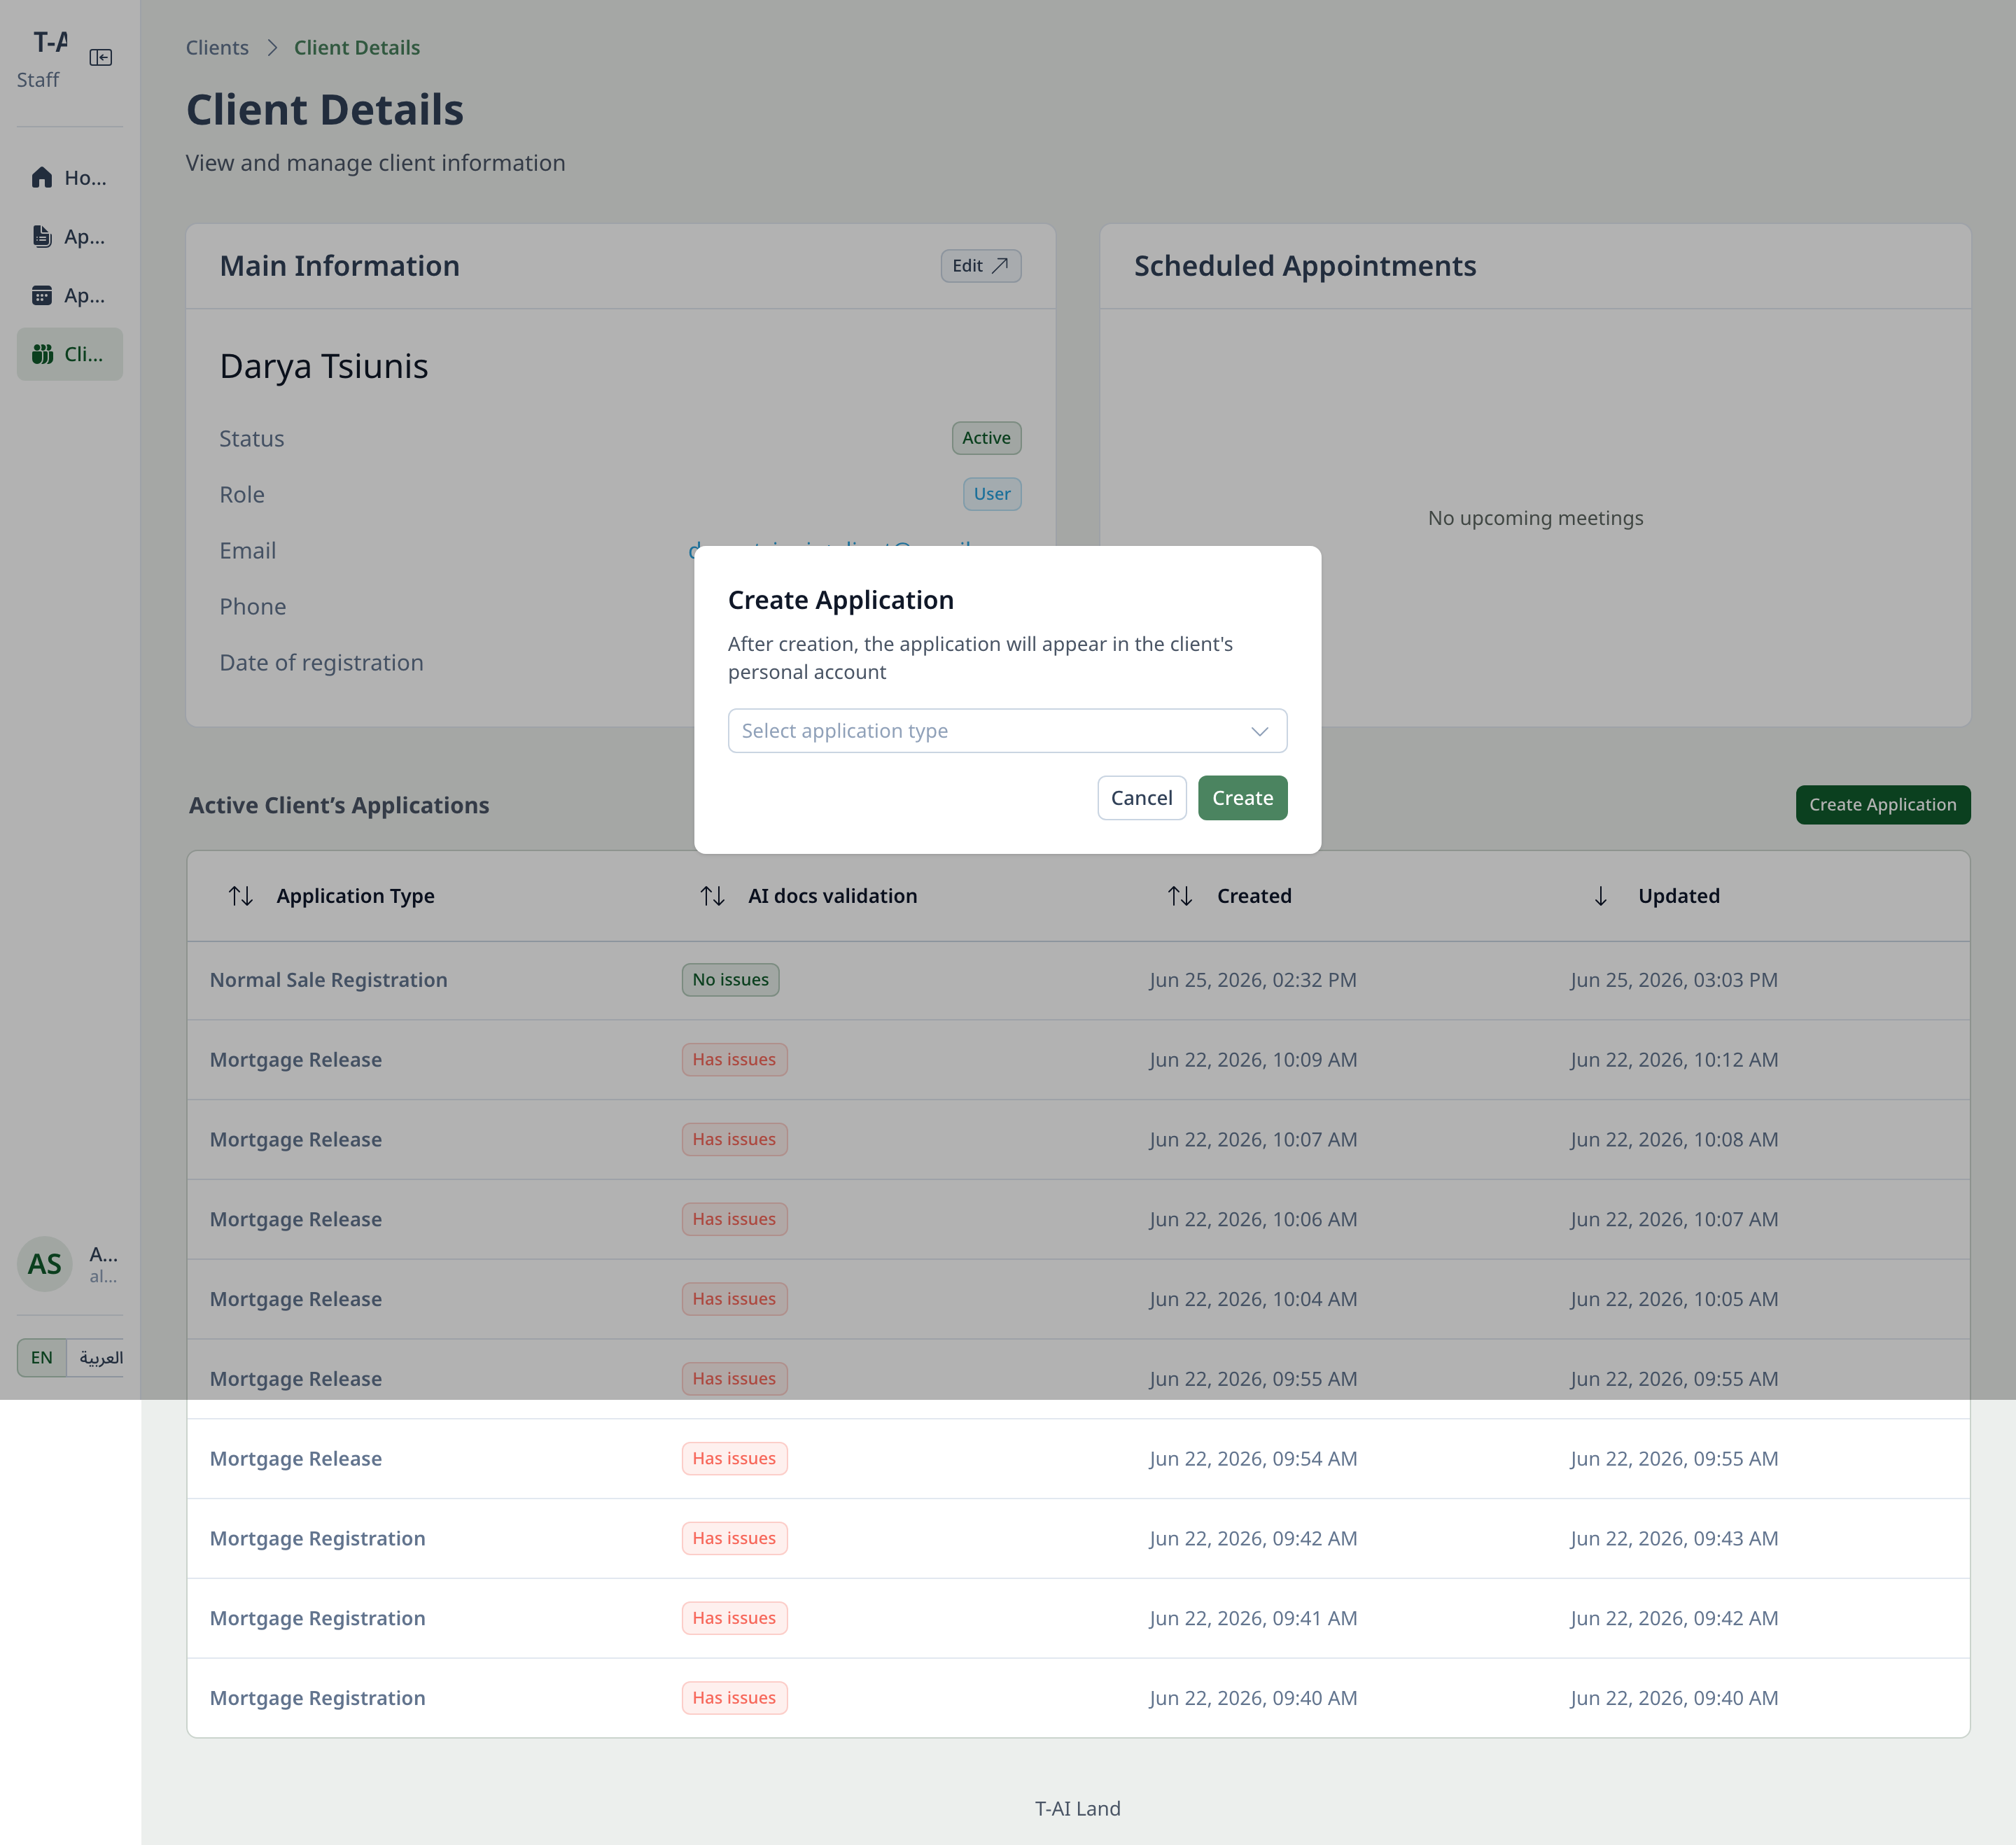
- An application is always tied to a client, so it is created from the client's card (not from the general Applications list).
- In the Clients menu, find the client and open their card (click the row).
- On the client's card, click Create Application.
- In the dialog, pick the deal type (e.g. Normal Sale Registration) → Create.
- The application is created for this client and opens on the application page — go on to upload documents (Step 3).
Step 3. Upload documents for validation
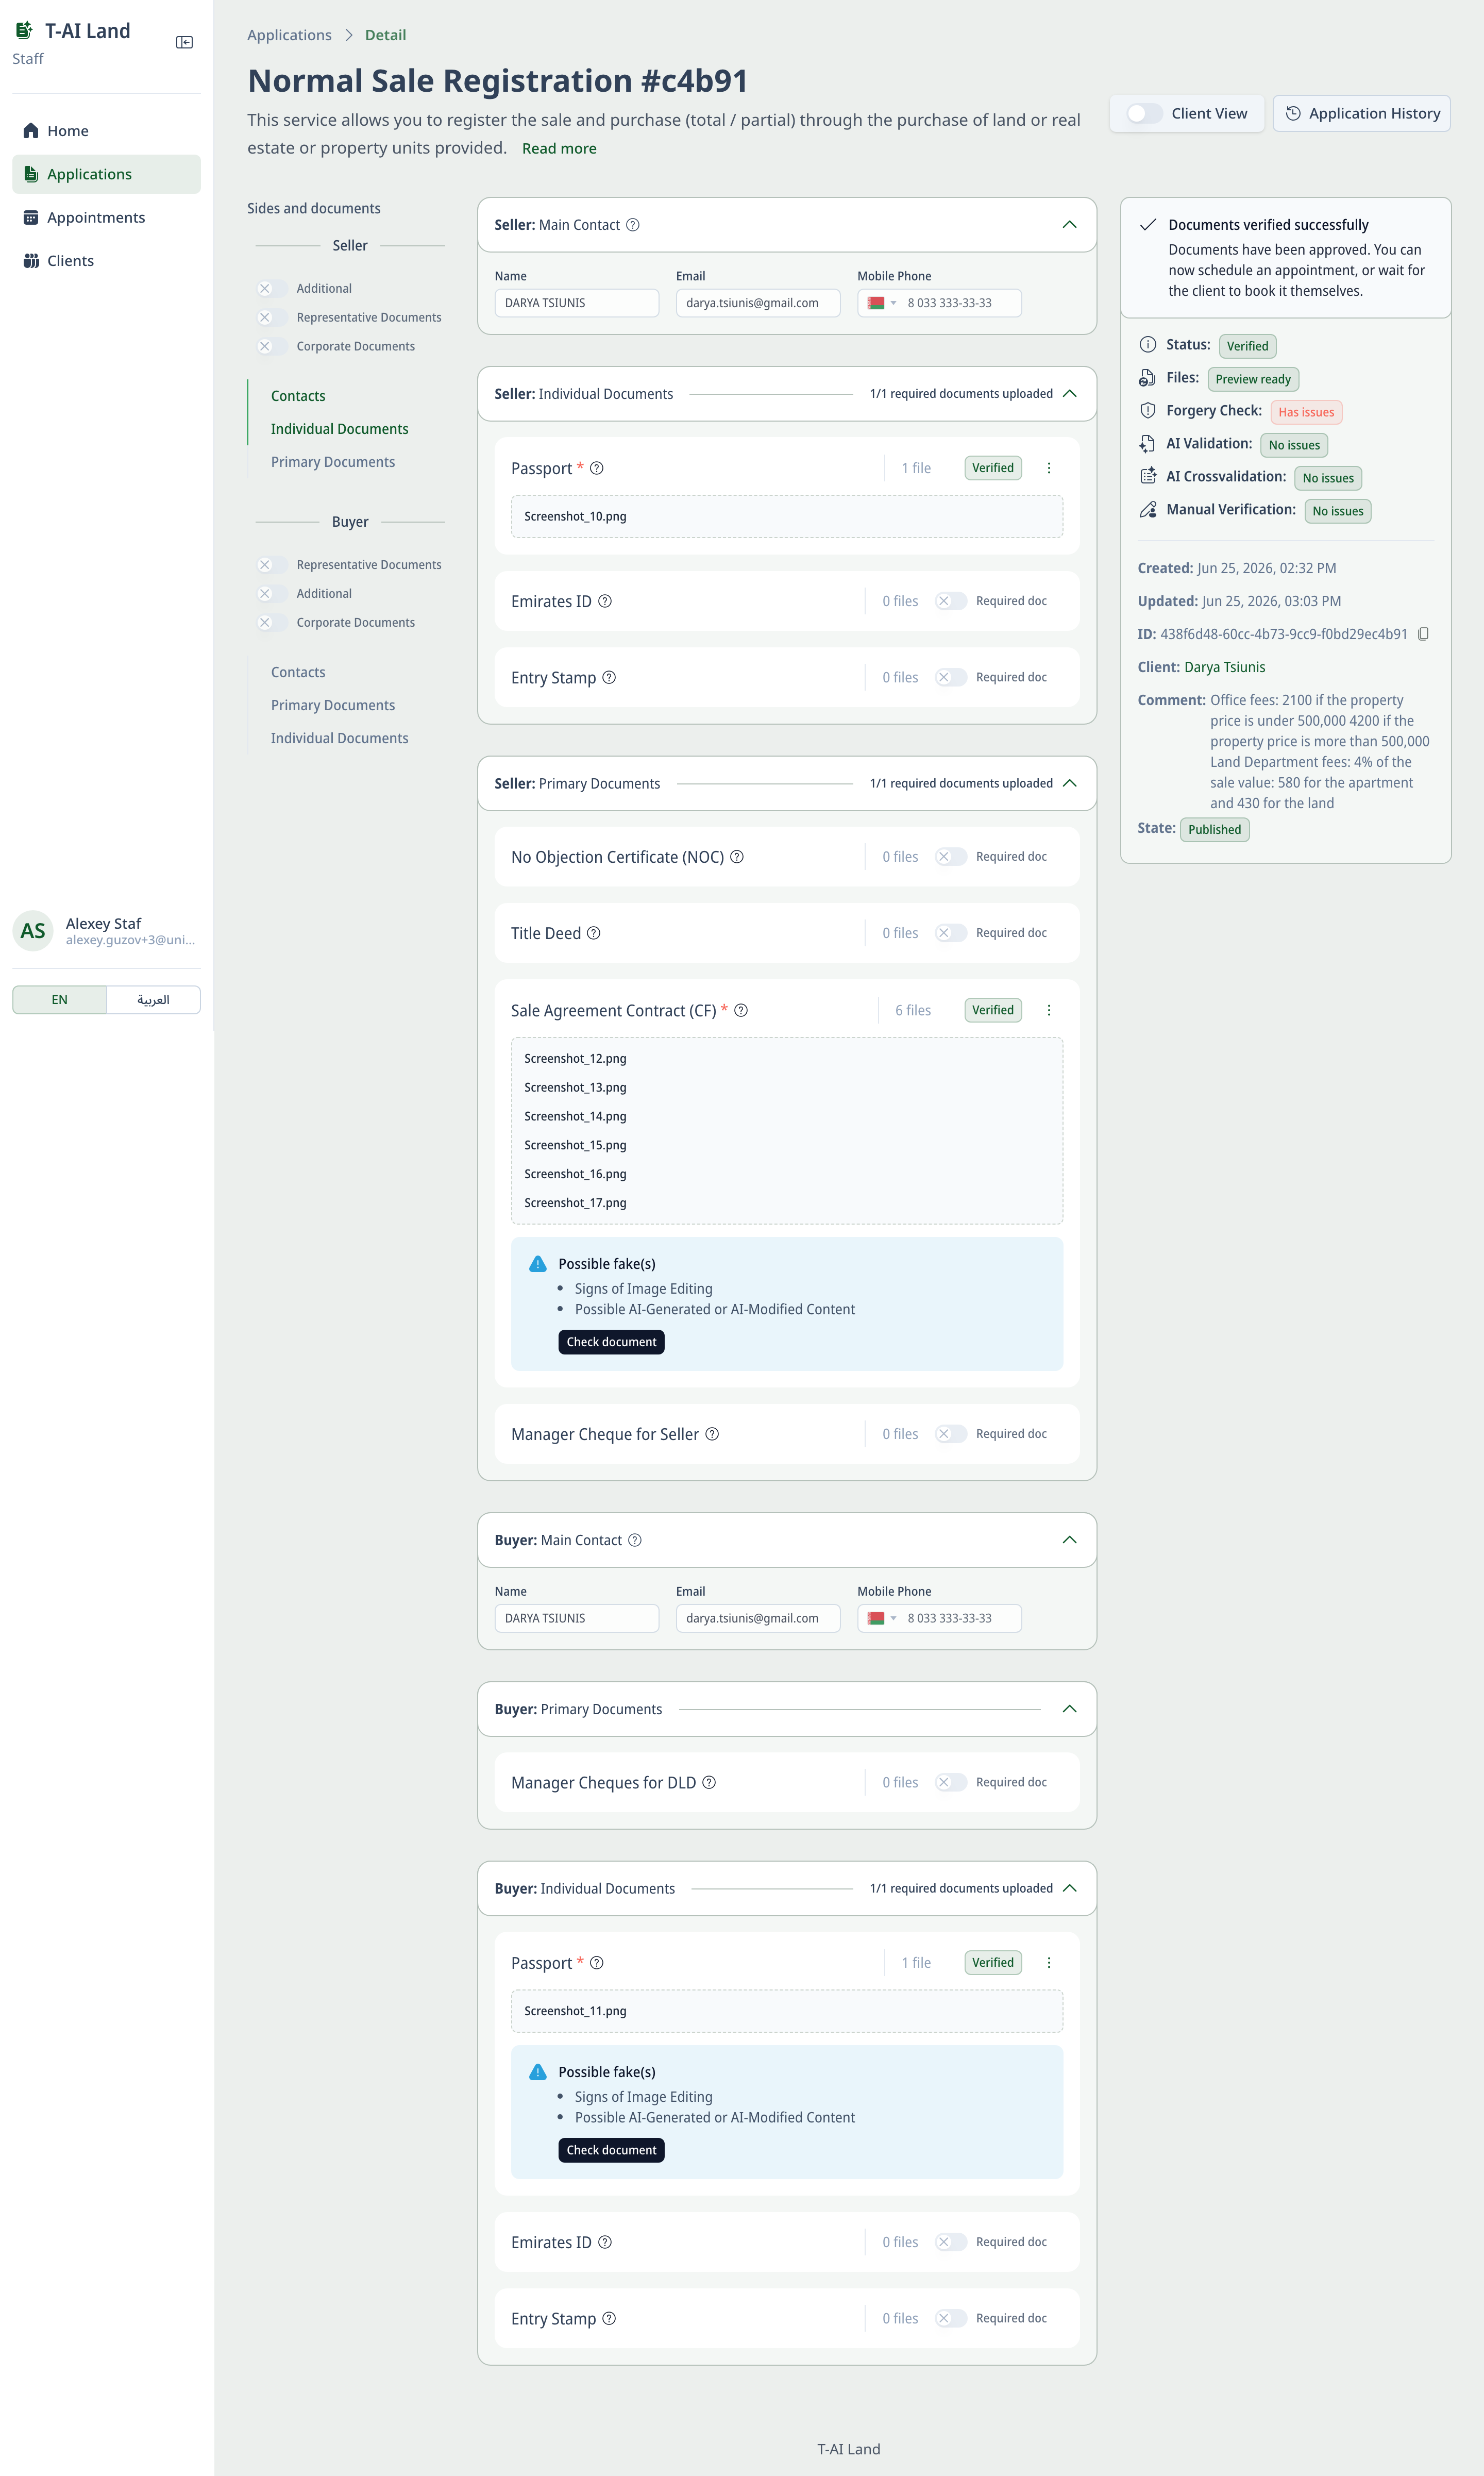
ℹ️ The Client View toggle is on by default — so the document upload fields are available right away, and the manager/officer can upload documents on behalf of the client for validation. If you don't see the upload area, make sure Client View is on (toggle at the top of the application page).
- Upload files per the checklist (you'll see "1/1 required documents uploaded" and document statuses).
- The system checks automatically: recognition → validation → forgery check → cross-validation between documents.
Left panel "Sides and documents". Documents are grouped by deal side (for Normal Sale — Seller and Buyer); under each side are its sections and groups. The green bar on the left = the section currently open.
Document groups:
| Group | What it means |
|---|---|
| Contacts | The side's contacts (name, email, phone) — not documents, but participant details |
| Individual Documents | Documents for an individual (Emirates ID, passport) |
| Corporate Documents | Documents for a company / legal entity (if the side is an organization) |
| Primary Documents | The main deal documents for this side (title deed, contract, etc.) |
| Representative Documents | Representative's documents — if acting under a power of attorney (POA + ID) |
| Additional | Additional documents (NOC and others as needed) |
- Group toggles (icon): ✕ grey — group is off, its documents aren't required; ✓ — on, added to the required checklist. Contacts / Individual / Primary are usually permanent — clicking just scrolls to the section.
- Example on screen: Additional / Representative / Corporate are off → both sides are individuals acting in person. Turn on Representative Documents if a side acts under a power of attorney, or Corporate Documents if it is a company.
⚠️ Groups can be turned on/off before submission (or by staff during the manual-review phase). A group cannot be turned off if files are already uploaded into it.
Step 4. Review the result and fix issues
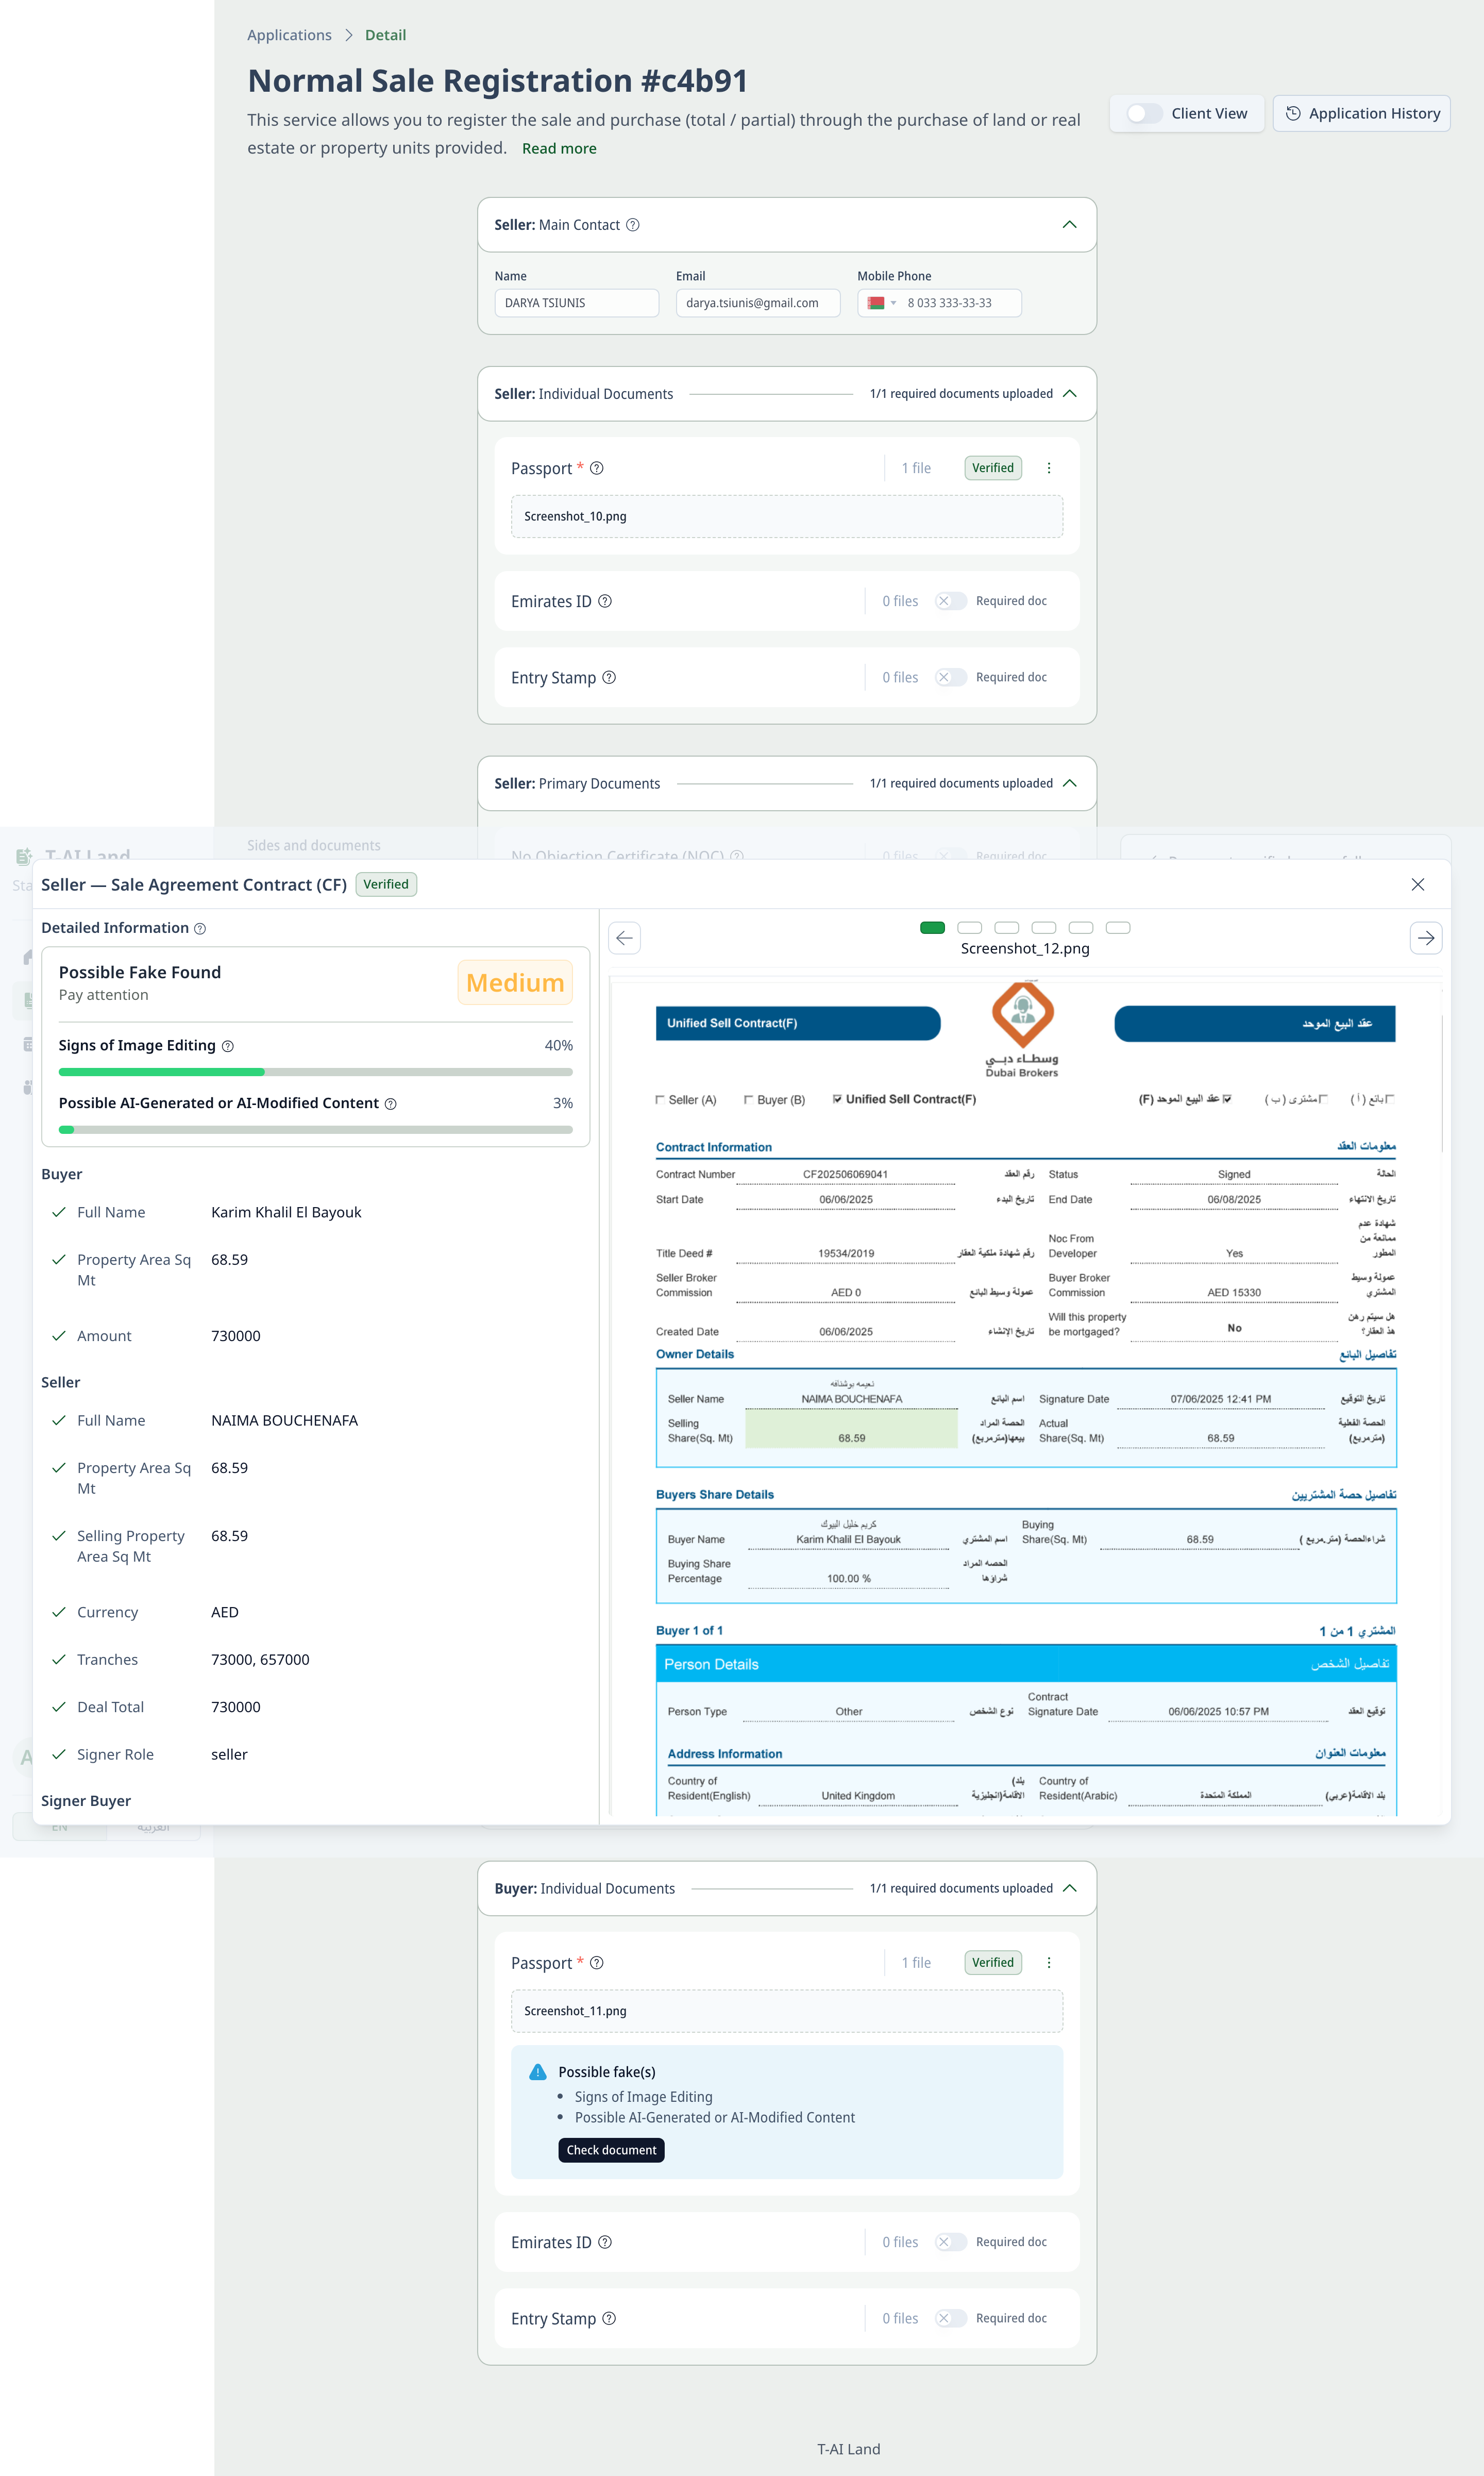
- Click Check document on a document → recognized fields and the forgery-check result open (Possible Fake Found: Low / Medium / High).
- If there is Has issues / mismatches or signs of editing — replace the document with a correct one and re-upload.
Step 5. Booking an appointment
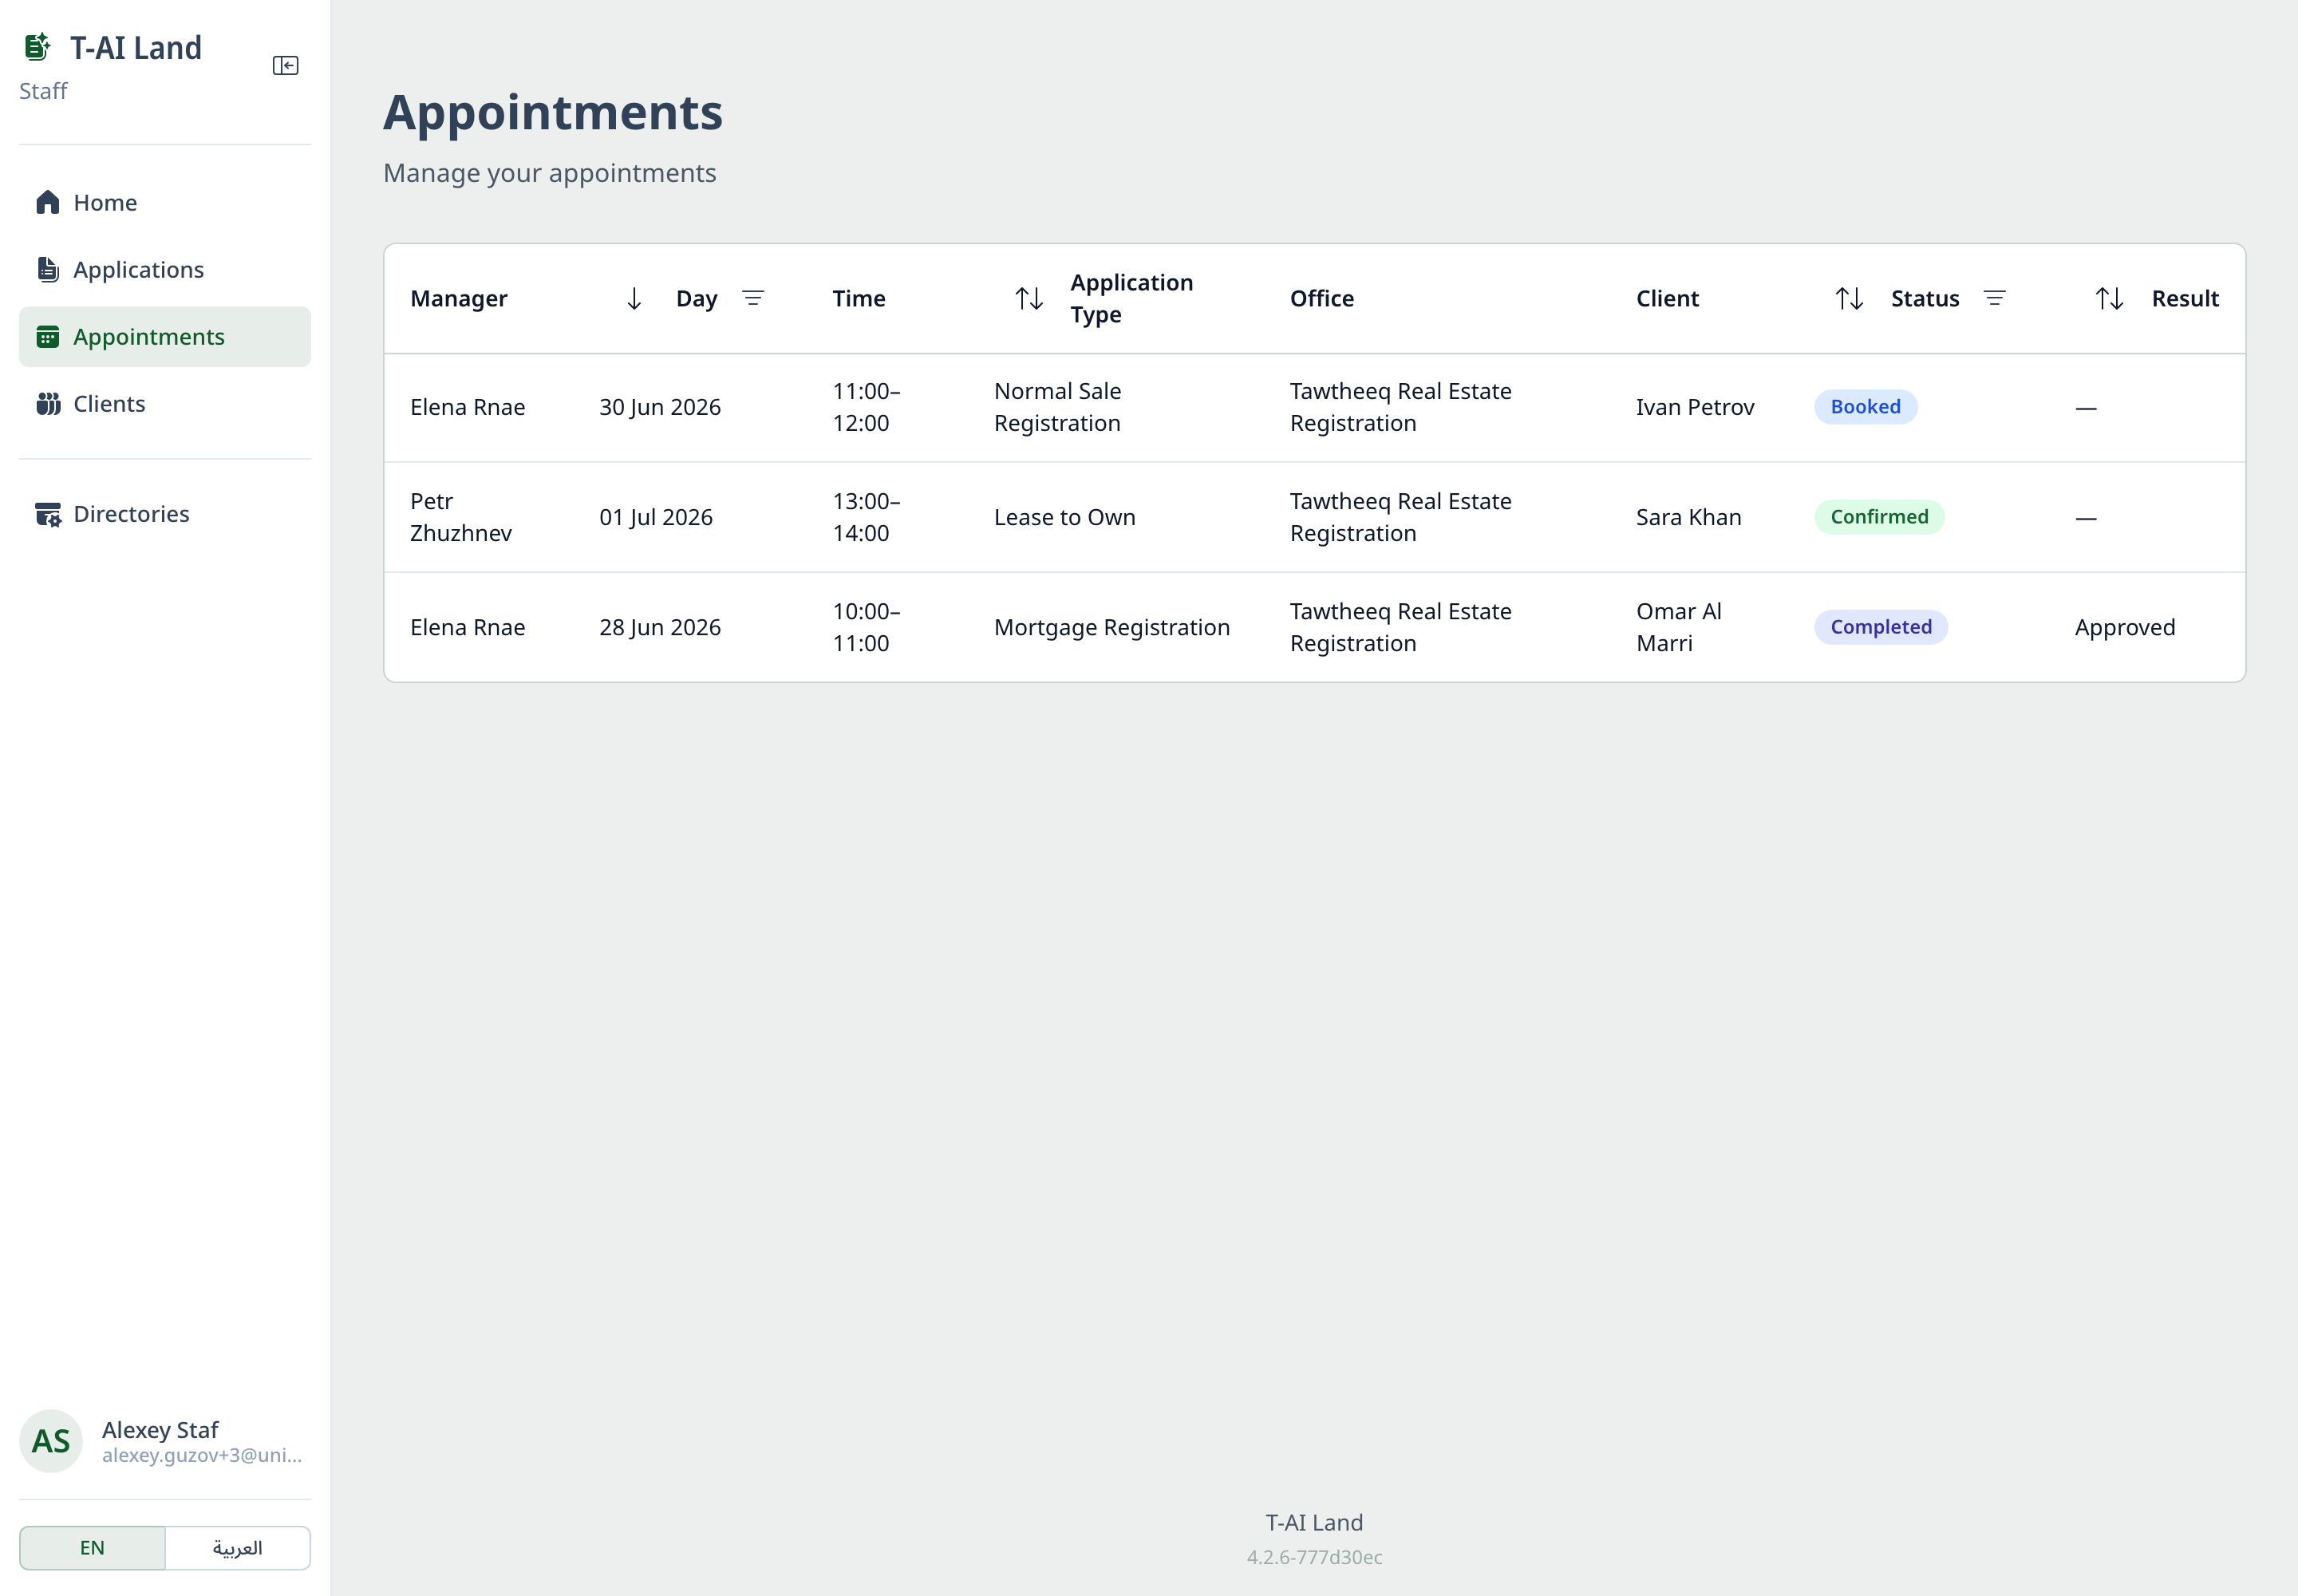
- Once the documents pass checks (Verified / No issues), the client gets access to the office's free slots (assigned in advance by the manager — Role 2, Step 3). The booking itself is made by the client in their portal; the resulting appointment appears for you in Appointments (Manager · Day · Time · Application Type · Office · Client · Status · Result).
- The client comes to the appointment with the originals.
Role 2 — Office Manager: setup and control
Manager menu: everything above + Employees · Offices · Data Export.
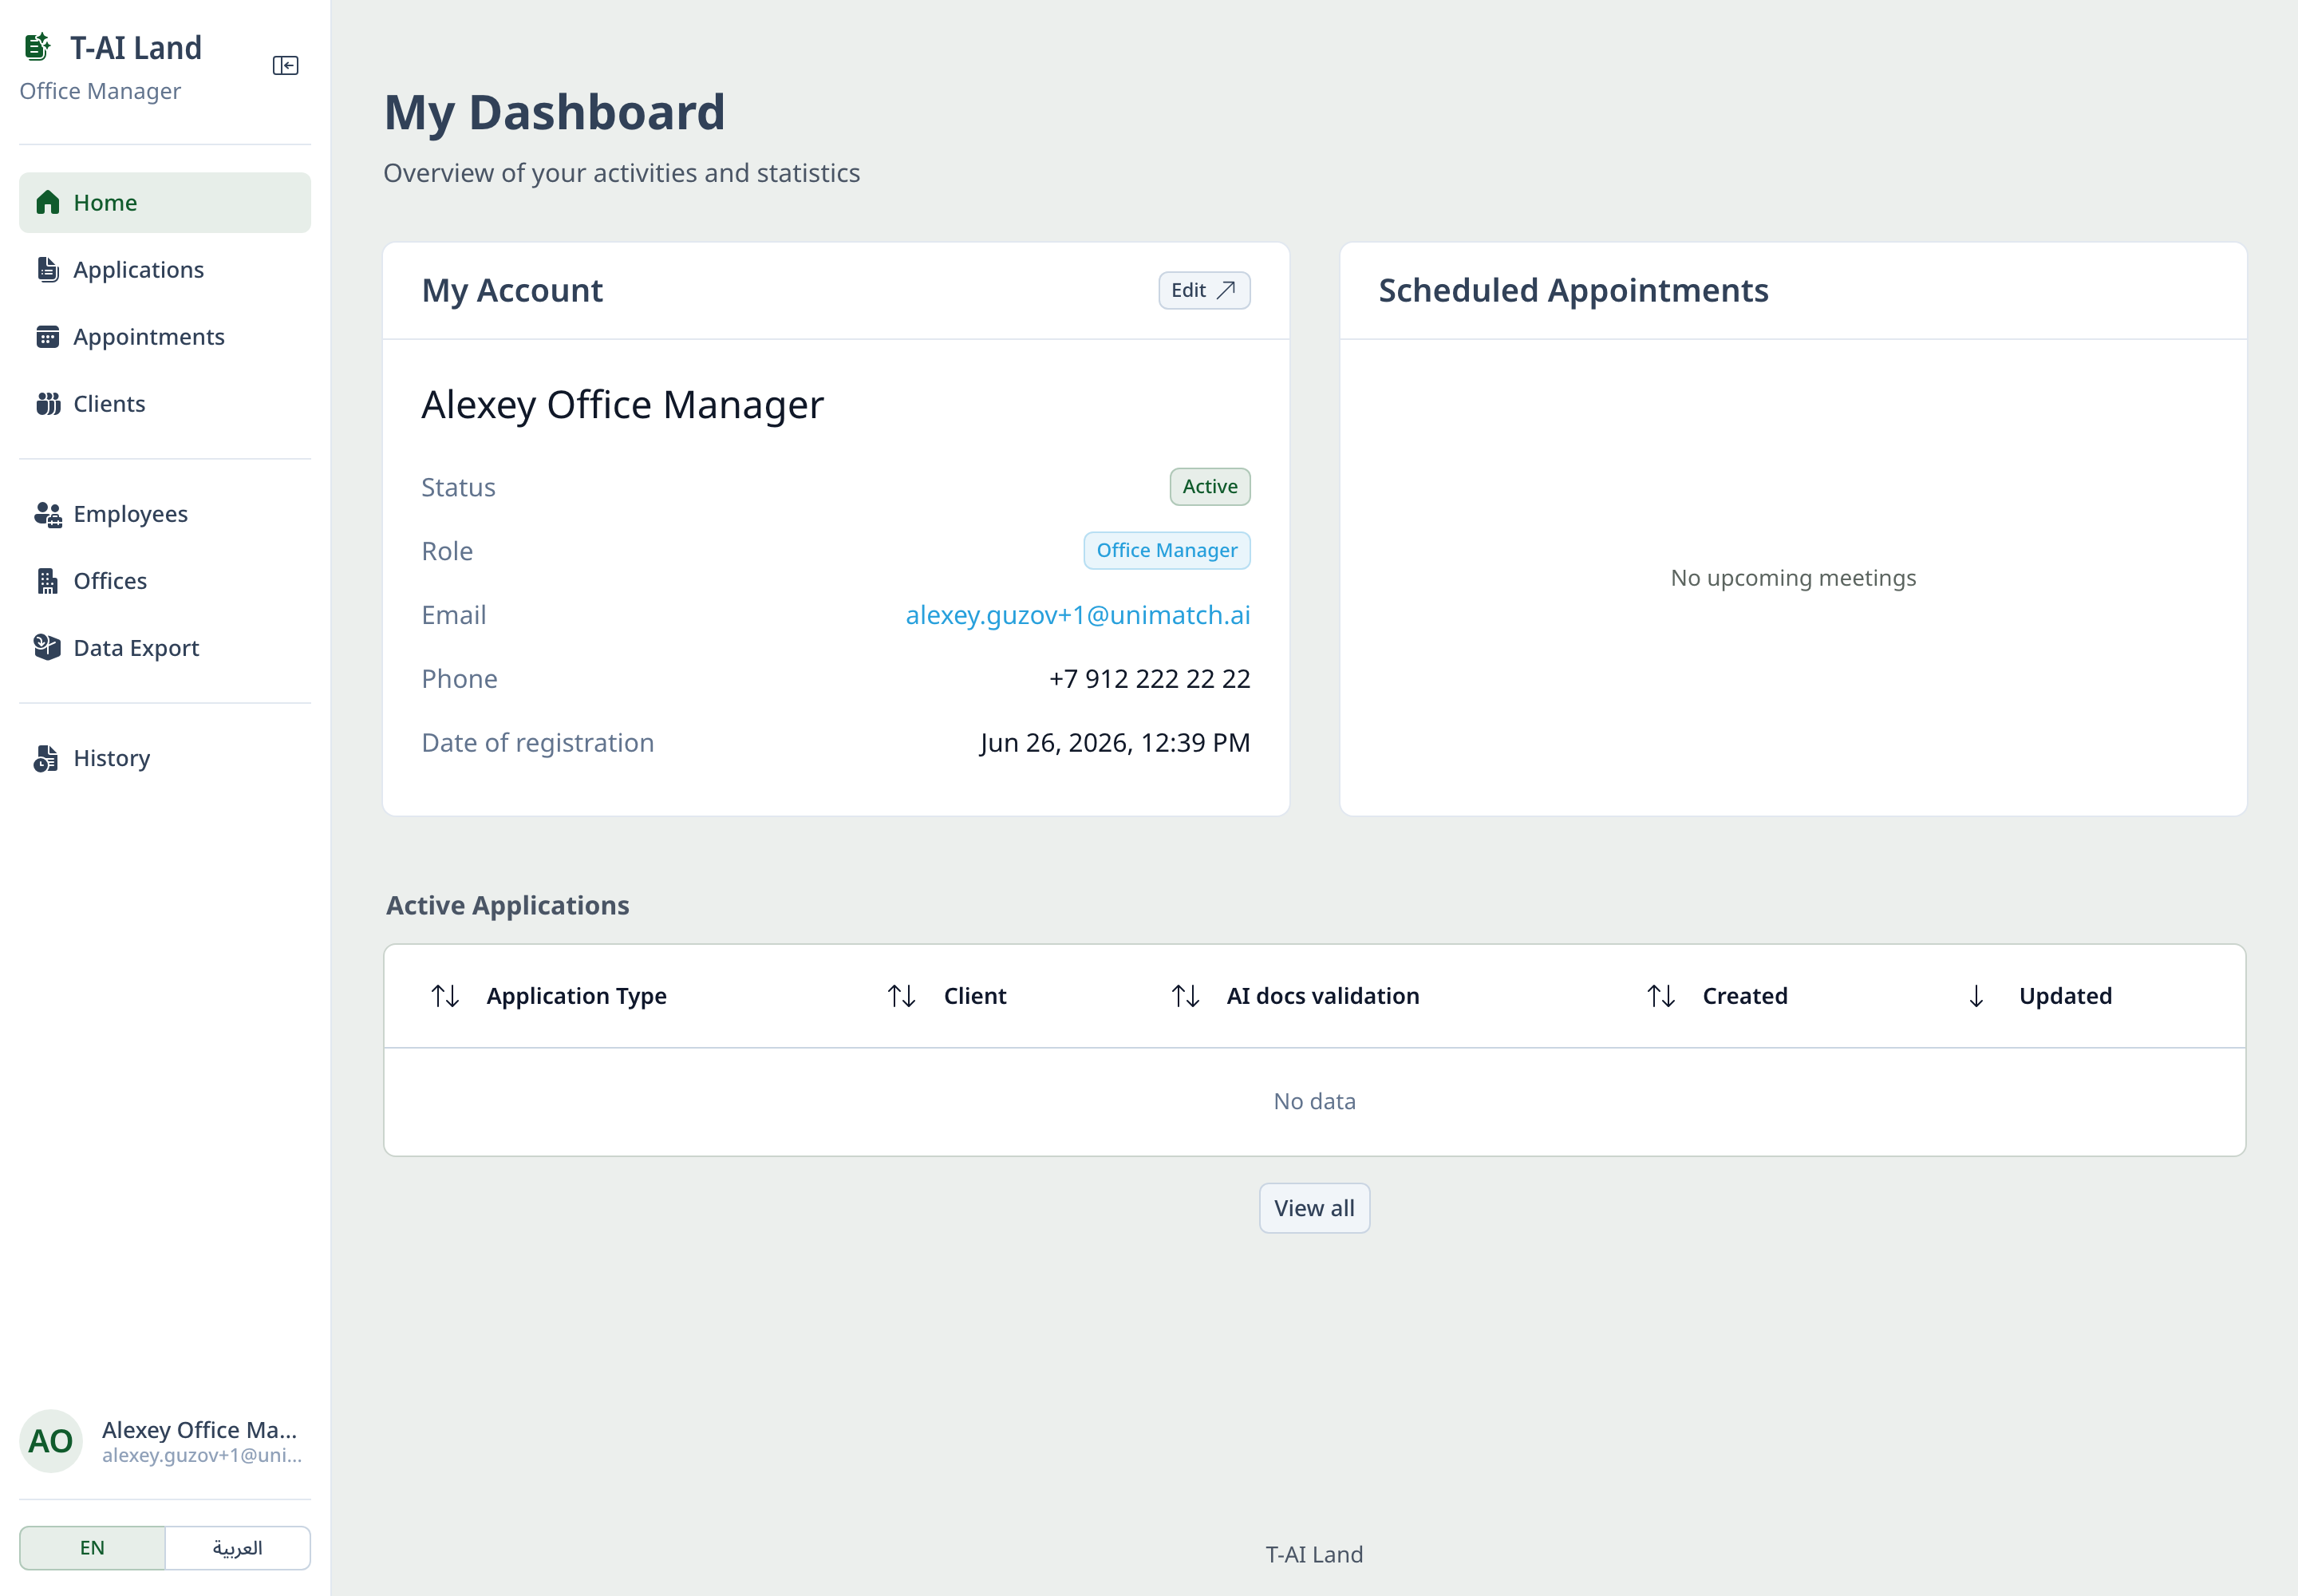
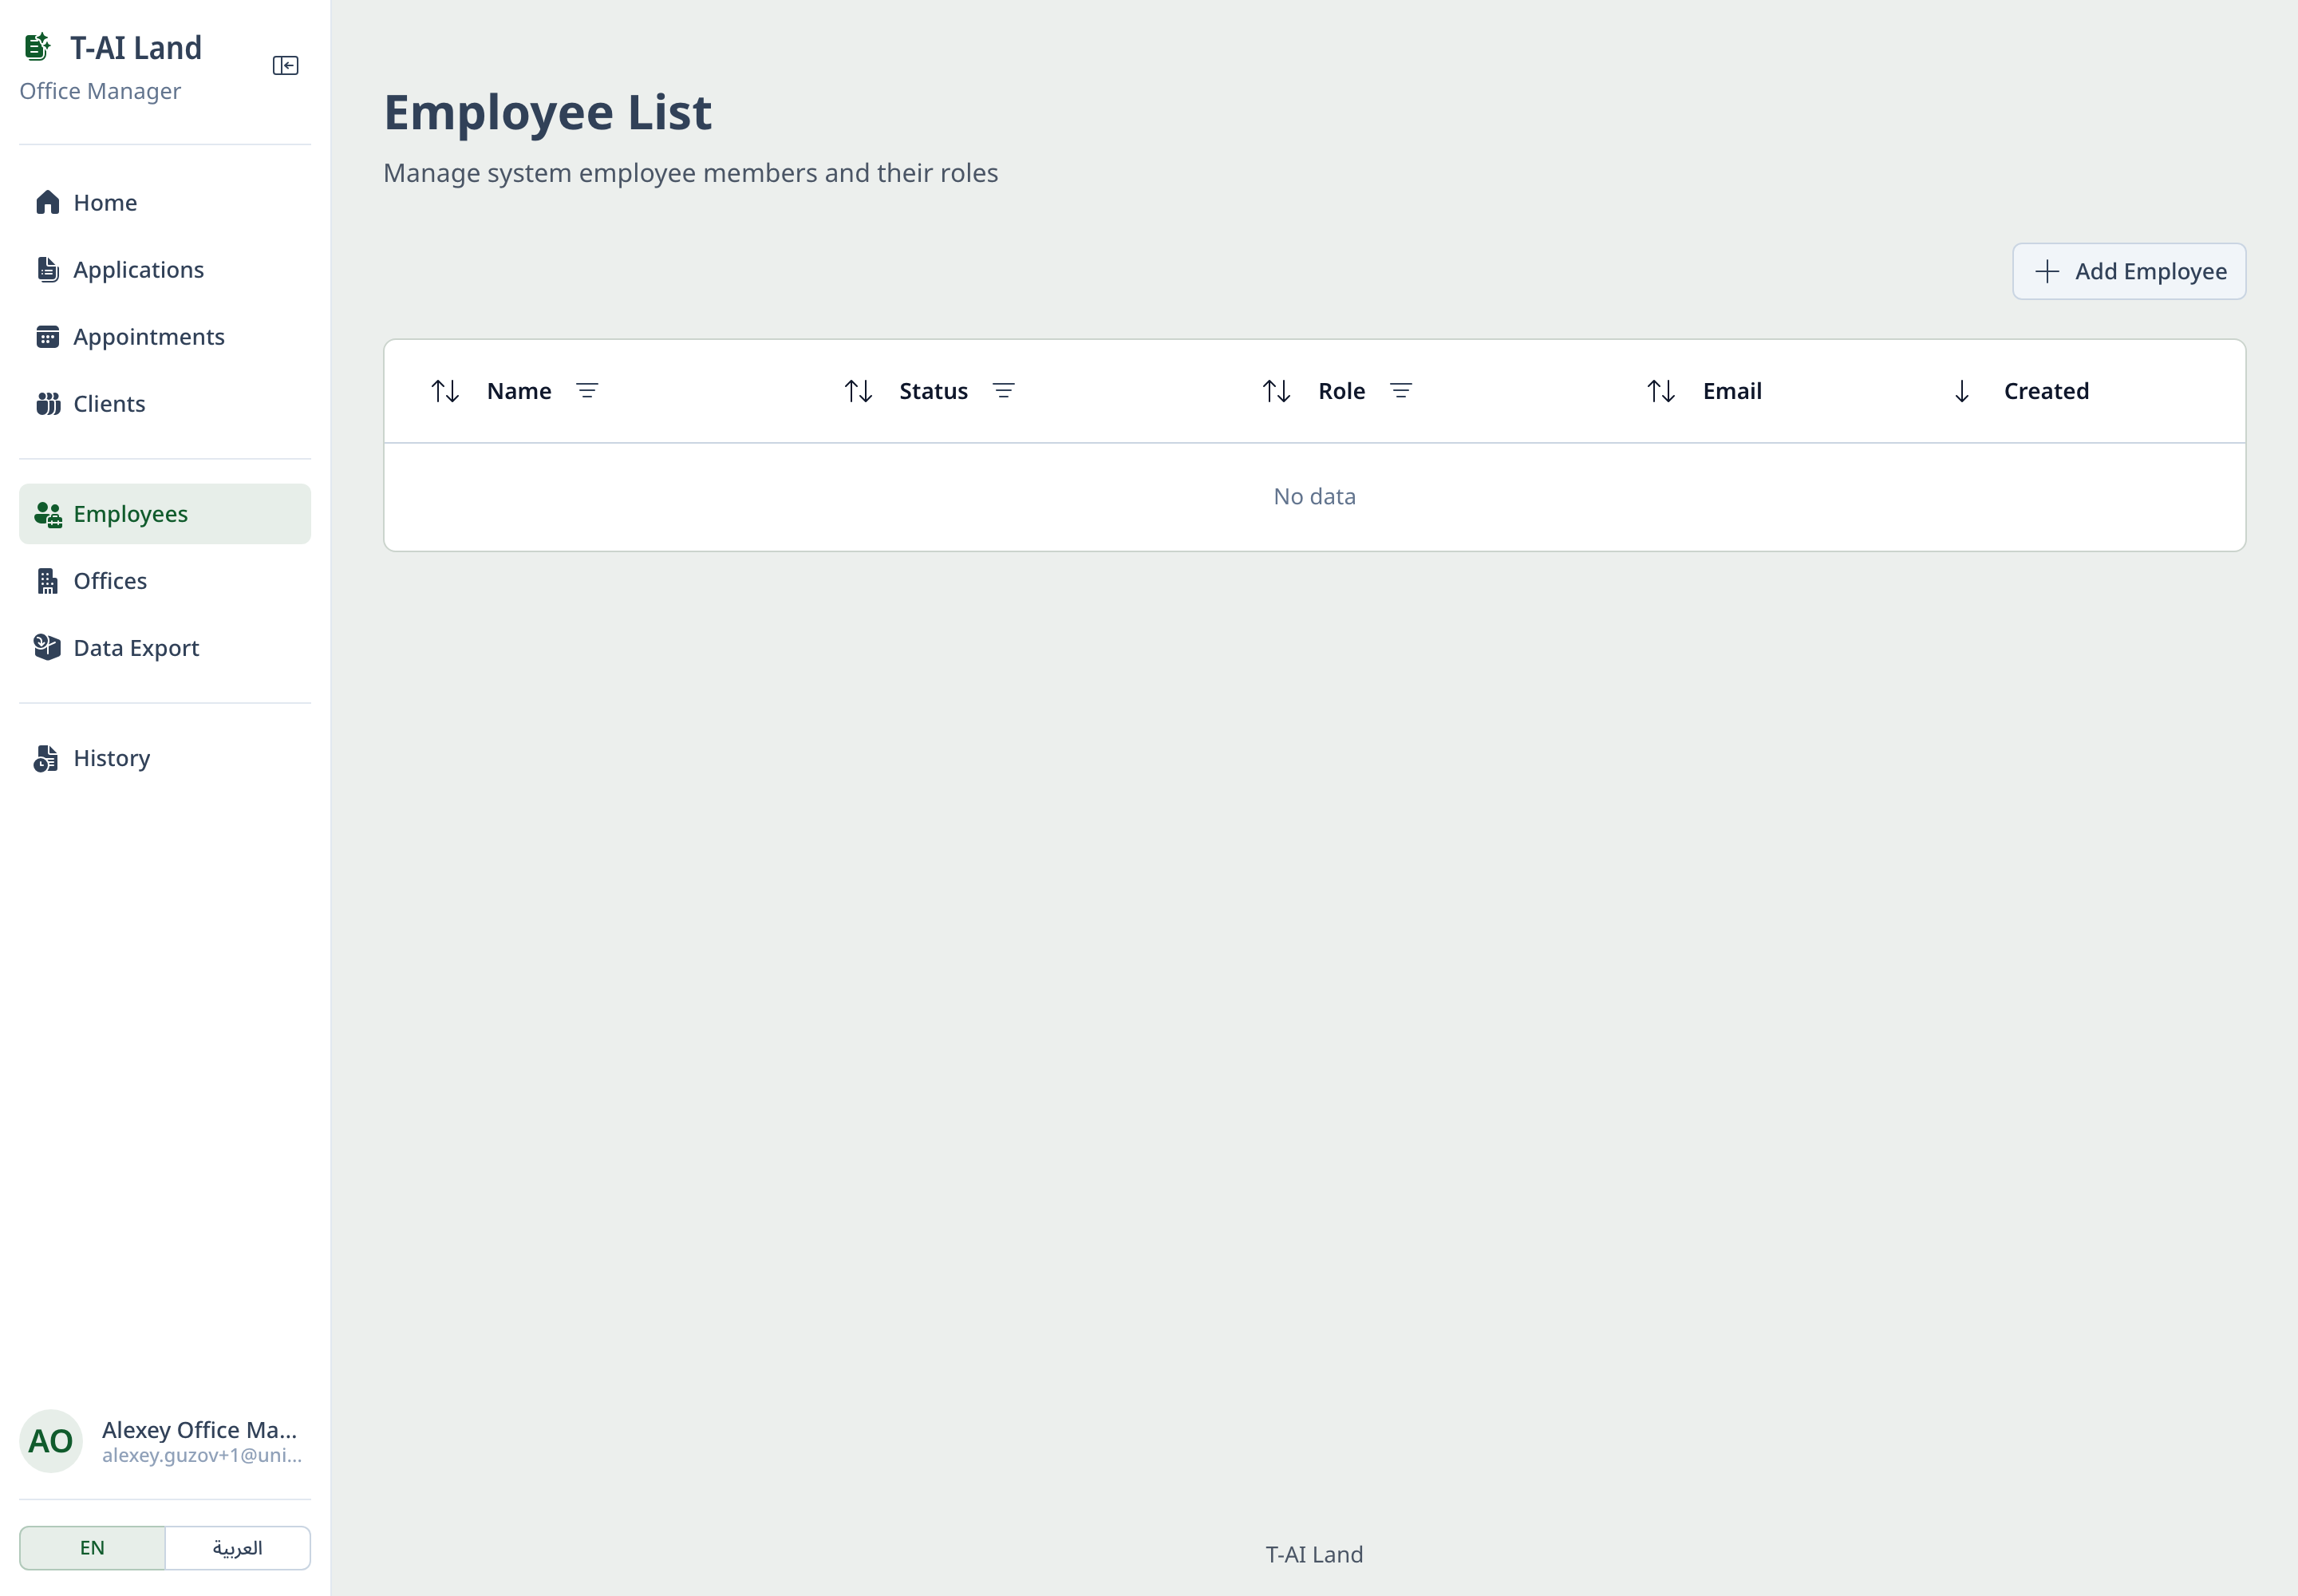
Step 1. Add employees
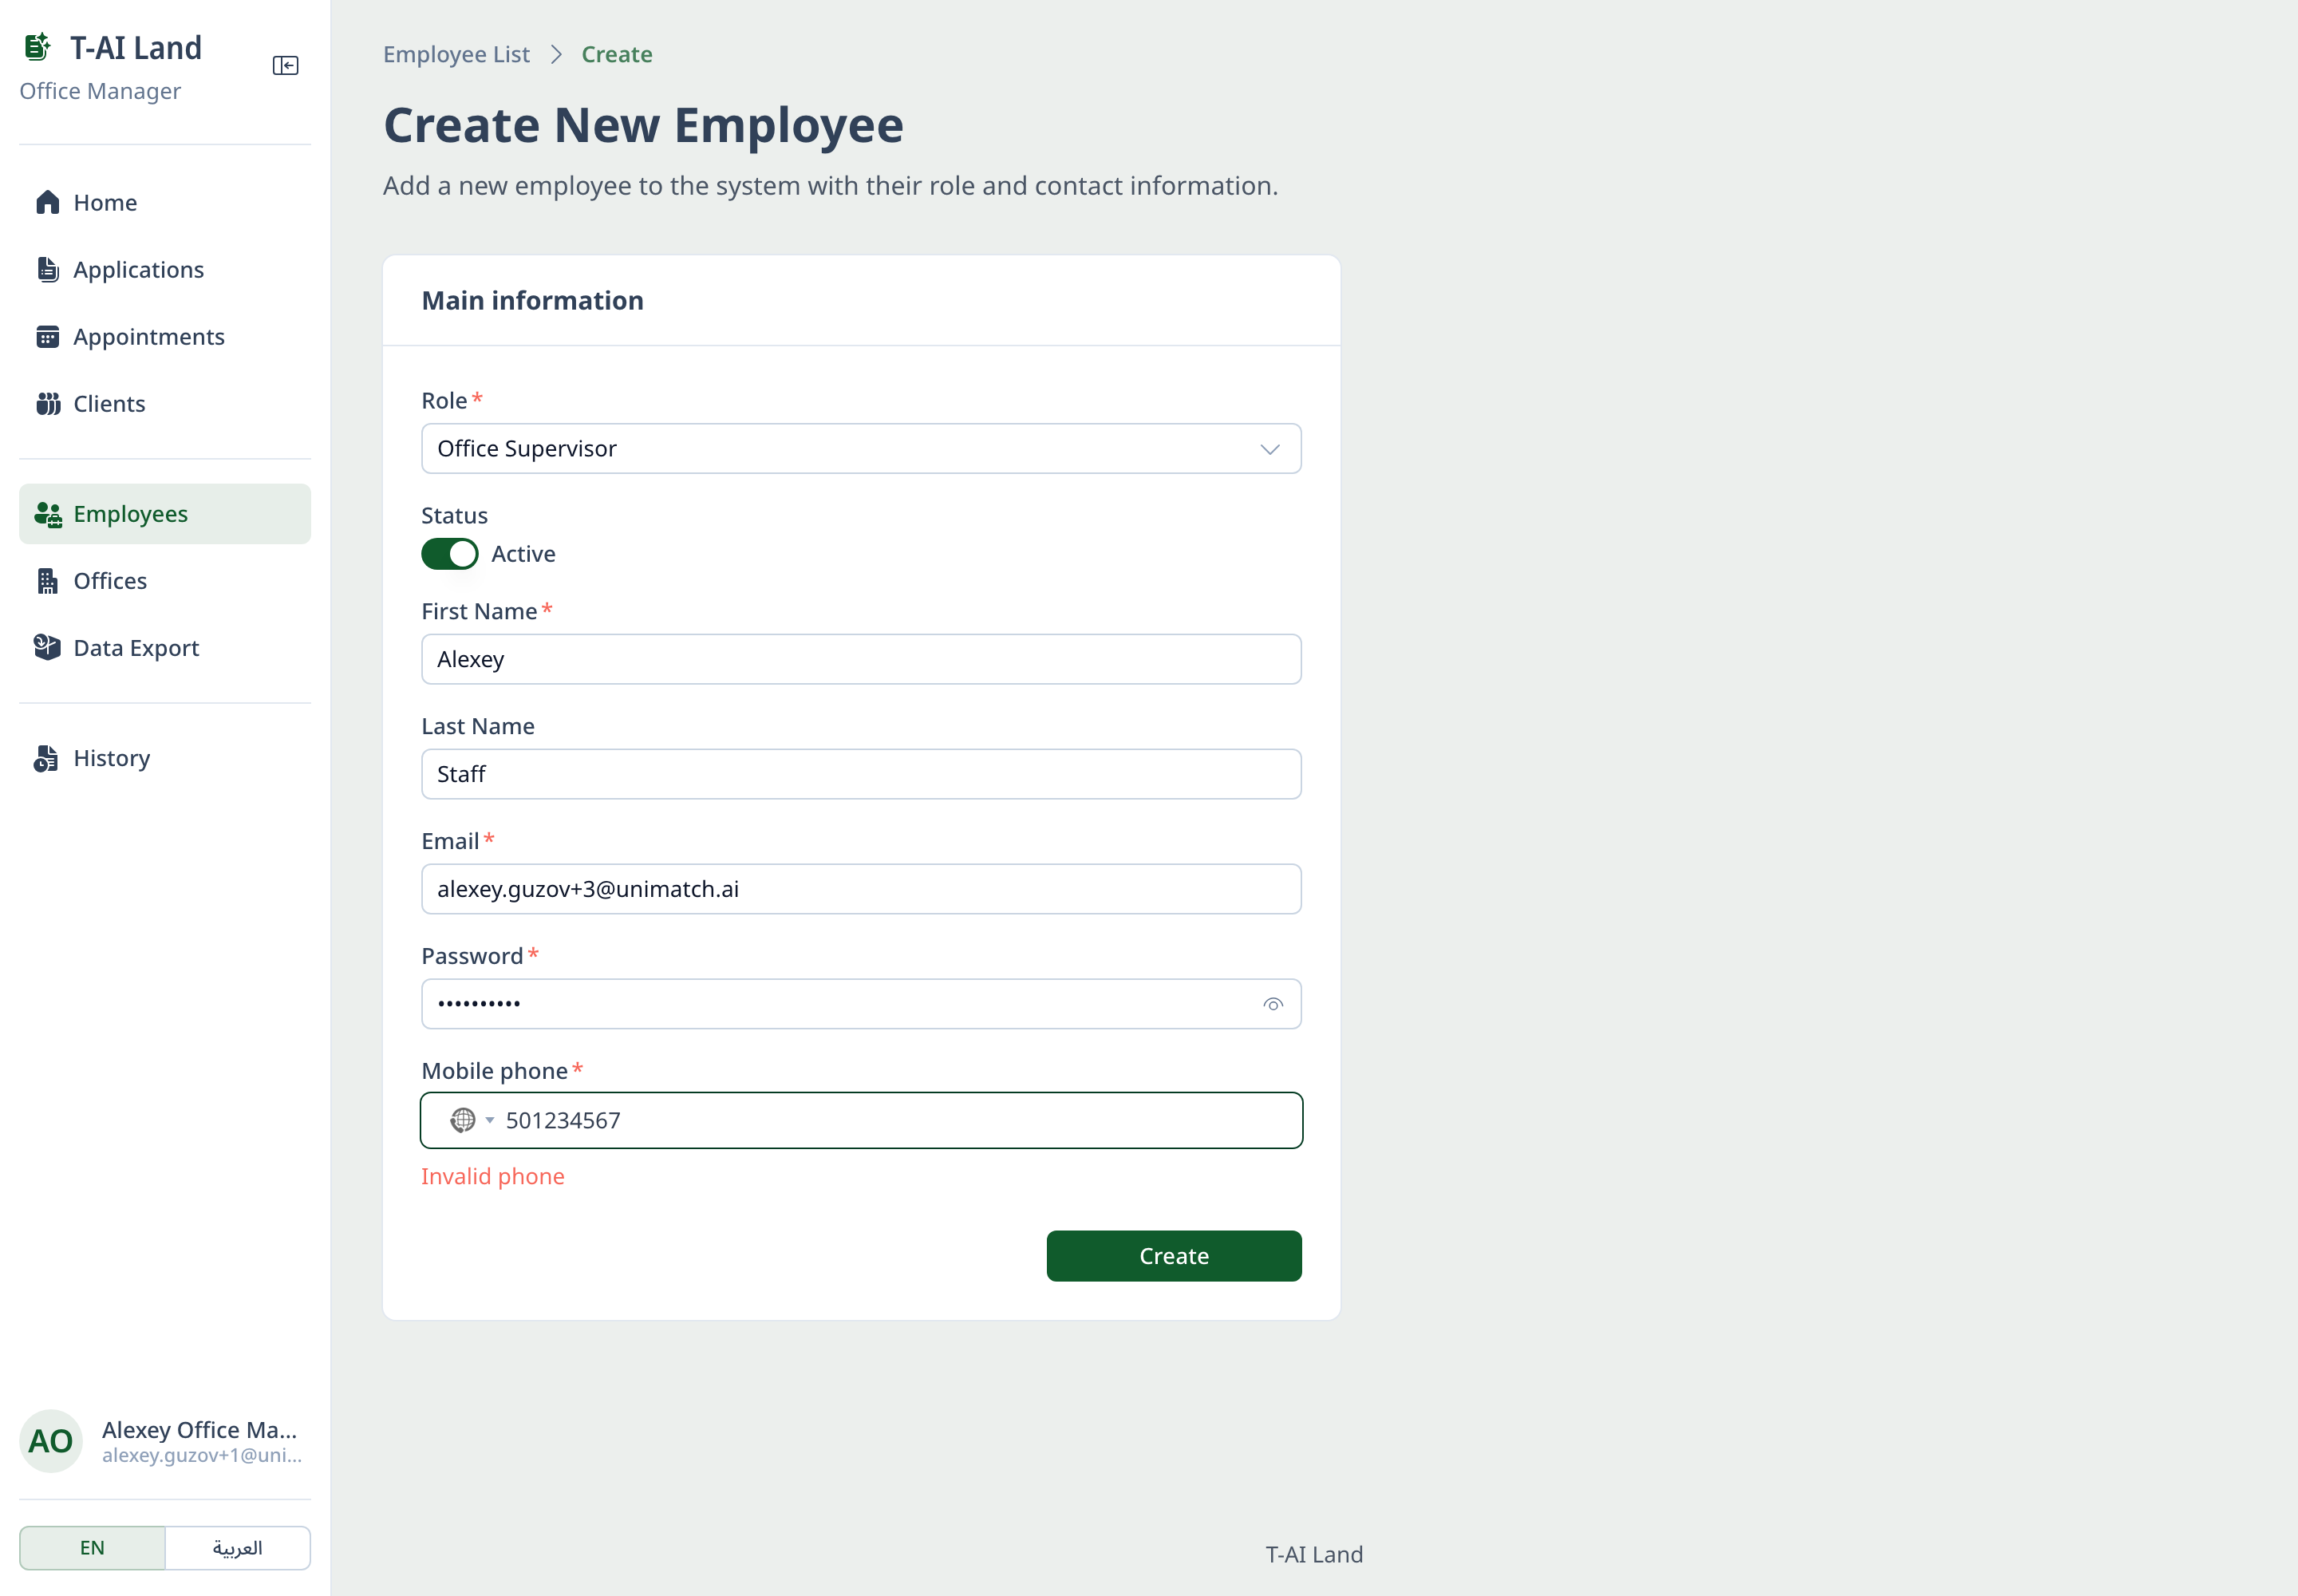
- Employees → Create employee: Role (Staff / Office Supervisor / Office Manager…), Active, name, Email, Password, phone. The employee signs in with this email.
⚠️ No email with credentials is sent to the employee — pass the login and password to them manually.
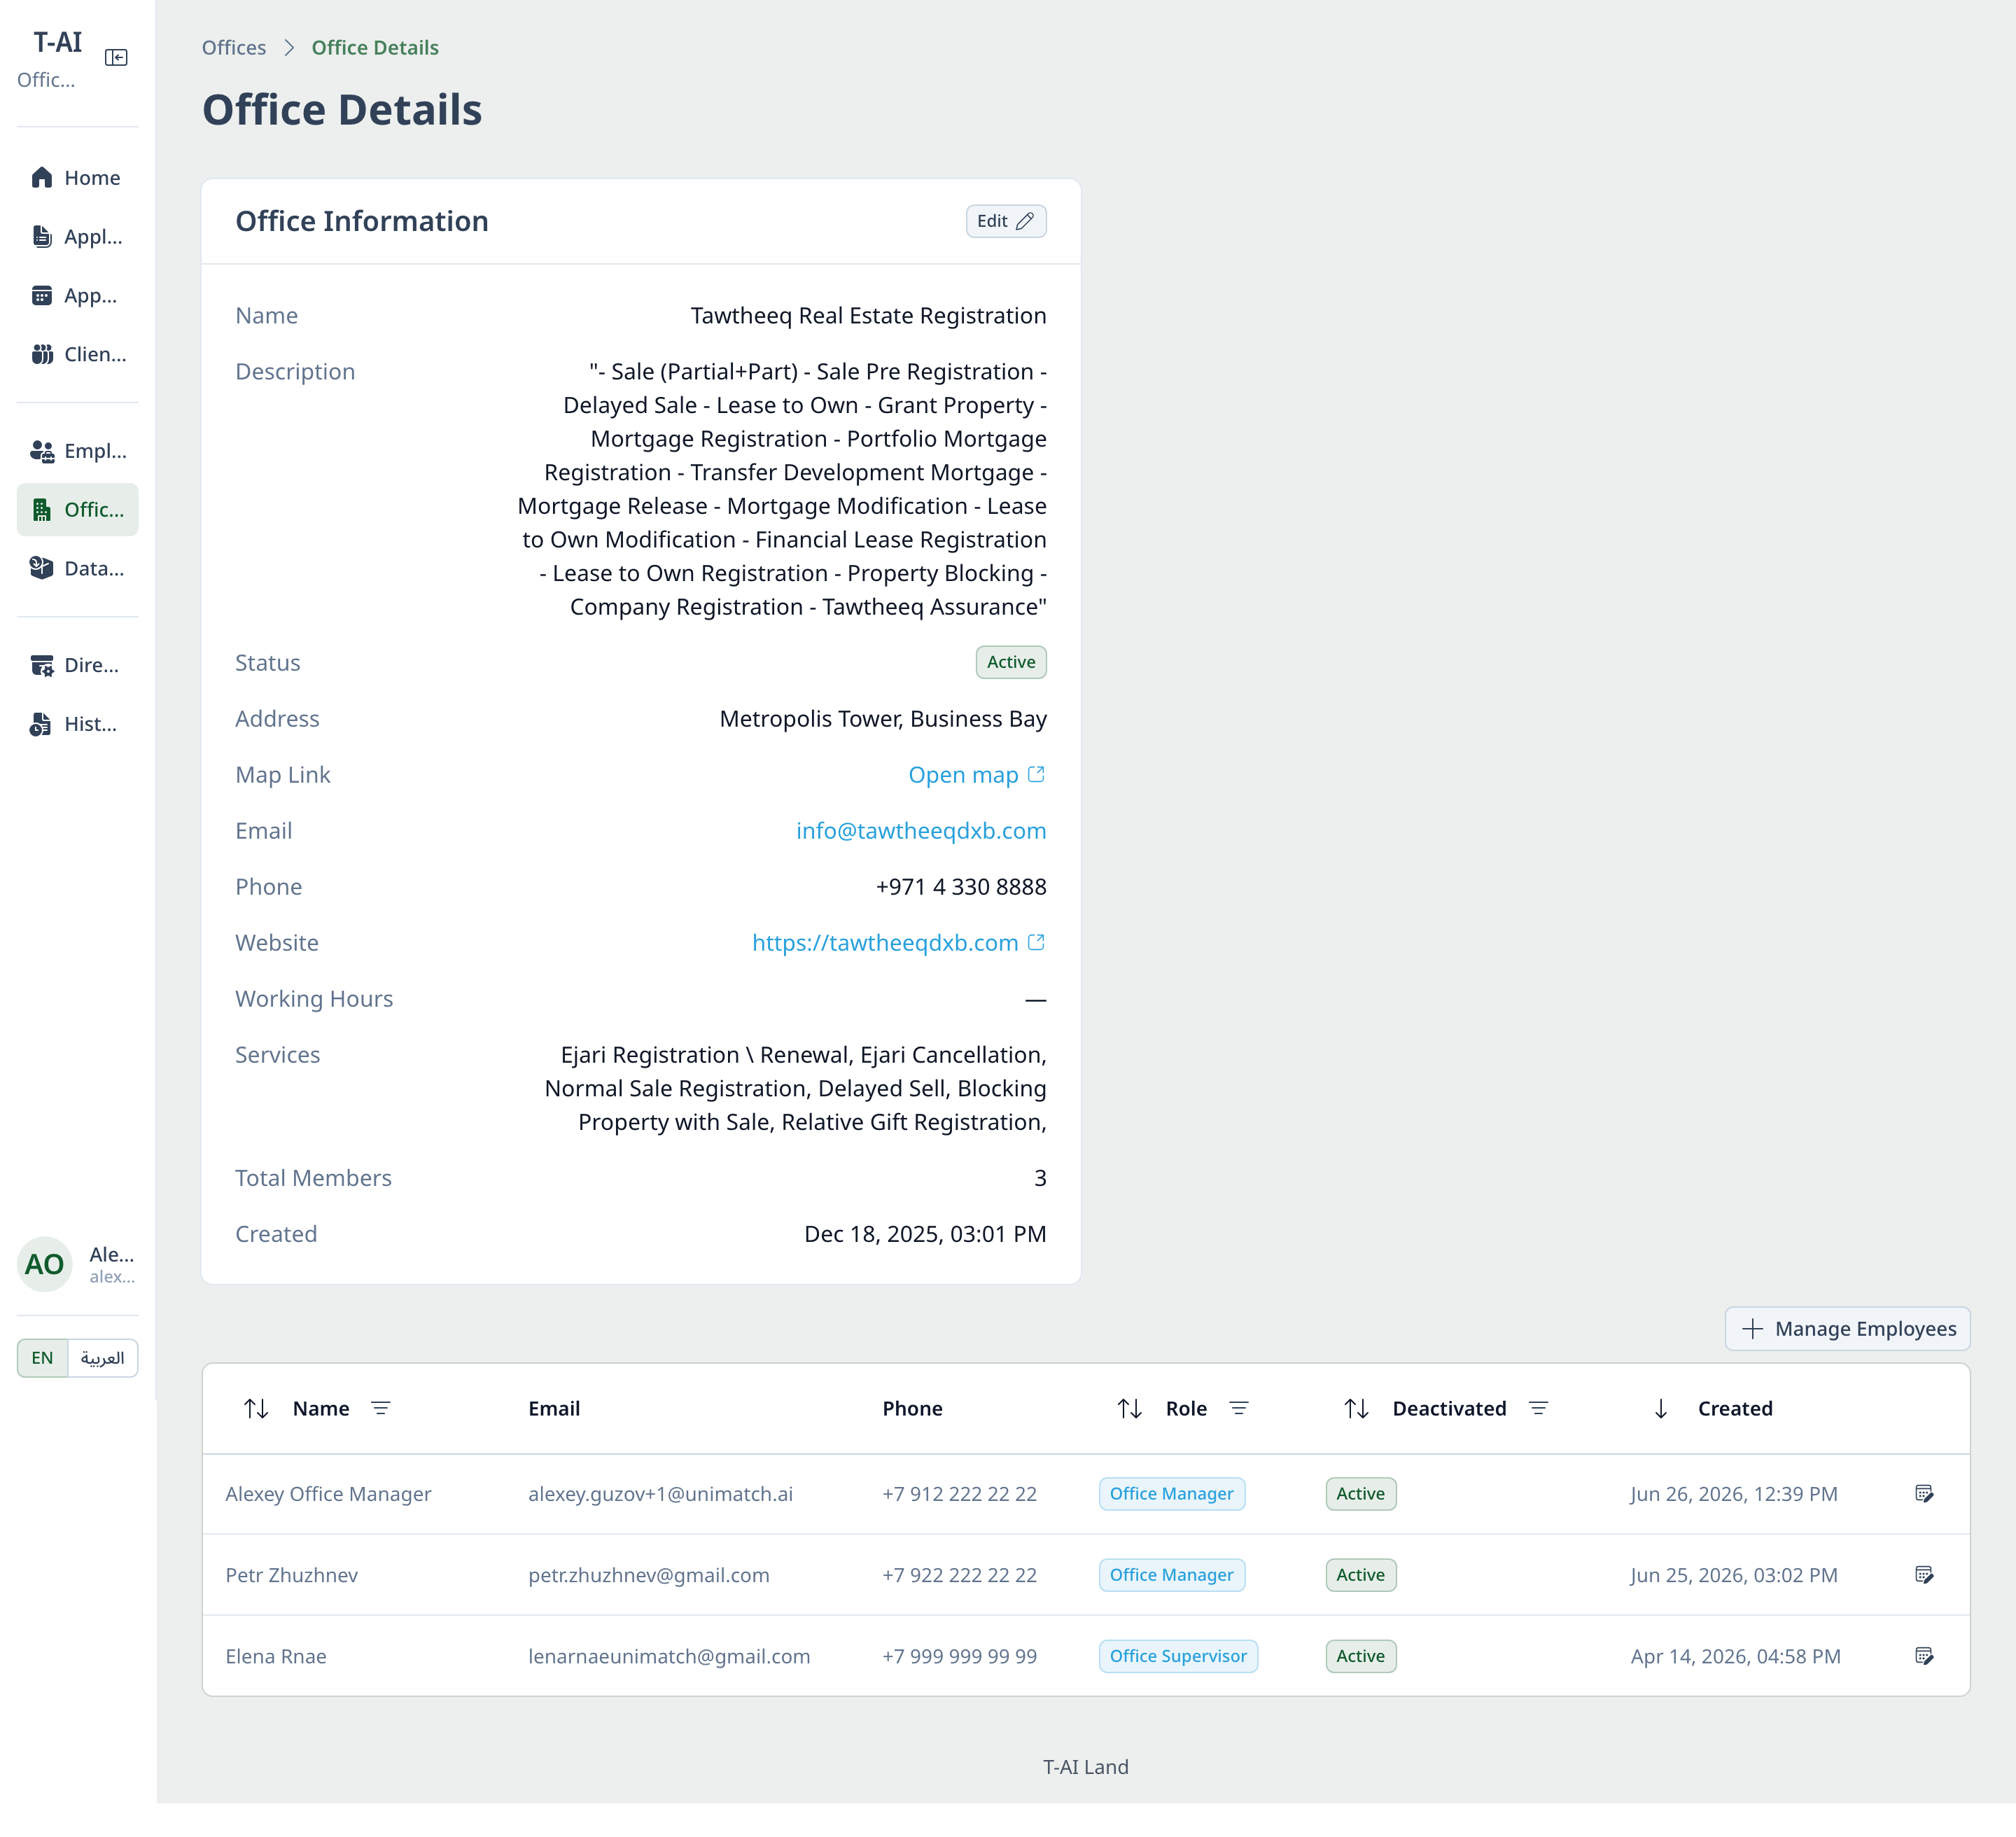
Step 2. Add an employee to the office
- Offices → open your office. The card shows office details (Email, Phone, Services, Total Members) and the office staff list (Name · Email · Phone · Role · Deactivated · Created).
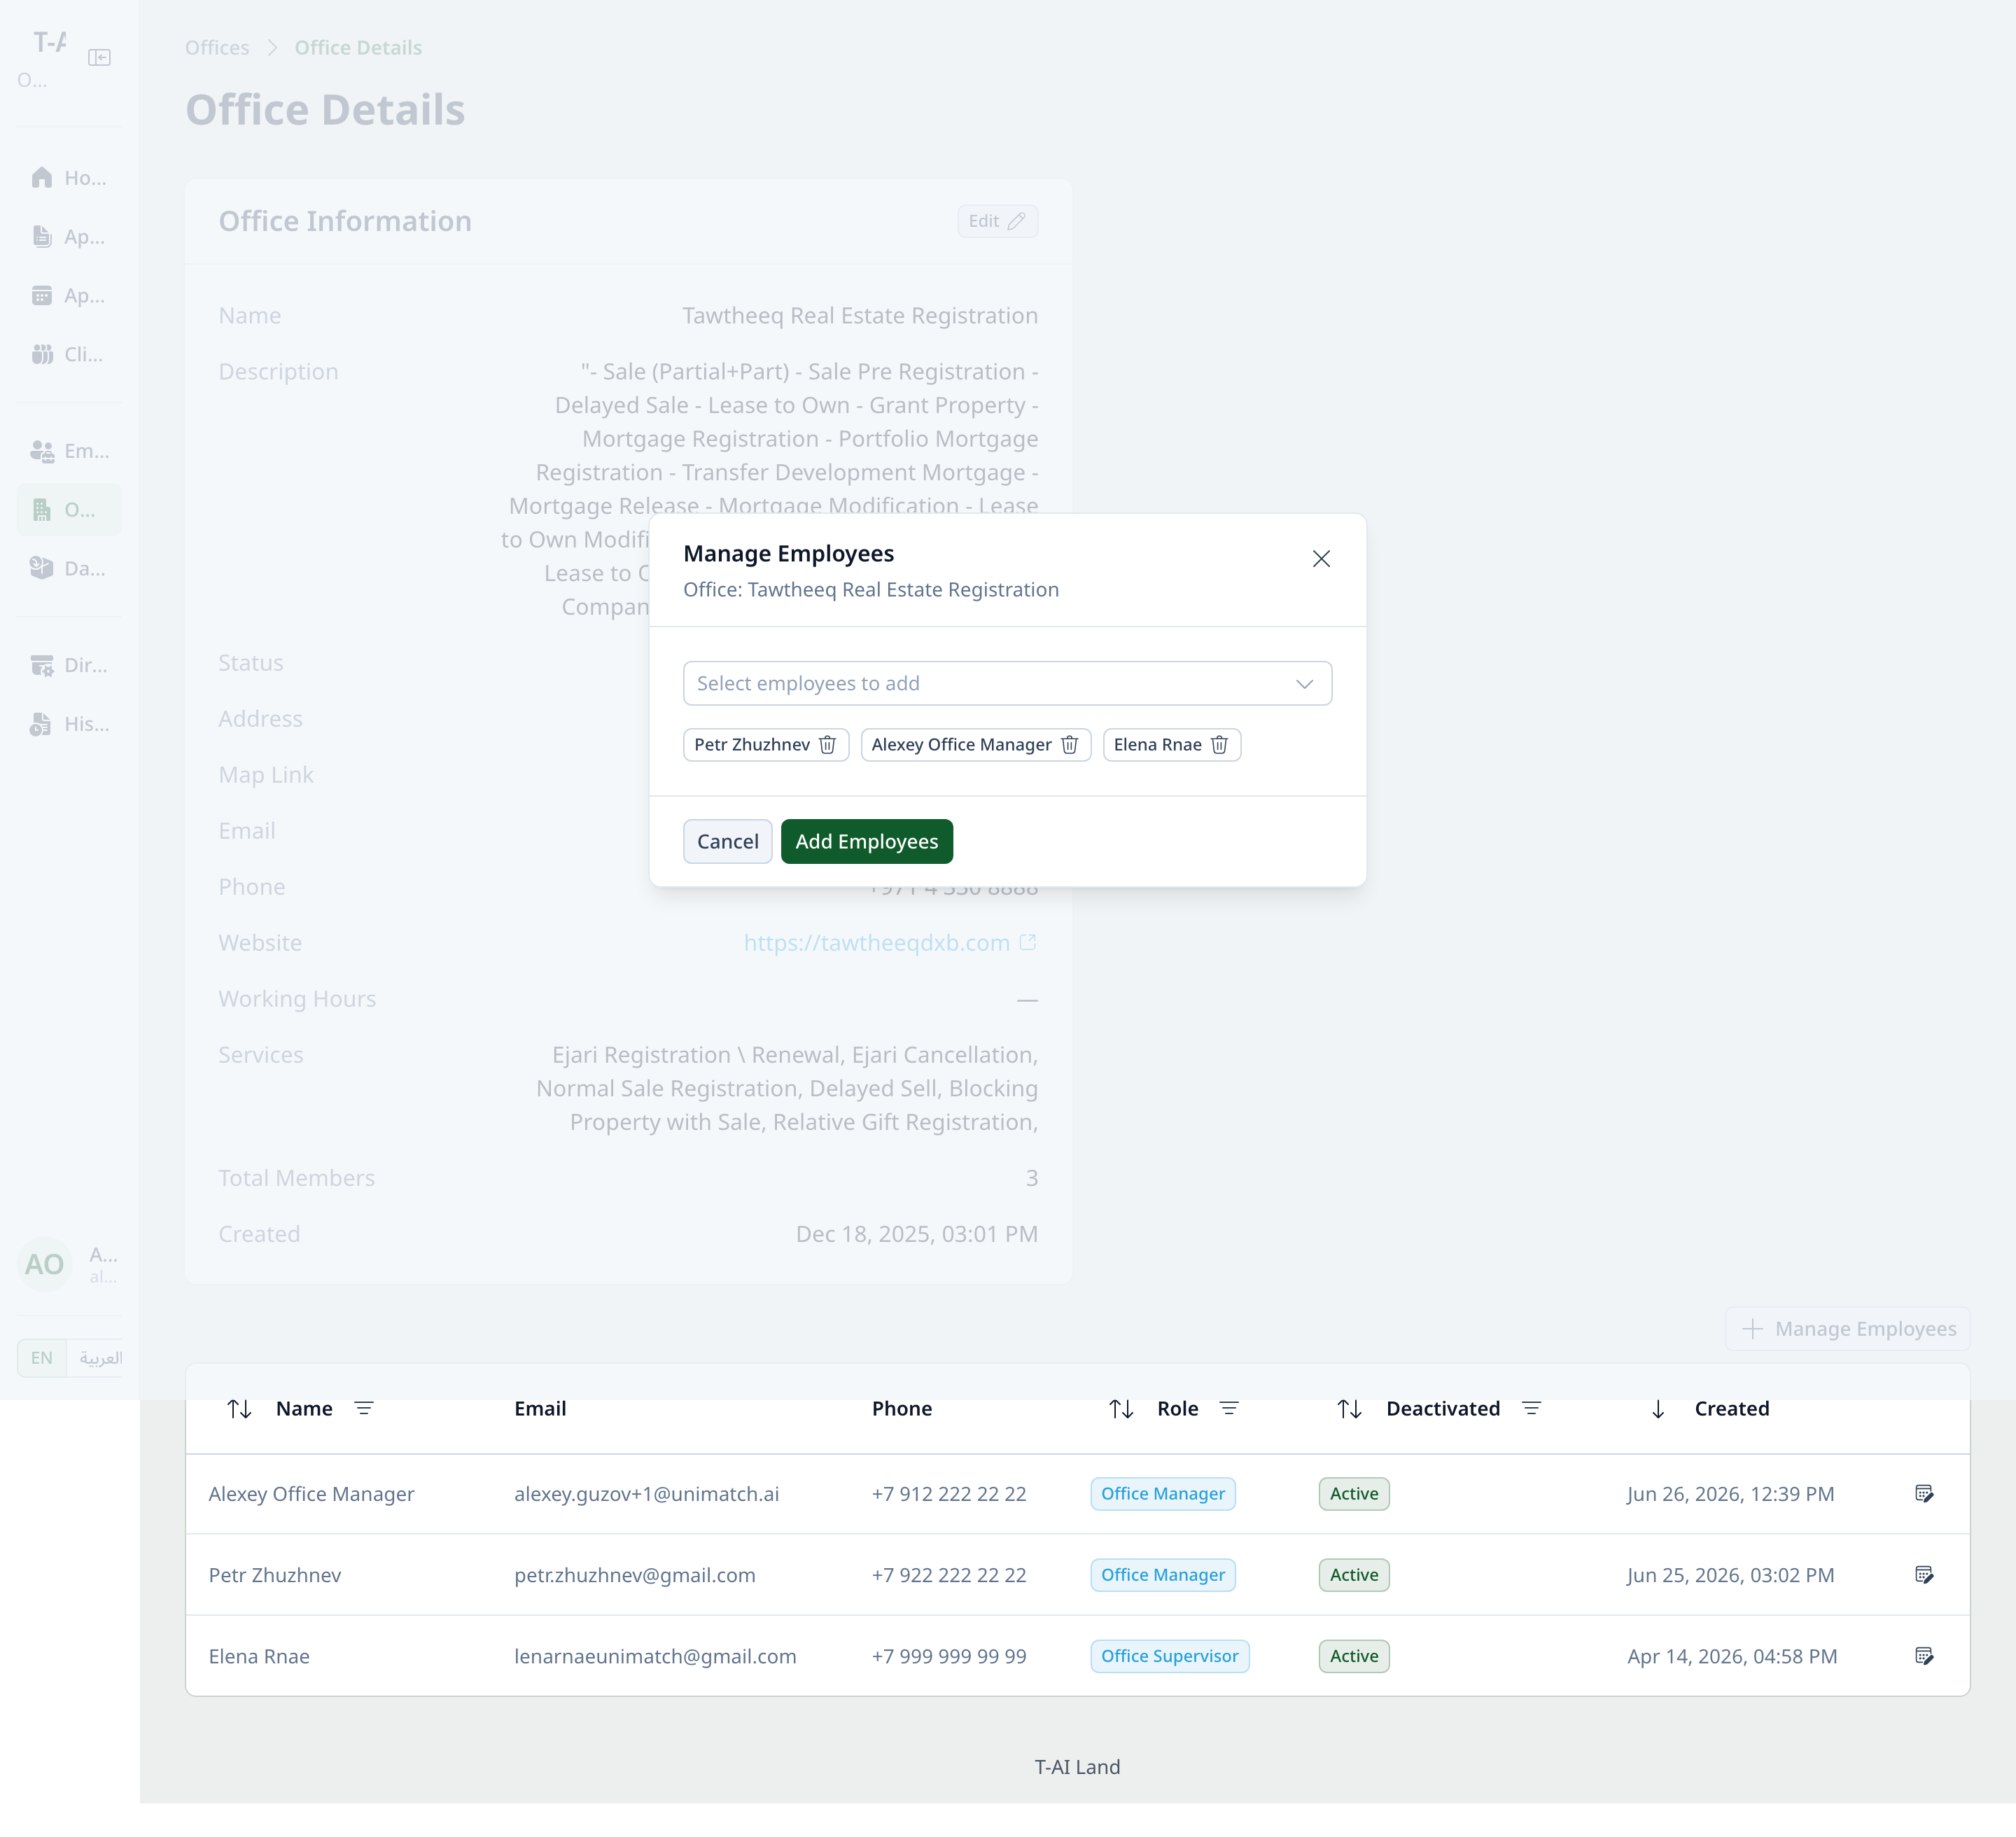
- Click + Manage Employees → in the Select employees to add dropdown pick an employee → Add Employees. To remove someone from the office — the trash icon next to the name.
Step 3. Assign booking slots for clients
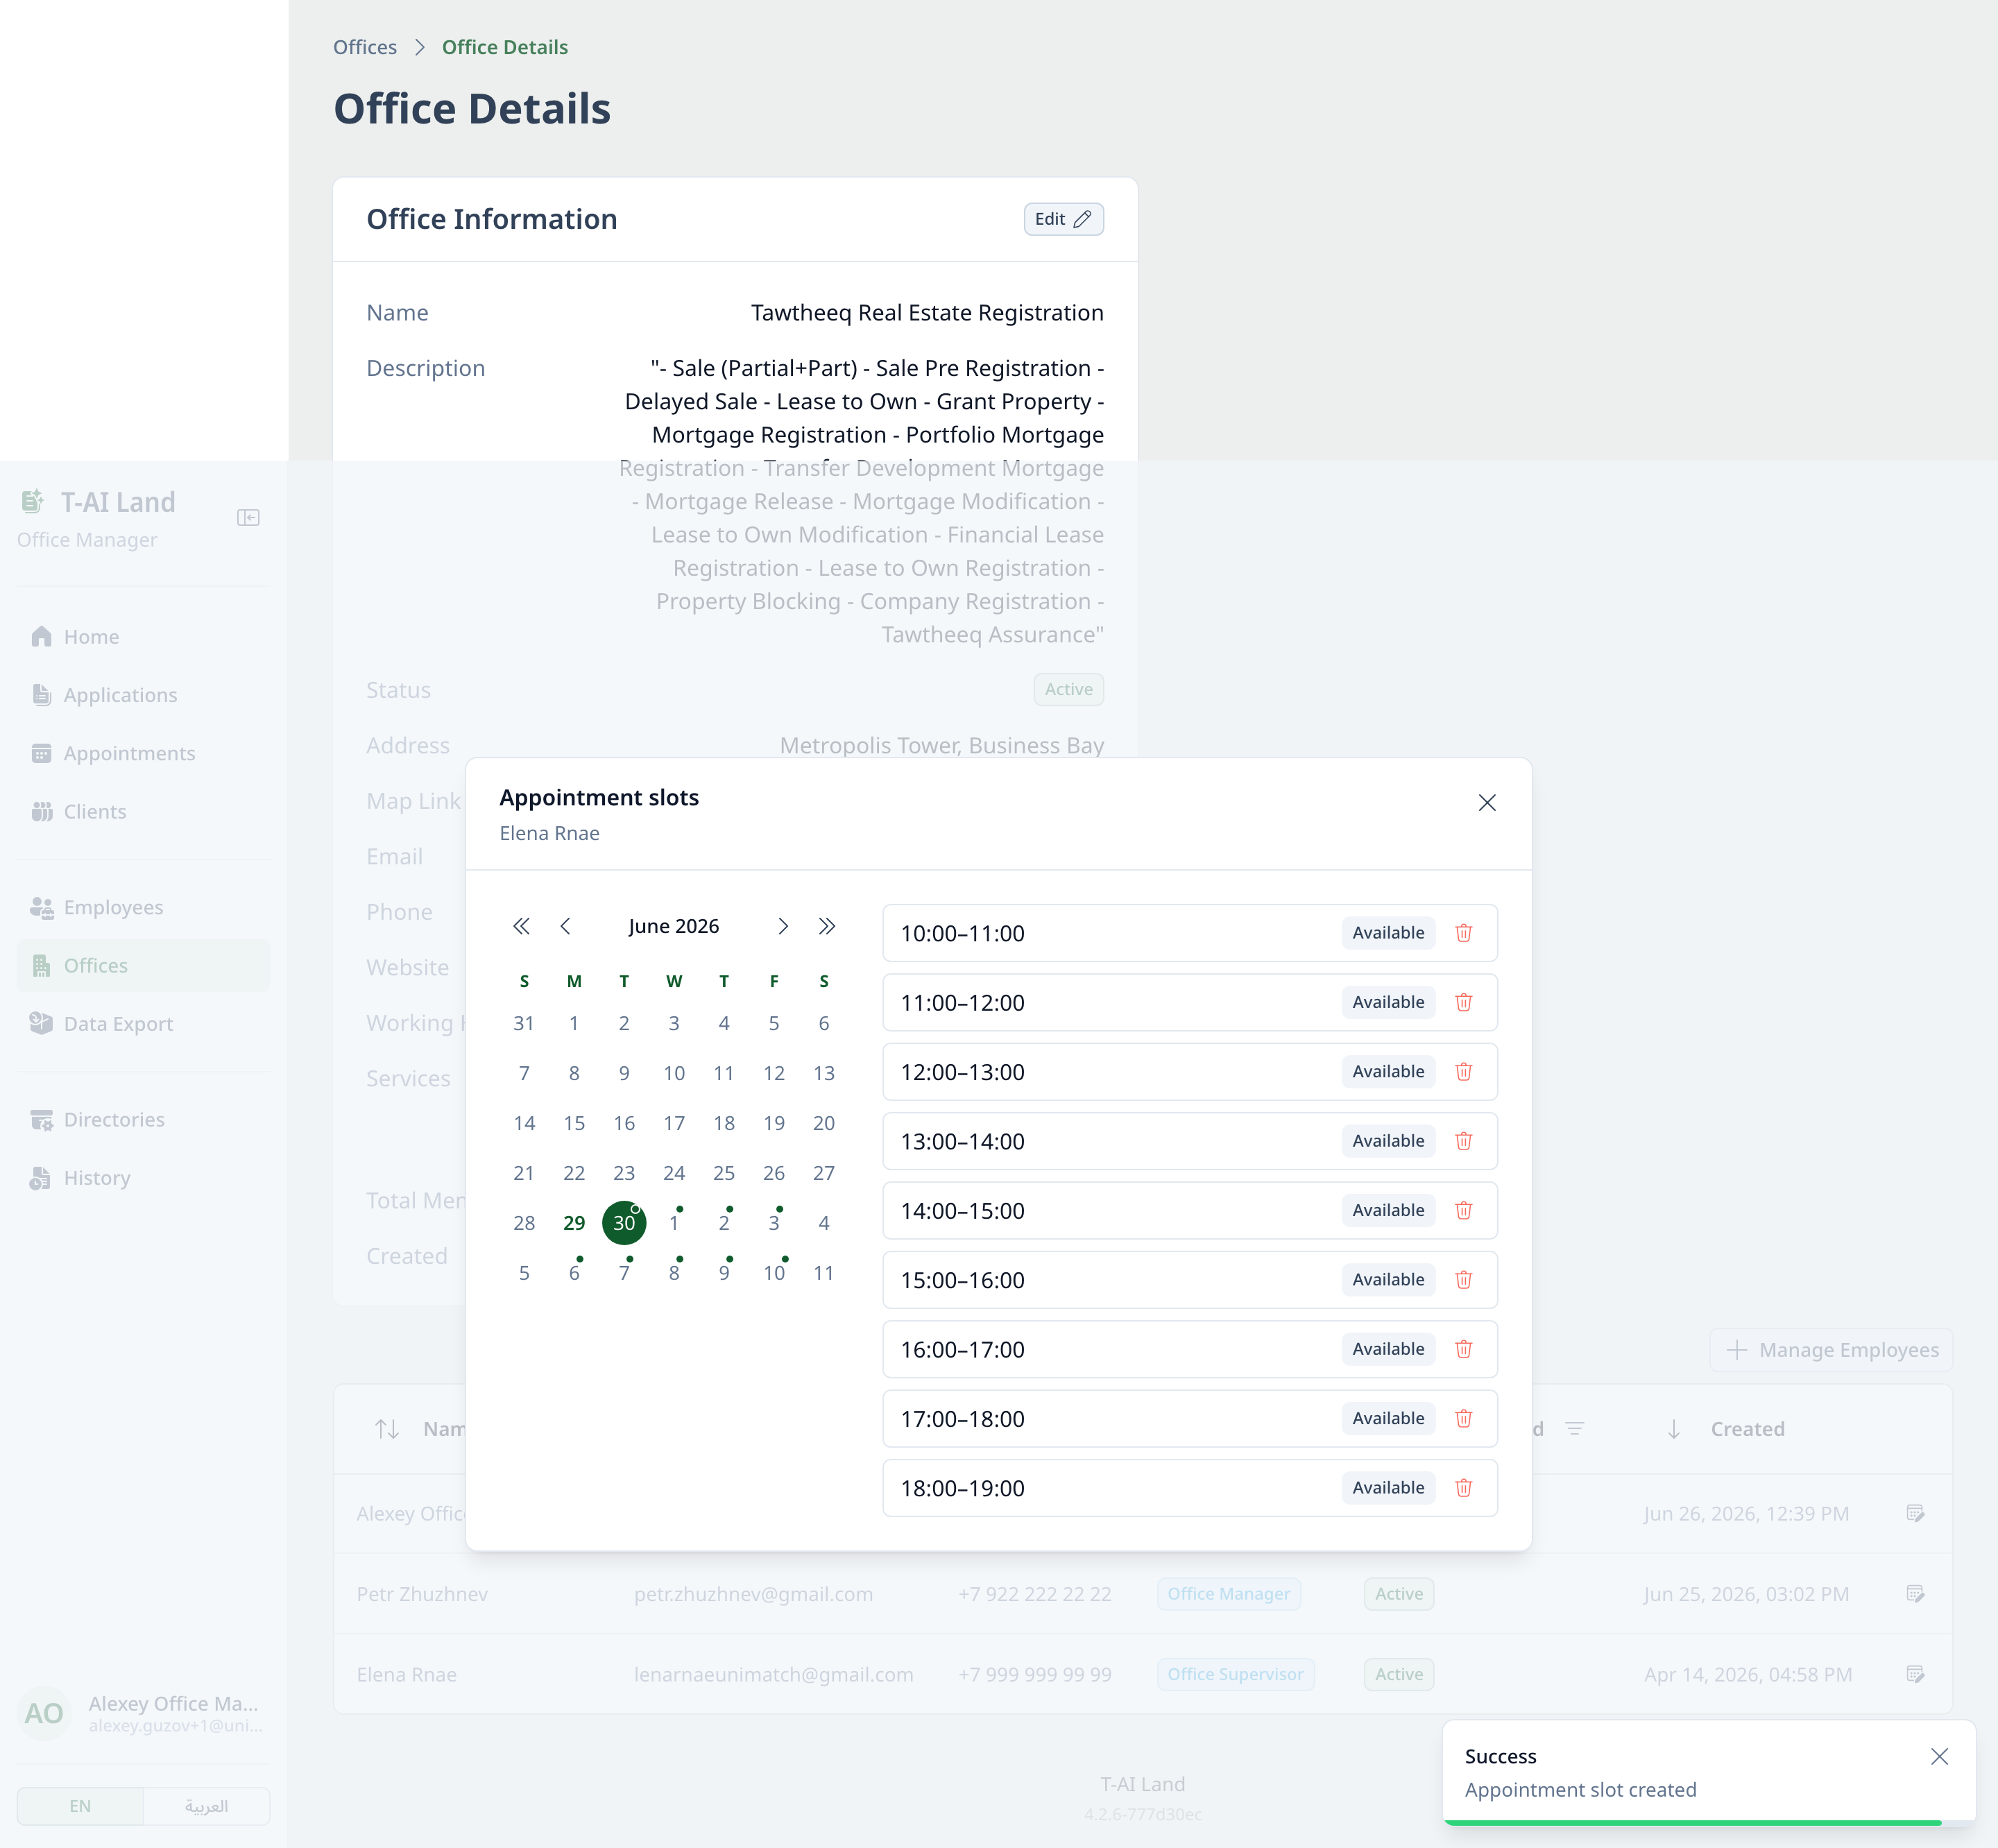
- In the office staff list, click the edit-slots icon next to an employee (right side of the row) → the Appointment slots window opens with the employee's name.
- On the left — a calendar: pick a date. On the right — hourly intervals (10:00–11:00 … 18:00–19:00).
- Click + Add on an interval — the slot becomes Available (open for booking). To remove a slot — the trash icon next to it.
- Slots are assigned manually and per employee; the client then picks a time from these slots. There is no auto-generation.
Step 4. Control office applications and appointments
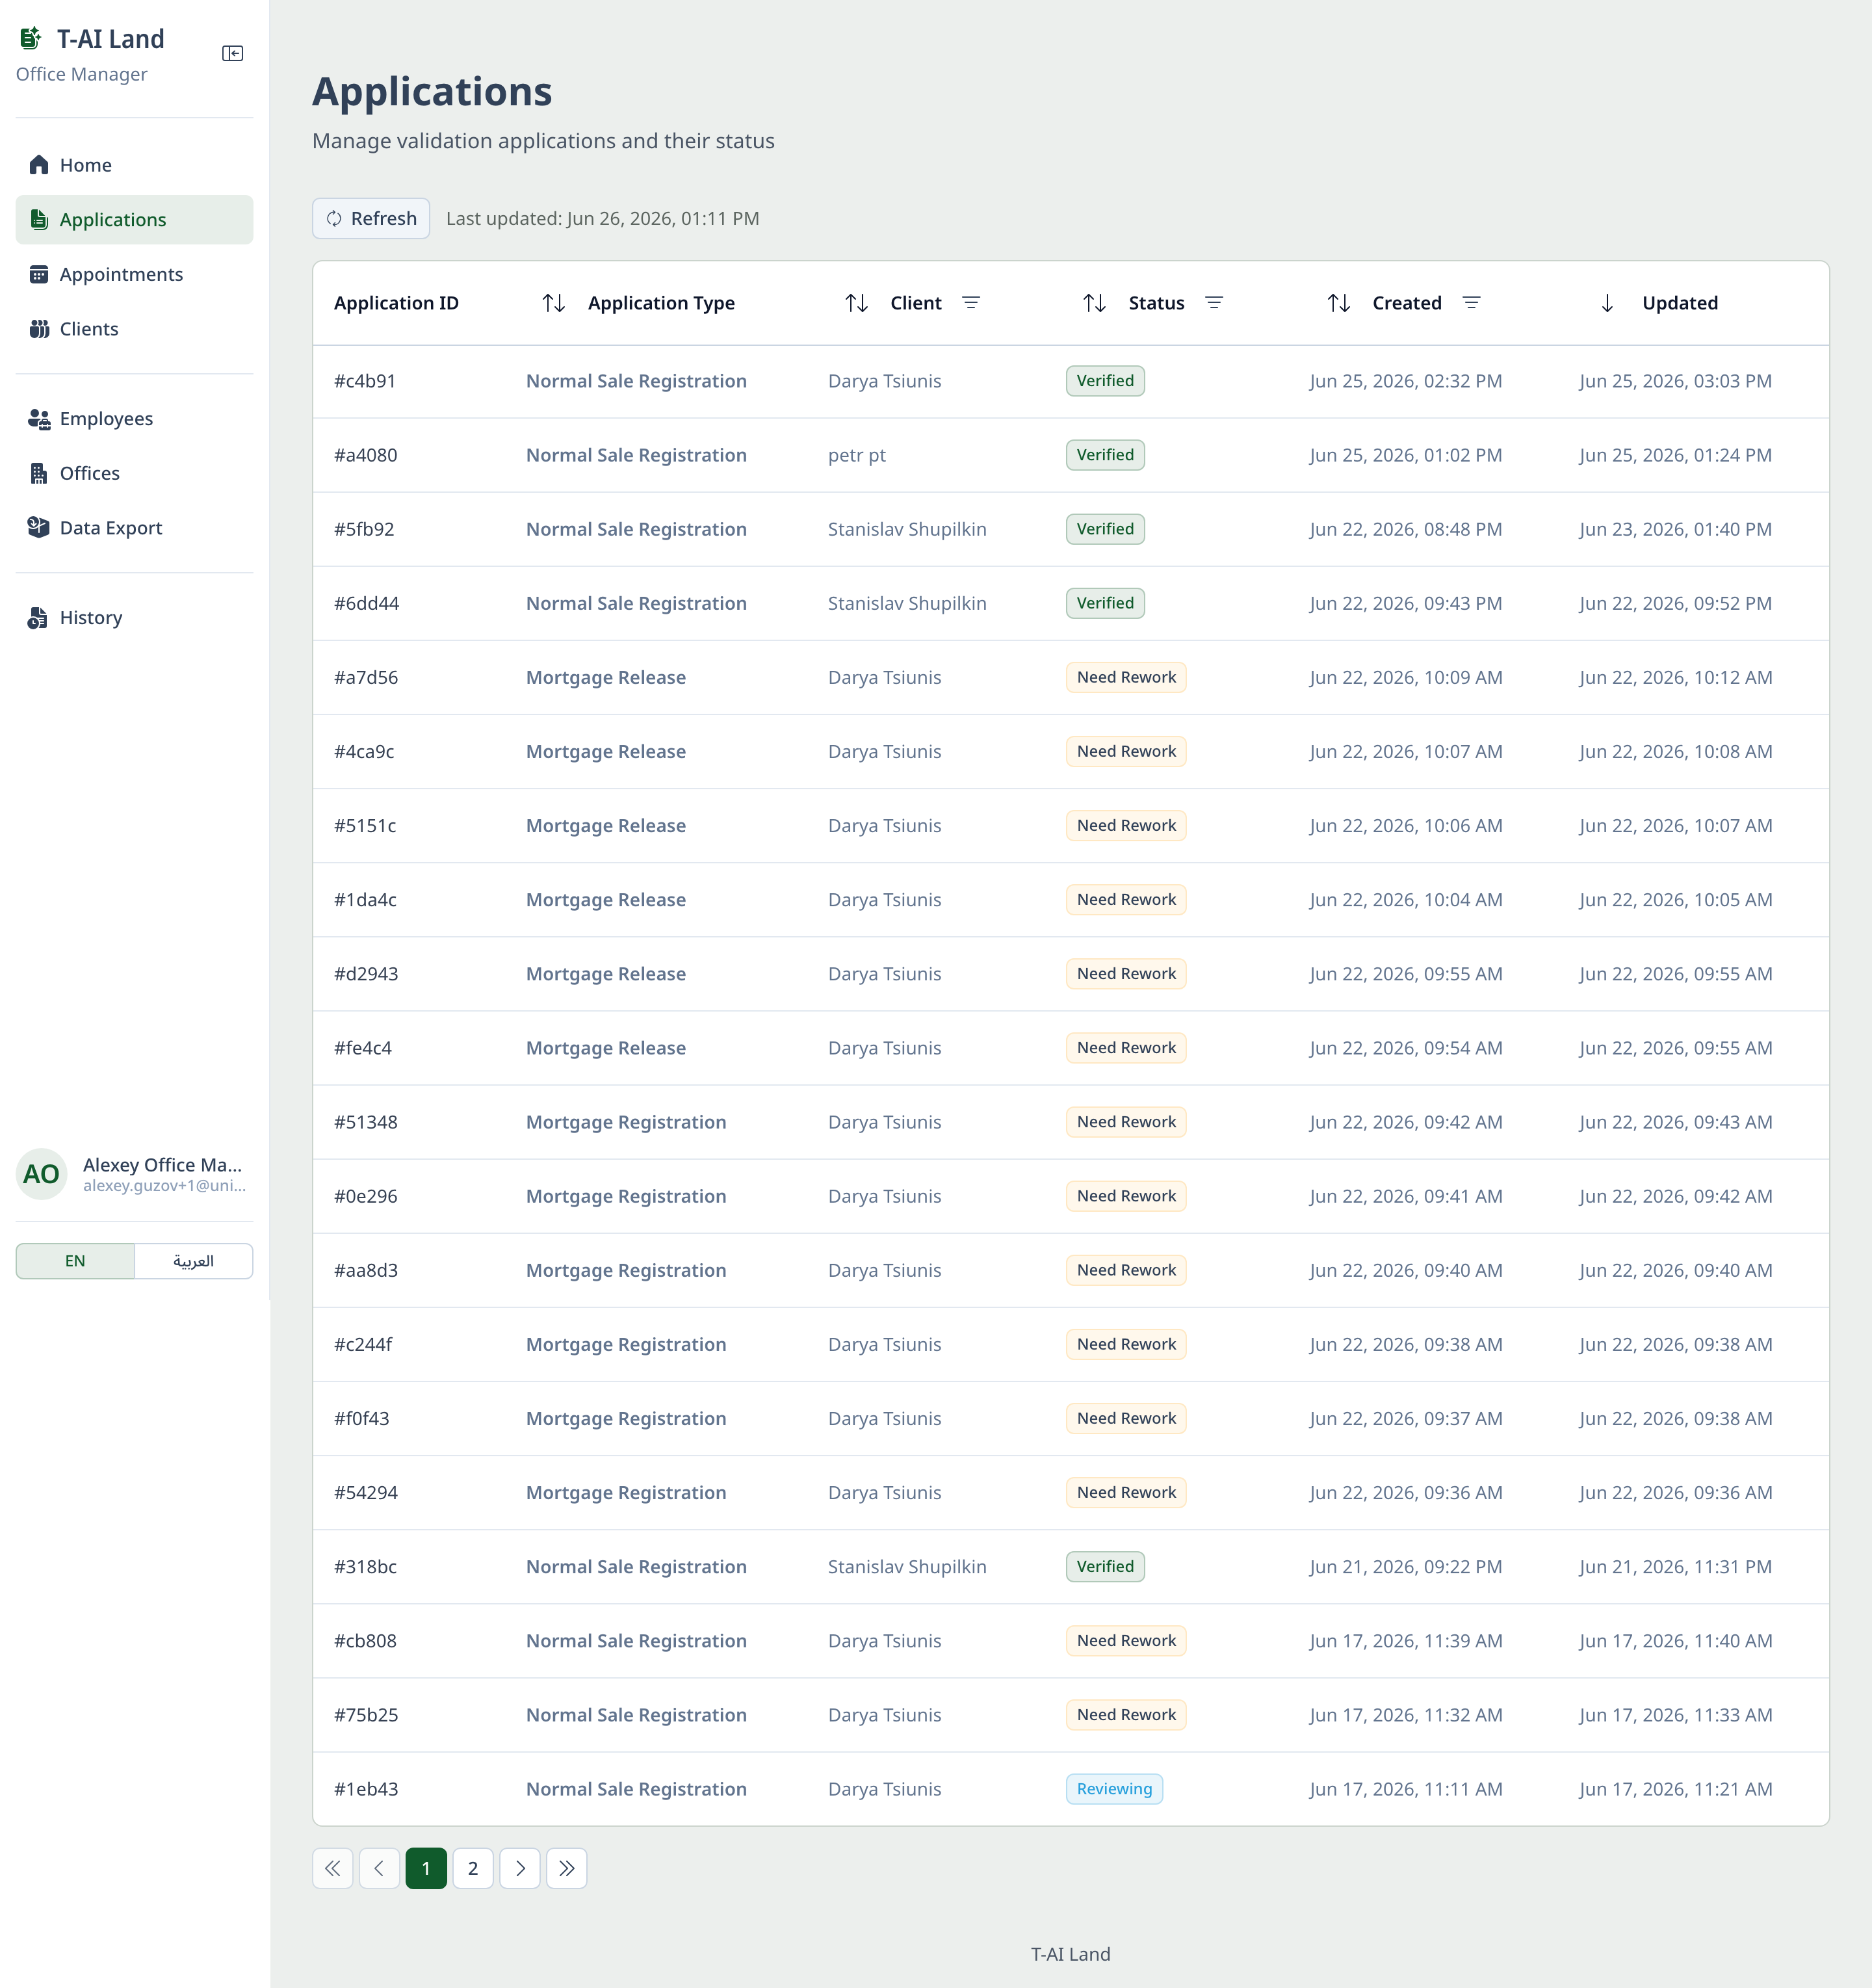
- Applications — all office applications and statuses: Verified / Need Rework / Pending. The manager can step in, check documents, and reassign if needed.
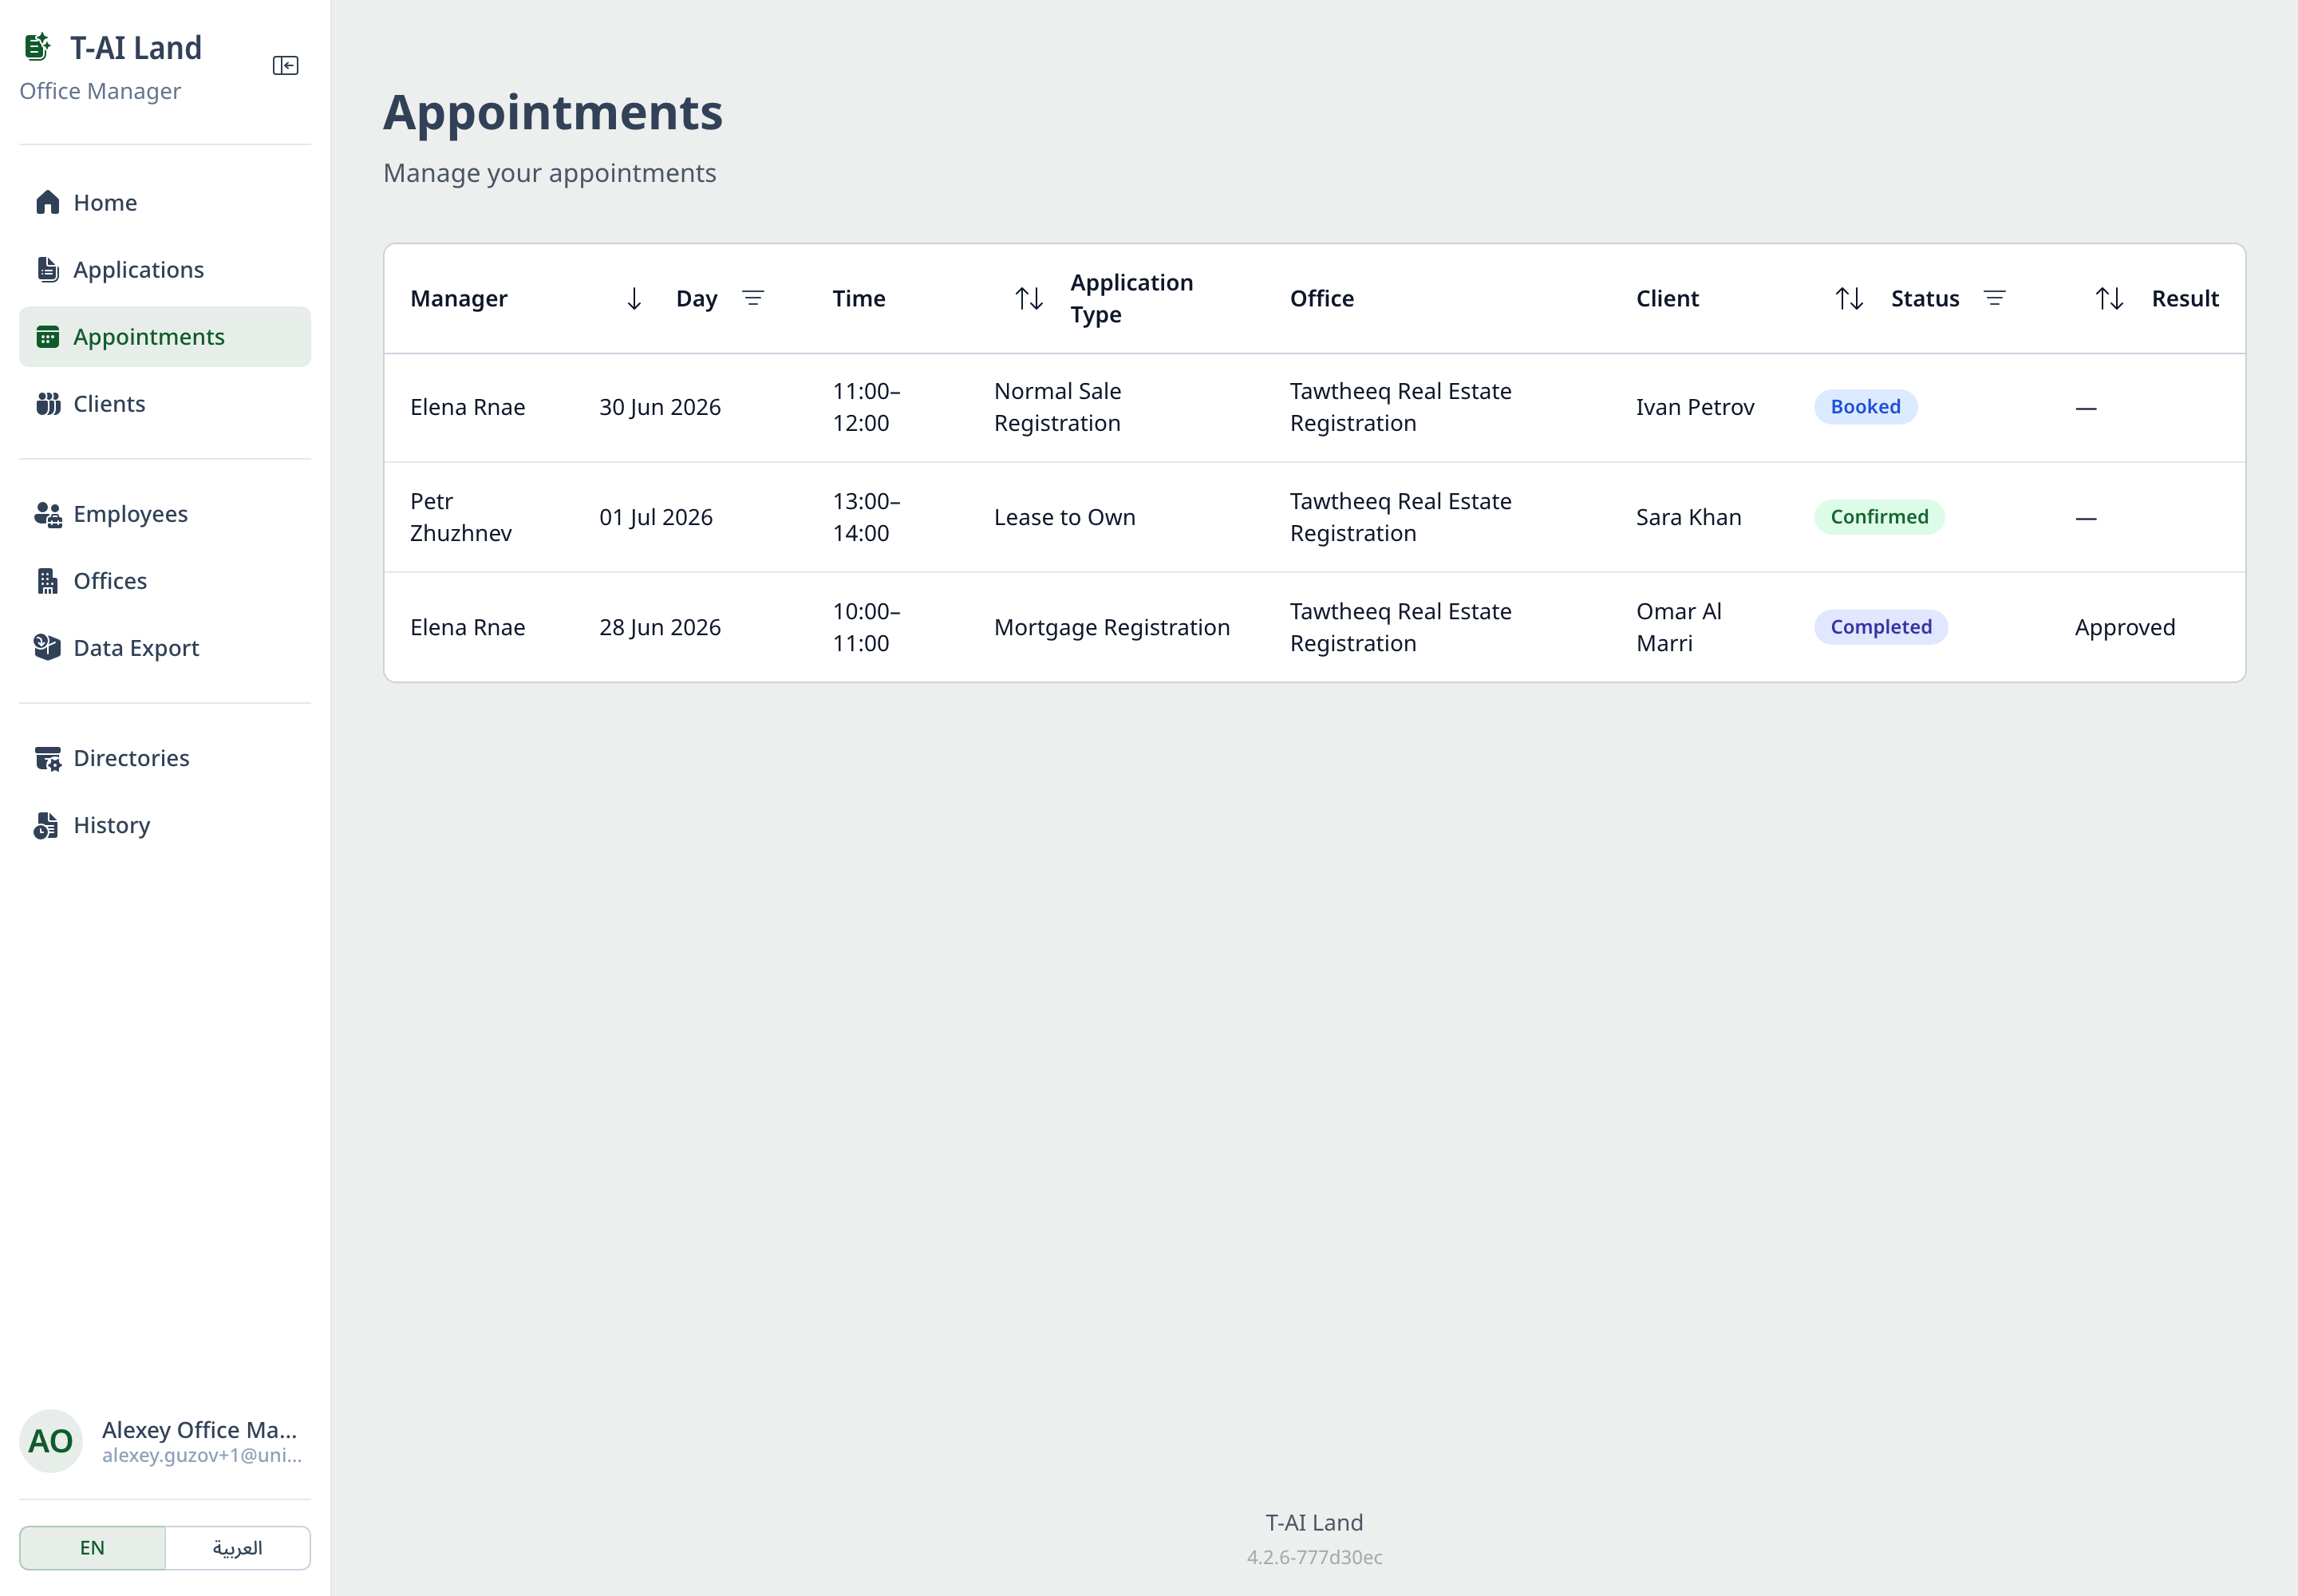
- Appointments — the office appointments list (Manager · Day · Time · Application Type · Office · Client · Status · Result).
Step 5. The manager can also perform the full officer flow (Role 1) when needed.
Statuses (legend)
- Verified / No issues — checks passed.
- Pending — checks in progress.
- Need Rework / Has issues — there are issues; fix and re-upload the document.
Important
- Don't upload edited scans — the forgery check will flag them.
- If a document is unreadable — re-upload a clear scan of the whole page.
- The interface is available in EN / AR.
📝 Feedback
Please fill in the form after every closed case. It takes a couple of minutes but helps us spot problems quickly and make T-AI Land better. The more feedback, the more precise the improvements.
- Form for trust-office staff: https://forms.gle/nu6iQ6ySeZrudUtNA
- Form for clients: https://forms.gle/fKBrPKVgtVVscdjL6